
Samsung Galaxy S10 Battery Replacement

Introdução
Ir para o passo 1This guide shows how to remove and replace the battery in a Samsung Galaxy S10.
The battery is held in place with strong adhesive. Using iFixit’s adhesive remover or high concentration (over 90%) isopropyl alcohol will make the battery removal process significantly easier.
Be sure to have replacement adhesive or Tesa tape at hand in order to re-adhere the battery and back cover.
If your battery is swollen, take appropriate precautions and do not heat your phone.
For your safety, discharge your battery below 25% before disassembling your phone. This reduces the risk of a dangerous thermal event if the battery is accidentally damaged during the repair.
Some steps may show the lower midframe/loudspeaker assembly removed. You do not need to remove it for the battery procedure.
O que você precisa
Fix Kit
Este kit contém todas as peças e ferramentas necessárias para executar este guia.

Peças


Ferramentas


Exibir mais…
-
-
Unplug and power off your phone before you begin.
-
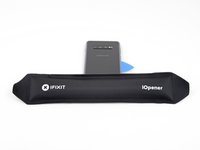
Heat an iOpener and apply it to the back cover's right edge for two minutes.
-
As you wait, take a look at the image of the removed back cover and take note of where the adhesive is located.
-
-
-
Rest the heated right edge of the phone on something that is about 0.5 inches (13 mm) thick. This angles the phone for the opening tool.
-
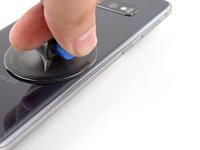
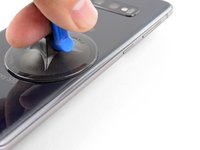
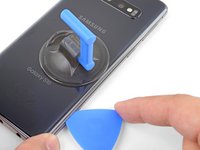
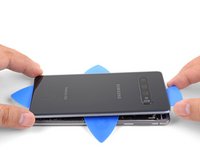
Brace the left edge of the phone with your fingers so that the phone won't slide. Pull on the suction cup with firm pressure.
-
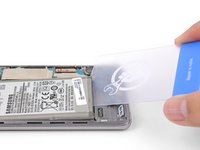
Press the edge of an opening tool into the seam between the back cover and the frame.
-
With the opening tool in place in the seam, slide it back and forth along the seam to loosen the back cover.
Might be hard with the suction cup on a cracked back. I'd rather break it off and buy a new back (it's super cheap, around 10$ online).
Guenter -
Yes! Apply a layer of packing tape to the cracked back cover first, and the suction cup will adhere to the smooth tape surface.
I will open the one that I am taking out of the computer now and then I will follow where it is
Am besten 2 mal gut erwährmen. Danach geht das öfnen top.
-
-
-
Heat an iOpener and apply it to the same edge of the phone for two minutes.
-
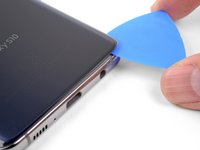
Apply a suction cup to the back of the phone, as close to the center of the right edge as possible (where the adhesive is narrowest).
-
Pull on the suction cup with strong, steady force to create a gap between the back cover and the frame.
-
Insert the point of an opening pick into the gap.
-
If you are having trouble creating a gap, the adhesive isn't weakened enough. Make sure you have heated the edge until just barely too hot to touch try this step again.
-
You can try applying a few drops of high concentration (over 90%) isopropyl alcohol into the seam to help loosen the adhesive.
I had trouble lifting up to create a gap. What I did is watch Jerry rig everything's teardown and he said the back glass must be barely too hot to touch in order for the adhesive to weaken.
So I heated the iOpener till it was too hot to touch, but not so long that it would burst. Put on right edge for a few minutes. Then I lift with the suction cup, using my middle finger and thumb to grip the sides of the phone and my pointer finger to pull up on the suction cup .
I cleaned the glass with an alcohol wipe beforehand to make the suction cup stick better, though I'm sure any cleaning method that removes fingerprints will help.
I couldn't make as big a gap as shown in the picture, but I was able to stick my metal jimmy tool carefully into the crack between the glass and the metal frame and it was just enough to slide the tool a little. And I was very careful since it's a metal tool. After that I could stick the plastic pick in and slice the adhesive and then that gets you started removing the back cover. Reheat often to weaken and slice adhesive. STOP and reheat if it even gets a little harder to slice. DON'T risk cracking the glass.
I think we should add that they should treat the back glass as gently as a raw eggshell. That's because I thought I wasn't applying excessive force and caused the glass to crack, but I didn't understand what counts as "excessive force." (A bit vague)
What excessive force actually means is as soon as you feel any resistance at all when slicing glue with the pick, stop and apply more heat before continuing. The glass can crack very very easily, when pressure is applied in only a small section.
See for me it was weird, the glass was weirdly weak. I just put the iOpener in the microwave and put it on there until it was almost too hot to touch and went around, the gap was like 0.5cm already, so I just went around and it came all off in like 10 seconds, I was kind of happy how easy it was, but sadly I went around too fast and now there's a line crack at the top left of my back glass, it's not sharp so it doesn't bother me.
-
-
-
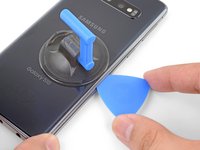
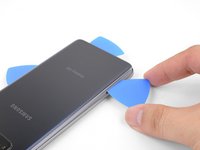
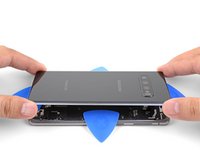
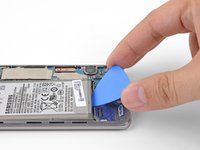
Slide the opening pick along the edge of the phone, slicing through the adhesive.
-
Leave a pick in the seam to prevent the adhesive from re-sealing.
-
-
-
Apply a heated iOpener to the bottom edge of the phone for two minutes.
-
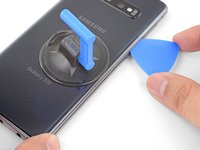
Insert an opening pick into the right edge near the bottom right corner.
-
Carefully slide the pick around the corner. Continue cutting along the bottom edge and around the bottom left corner.
-
Leave an opening pick in the seam to prevent the adhesive from re-sealing.
-
-
-
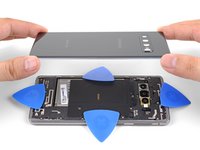
Once you have sliced around the phone, twist an opening pick in one of the edges to help separate the back cover from the frame.
-
Lift the back cover slowly. Use opening picks to slice any remaining adhesive.
-
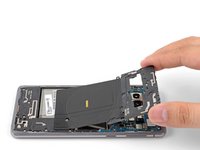
Remove the back cover.
-
-
-
Remove the eight 4 mm Phillips screws securing the top midframe to the phone.
ネジロックが原因である可能性があるため、iOpener で熱を加えてみてください。
-
-
-
The midframe is still held in place by a few plastic clips around the edge.
-
Insert the point of a spudger into the notch on the right edge of the midframe, near the volume up button.
-
Pry up to loosen the midframe from the phone.
Bei mir war die Kerbe durch den Klebstoff komplett verdeckt. Am bestern den Kleber vorher entfernen. Dann geht es einfacher.
-
-
-
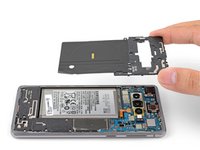
Lift the midframe from the top corners and remove it from the phone.
-
To reinstall the top midframe:
-
Align the midframe's top edge to the phone and lay the frame down on the phone.
-
Use fingers to apply pressure along the midframe perimeter to snap the midframe clips back into place. The edges should sit flush against the phone edge.
-
-
-
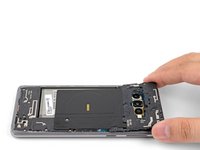
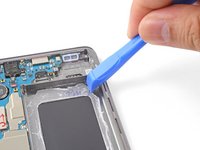
Insert the flat end of a spudger underneath the battery connector, which is attached to the motherboard below the rear-facing camera.
-
Pry upwards to disconnect the connector from its socket.
-
Gently push the battery's flex cable away from the motherboard socket to prevent accidental contact.
Between this step and the next (Step 12, Battery), the lower mainframe is removed in the images but there is no instruction to do so. I was able to remove the battery (1 min of heating with iOpener, plus 8 total drops [2 in each corner] of 90% IPA) without removing this lower mainframe.
-
-
-
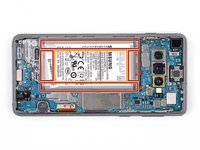
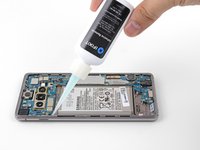
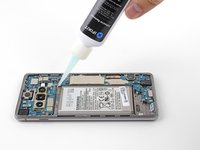
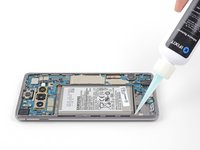
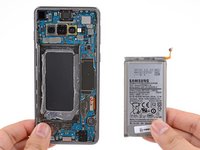
The battery is heavily glued in place. Note the marked areas under the battery:
-
The frame, where the battery is held by strong adhesive.
-
A cutout in the frame, exposing the fragile display assembly underneath. Be careful when prying in this area, or you may damage the display.
-
-
Ferramenta utilizada neste passo:iFixit Adhesive Remover$19.99
-
If you are using adhesive remover, follow these preparation steps first.
-
Apply a 1-2 drops of adhesive remover or isopropyl alcohol in each battery corner.
-
Wait for a minute to allow the liquid to weaken the adhesive.
-
Alternatively, heat an iOpener and apply it to the right side of the front of the phone for two minutes or until the battery is warm to the touch (from the transferred heat).
Was passiert wenn trotz des Adhesive Removers der Kleber am Akku sich einfach nicht lösen will?
Erstmal, Zeit lassen und nichts erzwingen. ;) Am besten erhitzt du dein Gerät nochmal, um den Kleber zu weich zu bekommen und versuchst es dann nochmal. Das ist leider sehr zähe Arbeit, die nur in Ruhe funktioniert.
I tried a few drops of isopropyl alcohol 91%, but the battery was still firmly stuck. I was too scared to use more alcohol so I heated the right side of the screen with an iOpener.
And once the battery felt warm, I was able to pry between the frame and the right side of the battery using triangle plastic pick. Pry, applying upward force to the battery. I kept prying on the side, moving up and down the side and prying again, till the battery popped out. It popped out on the top left corner for me, personally.
I did what the person in this video did: https://youtube.com/clip/UgkxDMPJGQ5EOkd...
Can anyone else share their experiences with using Isopropyl Alcohol? Can it damage the S10's screen? If so, how much will damage the screen? I'm only asking because I tried heat alone with the iOpener and didn't get anywhere, so I'm going to try Isopropyl Alcohol tommorrow.
Im sorry about my late reply. I myself stopped after a few drops since it didn't seem to weaken the glue enough and I read the scary comment about it destroying the display. I heated up the screen glass till it's barely too hot to touch. And they should be enough to loosen the glue. If it gets too cool then you have to heat the scren up again till it's barely too hot to touch. (I tried to add this detail to the guide, but perhaps they did not approve my edit.)
But it sounds like other people may have been successful with the alcohol, I just didn't want to take the risk
A X -
I ended up using Isopropyl Alcohol and only a few drops because I heard of people destroying their display's if they used too much, because the underside of the display is below the battery and I got it out!
I had to apply iOpener heat and 91% alcohol four times before getting the battery to pry.
I'm not weak, but this step almost made me cry. So my first piece of advice to everyone is to stay calm. It will come off, you can outsmart the glue, just use creativity, not force. Since all my plastic tools bent instead of moving the battery, I ended up using an old sunglass lens - and it worked! It's sturdy and thin enough, plastic and the curve helps lift the battery.
-
-
-
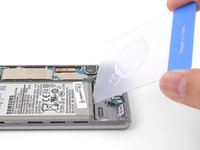
Insert the corner of an opening card into the crevice between the battery and the bottom midframe.
-
Pry the battery out of its recess using firm, constant pressure.
-
Try using an opening pick, an opening tool, or a spudger to pry the battery out. Do not use metal tools.
-
Repeat the adhesive remover/isopropyl alcohol application step and try again.
-
Try applying more heat with an iOpener.
This is the only real challenge in changing the battery.
My steps:
1. add isopropyl alcohol and let it soak for a min or two
2. use the blue opening tool to see if there is any movement (I guess it is not moving)
3. use the card (really the card - which is not a part of the battery replacement kit, or cut out a thing plastic card from the packaging yourself)
4. use the card to get under the battery. cut through the battery on the bottom side and the lower half of the left side. you should see that glue is coming up (even if just a bit) - make sure youre only a few milimeters under the battery
5. check if the blue opener allows you lifting the battery (maybe use a sudger too)
6. If not movement, add a bit more alcohol and WAIT
7. cut through the glue around the left lower edge again. use the opener again
repeat 6 and 7 if still no success
do not add alcohol everywhere, dont use too much of it
dont use other tools or any extensive force on the battery
Thanks for the helpful advice!
A X -
One thing that i noticed because mine was not moving at all was to insert the blue opening tool from where the connector head part is and just gently move it underneath the grey part of the battery and just slide it in a bit
The repair kit should come with the picks, but if you don't have them you could try using a spudger although it might be difficult because it might not be able to fit under the battery.
Das Akku geht wirklich sehr schlecht raus. Am besten geht es wenn das Display mit dem iOpener 3 mal erwärmt wurde und danach ein paar Tropfen Kleberentferner, 4 je Ecke. Danach mit dem Spudger an der linken untern Ecke anheben. Der Rest geht dann ganz einfach.......
Eng Translation of Martin Thiel's comment:
The battery is really bad. It works best if the display has been heated 3 times with the iOpener and then a few drops of adhesive remover, 4 per corner. Then use the spudger to lift the bottom left corner. The rest is then very easy.......
A X -
picks were too flimsy, I ended up using a plastic tire lever. (after heating it and adding alcohol multiple times)
-
-
-
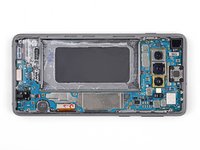
Remove the battery.
-
If you used isopropyl alcohol or adhesive remover, wait ten minutes before installing the new battery to allow the liquid to completely evaporate.
It doesn't look like any battery adhesive comes with the kit, can I use tesa tape instead?
The kit should come with adhesive stripes. These are from Tesa, but are for repairs like this. You could also buy adhesive stripes for your phone. There are several ways to keep the battery in place, but I prefer the stripes from iFixit.
Yea, the kit doesn't come with pre-cut adhesive, but it comes with strips of Tesa tape. Just make sure you don't put the strips on the place that didn't have adhesive originally, because that's the bottom of the screen.
-


To reassemble your device, follow these instructions in reverse order.
For optimal performance, calibrate your newly installed battery after completing this guide.
Take your e-waste to an R2 or e-Stewards certified recycler.
Repair didn’t go as planned? Check out our Answers community for troubleshooting help.
Cancelar: não concluí este guia.
77 outras pessoas executaram este guia.


24 comentários
Selbst als Selbständiger muss man ab und zu nachforschen, dank dieser Webseite-Info habe ich mich vergewissert dass ich alles genau so richtig wie beschrieben und auf den Bildern machen wollte.
Danke dem Autor dieser Information.
MFG
AK Computer Service
Sehr gut. :) Dafür gibt’t diese Seite.
You need to screw the midframe down again before trying to do a power on test, not just reconnect the battery. If you don’t, you’ll get an overheat error icon (red thermometer in yellow warning triangle) when trying to power it on because the NFC sensor is on the midplate and the pogo pins connecting it need screw down pressure to make a solid connection. (No I don’t know why NFC is needed to power the phone on, or why its absence shows as an overheat error.) After figuring this out (shut out to Go Cell Phone Repair on Youtube) the battery repair worked fine.
I had the same issue. I was stressing out so bad haha, but everything worked out fine in the end :)
The iFixit kit to replace the battery in S10 worked fine, including the heating sausage. Jus need to take your time and take great care to follow the instructions in order. The most stressful bit was getting the new adhesive in the correct spot to achieve a flawless finish. It is brilliant that these phones are repairable and that there is so much support for same. Shame on you Apple. We have to stop throwing repairable things away, both to save money and to save the planet. Thanks iFixit.
Don't do what I did and flood the battery with isopropyl alcohol because it seeped into the screen and after a few hours the screen stopped working altogether. Very costly mistake!
Same, wish I had read the comments beforehand.
thanks for that pointer. I read it before I started the replacement and I only used a bit of alcohol which did no harm. thanks a lot!
Guenter -
Hallo zusammen,
insgesamt hat es geklappt, wobei sich der Deckel des S10 fast zwei Stunden geweigert hat sich zu öffnen. Trotz des Wärmekissens und dem Einsatz eines Heißluft-Föns. Letztlich hat es dann doch ohne Beschädigungen zu verursachen funktioniert.
Allerdings ist der von iFixit gelieferte Akku nicht besser als der alte Akku. Der alte Akku hatte 82 % und der von iFixIt gelieferte neue Akku hat (trotz Kalibrierung) nur eine Kapazität von 85 % (2800 mAh). Maßnahmen wie Akkuschutz-Laden auf 85 %. haben nichts gebracht.
Es wäre ein voller Erfolg gewesen, wenn das Ersatzteil auch die gewünschte Qualität gehabt hätte. Ich habe extra den teureren Akku von iFixIt gekauft, statt anderer Alternativen.
Zurückschicken bringt nichts, denn dann muss ich das Handy wieder zerlegen. (: Insgesamt bin ich sehr enttäuscht von IFixIt.
Gruß Michael
After replacing the battery, the battery will not charge anymore. What to do?
I was ultimately successful with this repair but don't make the same mistake as me: I was so focused on removing the back panel that I didn't realize I was actually removing the screen, so of course I broke it while doing so. Luckily I was able to replace that as well, but would have preferred not to pay for a new one!
Great instructions and nothing that doesn't work as explained. My advice on a few steps:
* I didn't use the iOpener, a hairdryer did the job in NO time. I see absolutely no risk of breaking the glass when heated properly and using the plastic openers as shown. make sure you cut through the glue properly and you should be fine.
* You WILL NEED the adhesive removal / softener because that battery glue is nasty! I used isopropyl alcohol to soften the glue (there is this plastic thing that allows you to add alcohol in smaller doses. LET IS SOAK for a min or two! However, to really remove the battery, I just cut the flat plastic case (in which the battery shipped). This is a typical packaging plastic which is very flexible and flat and perfectly bends to reach below the battery and cut through the plastic ( you could also use those flat plastic cards shown and sold here on ifixit too).
Great product!
Leider wurde von ifixit nicht erwähnt, dass mein Originalakku 4000 mAH , aber der ifixit-Akku nur 3300 mAh hat.
Das ist fast 1/4 weniger, ich bin enttäuscht !
Wo hast du denn die Angabe von 4000 mAH gefunden? Steht das auf dem Akku? Weil Samsung selbst für das Galaxy S10 3100 mAH angibt.
I used a hypodermic needle to apply 91% alcohol to the corners of the battery. Being extra careful not to use any more than needed. A few drop will do it.
Vielen Dank dank dieser Anleitung konnte ich meine es sehen reparieren. Was mir noch gefehlt hat in der Anleitung war wo ich die Klebestreifen anbringen muss und wie ich die Klebestreifen anbringen muss
Dafür gibt es eine extra Anleitung: https://de.ifixit.com/Anleitung/Vorgesta...
Thank you very useful
I bought this battery back in March of 2023. The repair was super easy and the hardest part was cleaning the old adhesive from the frame which took over an hour!. Unfortunately just like a lot of people mention the battery quality of this particular kit seems to be iffy. The battery life is hardly any better than my original 4 year old battery which was around 67% health. This new iFixit one is estimated to be around 74% by accubattery even after a whole year of use and cycles. I've tried every single method to recalibrate/reset my battery cycle count without much of an improvement. 3.5-4 hours is the absolute most I'm able to get out of my device of moderate continuous usage. Fortunately i did contact iFixit and they gave me a full refund but until they fix this issue with their supplier of this particular battery i cannot recommend it. I'm saying that because I'm sure other batteries are fine. This isn't to prevent ppl from buying iFixit batteries I'm sure they are great but unfortunately just not this one.
Process was fairly straightforward and I like the kit. In my personal experience I did have few minor complications: (1) the battery cable was around 2mm longer than the original one and you have to fold it a slightly to get it connected, (2) unlike what is shown in tutorials, most of the adhesive was stuck to my phone and was a nightmare to remove, I was scratching the frame of my phone for hours with IPO 100 trying to get adhesive off one tiny black glob at a time, (3) I am not sure why, but the top-left corner of my phone is still sticking up a bit - it is fine but I might need to open it up again to double check and see if I can make it flush. Overall the kit works well, and it was not too difficult. My phone looks pretty good. Next time perhaps I would double-check that the back panel can be pushed down fully flush with the frame before adding adhesive, and/or look harder for any raised parts of the internals.
I agree with this comment and that the battery cable is a few mm longer than original one; I ended up just bending it at the junction with the battery to give it a little more curvature and then it snapped into the receiving connector just fine. Sounds like this is what you did too.
I just completed this repair (took me 45 min to remove battery, including 10 min to let isopropyl (IPA) dry, and 10 minutes to reinstall battery. I chose not to replace the adhesive as plenty of mine was left and was sticky and not folded upon itself).
A couple notes:
* heat is your friend! I had no issues getting off glass/battery by using the iOpener to apply heat as instructed. 2 applications of heat were sufficient for me
* I used 8 total drops of IPA and my screen is completely fine. During the 10 min dry, I had the phone screen-up to prevent IPA from pooling into the display (use gravity to your advantage).
* Step 12 shows removing the lower mainframe; I didn't do this and I easily got out the battery. If you don't have the plastic card tool - use a lens from an old pair of sunglasses. The rigidity of the lens + its curvature makes it the perfect tool to remove the battery.
Thanks for the great guide, and good luck!
I agree with this comment and that the battery cable is a few mm longer than original one; I ended up just bending it at the junction with the battery to give it a little more curvature and then it snapped into the receiving connector just fine. Sounds like this is what you did too.
I think we should mention that the glass needs to be barely too hot to touch to determine when it's hot enough that a pick can be slid underneath.
Or we can mention a thermometer temperature, but most diy people probably don't have a thermometer to check.
A lot of people seem to have issues using the iopener to unglue phone parts like back glass (can Google it), likely because the glue didn't get hot enough, so mentioning the desired touch temperature can be helpful for DIYers to ensure that their glue is sufficiently weakened and they can begin working off the part.
(Just being hot isn't enough for glue to weaken, as you can probably attest to if you've ever had your phone get really hot but the back cover never came loose)
A X - Responder