
MacBook Pro 13" Unibody Early 2011 Hard Drive Replacement

Introdução
Vá para o passo 1Use this guide to replace a dead hard drive.
O que você precisa
Kits de conserto
Estes kits contêm todas as peças e ferramentas necessárias para executar este guia.


Peças


Ferramentas


Exibir mais…
Vídeo de Apresentação
-
-
Remove the following ten screws:
-
Three 14.4 mm Phillips #00 screws
-
Three 3.5 mm Phillips #00 screws
-
Four 3.5 mm shouldered Phillips #00 screws
-
-
-
Use the edge of a spudger to pry the battery connector upwards from its socket on the logic board.
Prying the battery connector off does not take much force. I did exactly what the guide suggested (walked it off back and forth) with the spudger without any problems. Just be very gentle, much like with anything inside laptops, they are very fragile and need to be worked with carefully. A+ instructions, battery replacement was a success.
Be patient on disconnecting this one. It worked for me step by step, little by little.
I used the nails of thumb and pointer finger simultaneously - worked pretty fine
I whittled down ends of two wooden strips to use, along with my fingernails to start with. I used halves of a wooden clothespin, but popsicle sticks should work too.
-
-
-
Bend the battery cable slightly away from its socket on the logic board so it does not accidentally connect itself while you work.
I put some tape between the connector and socket while working on the drive.
That's a good tip
Anrothan -
Great tip, I did that too
One other note: The screw heads fit flush with the curvature of the case -- which means that they aren't exactly horizontal. In other words, they aren't perpendicular to the table that the computer is resting on. Don't try to force them straight in vertically, because you'll risk cross-threading them. (nearly ruined one screw hole myself!)
On my MacBook Pro, the connector seems to be an integral part of the battery.
I suspect it’s just like the special screwdriver required for seatbelts on cars – to discourage regular consumers from attempting repairs. Of course, this only encourages consumers to use the wrong tool to attempt to repairs
Dissambling my MacBookPro Premium Mid 2012 (i5-3210M 2.5Ghz) was easily, Careful with the screws, use screwdriver fitting exactly with the screws, you damage them very fast. Work very exactly, relaxed with time, consentration, good Tools and with feelings in your hands. Disconnect the Akku was easy if you take care, remove it to be safe, Two screws more, more space to work & haven`t to think about damaging someting. Apple use diffrent screws, you should have many difffrent scewdrivers. It is also good to clean everything inside, With time everything gets very dusty & dirty, don`t forget the sides and little fittings at the case. Use a pinsel, alcohol, soft peace stuff, it will look like new. If you have knowledge & experience, you can paint it in any colour or airbrushing for individualizing. You can also just polish it with a soft Politure (Sonax car Polish No1, NOT with wax or take an other light Politure you familiar & can do the job, A Laptop should serviced once a year, keeping it good working over years
First thing i do is open & cleanig everything inside,specially the cooling & fan, renew the thermal paste with an high quality product. Install the Nain System, clean up Bloatware and other unnecessary things, install standard software for daily use, additional change system components against better one (Edge to Firefox, Windows Media Player to VLC , an Office Suite and configuring everything for Data Protection, Privacy- & Indentety Protection, install Drivers from the component Manufactur (incedible effect, disable limitations, more functions, work better & faster, increasing performance, additional change the WiFi & Bluetooth Card to a better one a UMTS WWAN to an LTE Card, increase RAM with two Dual-Channel working SODIMMs, Use M2 or 2,5" SSD if no M2 Slot aviable) as System- and Software iDrive, a FAT32 formatted 32GB Partition to be safe of metaviruses comes with harmless downloads, and a big 2,5 HDD to store the user data. What does you guys think about this? Old Computer become a new life,
I livein Austria, near Vienna, if someone needs help or anything else, i would be glad to help. I always searching old or broken devices to bring them to new live. I also searching for spare parts, specilly a Bottom & Side Case and a 256GB or higher NGFF Storage Card for a Sony Vaio Tab 11 SVT1144HE (2014), some 14,1" Displays for a HP Probook 440G5 (2016), Elitebook MT 43 Mobile Thin Client, (2011), Dell Vostro 3460 (2012) Lenovo Thinkpad T440s (2014), and a Logic Board for an Lenovo Ideapad 330-15ARR (2017, damaged by Water i think) and a Logic Bord for an Alienware 17R4 with i7-6870HX & Nvidia 1080 (2018, CPU dead, maybe there is a repair Guide or workaround to bring it back to Life). I need always 8GB or 16GB DDR3 and DDR4 RAM Storage (perfectly two ident one for Dual-Channel use for Laptops, M2 SATA 6GB/s and NVMe PCIe SSDs 500GB or more and 2,5"SSD or HDD with 1TB or more and 3,5" HDD with 4GB or above. If you have some of this or other useful parts and doesn`t need them, please make me an offer, maybe
2
an change something you need. This is not a Business what i do, it`s more a Hobby with challenging new Excercices.. Thats the best Point. Plase forgive me as a Newbie this very long Post in the wrong Section, but if you are start writing you cannot stop.... But now i have to come to an end and would be happy if someone wants to get in contact. My E-Mail is: udontknowme@gmx.at (the adress name is just a notice against Big Data and for Privacy Protection!
-
-
-
Remove the two Phillips screws securing the hard drive bracket to the upper case.
These were Philips #0 screws in my computer.
-
-
-
Remove the hard drive bracket.
Don't miss this step: I almost did and of course couldn't get the disk out until I looked at the video !
-
-
-
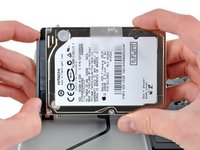
Pull the hard drive cable away from the body of the hard drive.
-
Remove the hard drive.
The hard drive cable is a recalled part on these machines. You may need to replace it before your drive will be read correctly. The Apple Store will replace your cable for free if it's problematic.
@emarch wrote "The hard drive cable is a recalled part on these machines. You may need to replace it before your drive will be read correctly. The Apple Store will replace your cable for free if it's problematic."
Thank you, Eric. This is excellent information. I'm reading this guide because my Mac booted with the flashing 'folder with question mark' icon. It turns out that my drive is no longer recognized internally, but thankfully it works okay through a USB hard drive adapter cable--phew. I read somewhere (on iFixit?) that some have had success by putting two layers of masking tape on the plastic around the data side of the SATA connector on the hard drive; supposedly this improves the fit and contact. I might try this or otherwise replace the cable (c/o Apple or DIY). Thanks again!
-
-
-
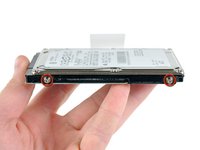
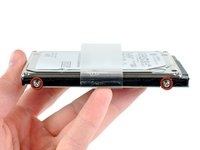
Remove the four 6.0 mm T6 Torx hard drive retaining posts from the sides of the hard drive.
-
Transfer the hard drive retaining posts to your new hard drive.
T6 were just too small to fit the screws of the retaining post, and T8 was just too big. I suspect a T7 will fit. I will get a T7 screwdriver and report back.
Beware other users: T6 as the guide suggests may not be the correct choice for all.
If replacing the hard drive with a 7mm SSD, is a spacer required? This guide from Crucial suggests it is, but there's no mention of it here.
http://guides.crucial.com/Guide/MacBook+...
Just wondering if people are managing without the spacer.
I had the spacer and used it, and all seems fine. I put in a Crucial MX500.
I just replaced the original hard drive on my mid 2012 MBP with a Crucial SSD from iFixit and am amazed at the new zip this has giving it! I first upgraded the RAM from 8 to 16 GB and that helped the speed but nothing like this new SSD, I found everything in this guide to be accurate for my computer. I did take the course of first cloning my original drive onto the SSD using the recommended SuperDuper! software, following the guide for that, and highly recommend taking that route.
Great instructions as usual. Once I removed the old drive I found a round black rubber part (like a nipple) that had a rim on one end. I looked and googled to no avail! So there is a oblong hole (looks like a female lightning port) through the side of the MacBook right where the HDD is. And on the inside of the Mac there is a black frame near that oblong hole with a perfect circle shaped hole that this black rubber part fits into. All done and back together. Then I recalled person that I bought it from worked at auto dealer and took it into the shop where a co-worker used a blow gun to clean it up before selling. I guess 90 PSI blew the rubber part out!! So if any one finds one, you will know where to put it back
The instructions are admirably clear and I successfully installed a 1TB Crucial SSD. However, it might be helpful to remark that the new drive MUST be formatted in APFS. Not knowing this, I formatted in HFS+ and loaded a Time Machine backup onto it. The new disk at first booted and then hung after the initial process had completed (the progress bar stayed on the screen). I only discovered the formatting problem when I wanted to clean install Mojave on the new HD. A day lost and a splitting headache later, everything is now up and running and LOTS faster!
Great instructions. The only and VERY important thing I would add is to copy your hard drive FIRST before you remove it. If someone above hadn’t mentioned this, I would’ve been screwed. (seems obvious now, but I’m a newbie with computer repair). I installed a Samsung V-nand SSD 860 EVO 500GB using the Sabrient 2.5 SATA hard drive USB 3.0 Enclosure with the Super Duper software. Took almost 6 hours to copy the HD. Then I just swapped it out with the old one. Voila! my 2011 MBP booted up perfectly! Thanks again for your help!
FYI: I tried to order the Crucial SSD as recommended on this site; however, it never shipped from Amazon after over 2 weeks. The Amazon listing never said it was out of stock. So, I researched Crucial and discovered it’s been sold to China and the customer service/product isn’t what it used to be. I cancelled my order and just went to Best Buy. Do your own research.
To confirm (uk) T7 for the retaining post screws.
To confirm - no need for a spacer for a 7mm drive the retaining post keep it in place, then there is just a bit extra 2mm “space” above (or below , depending on your perspective) the drive :-)
With no SATA connector to clone straight to the new drive before removing, which would be simplest way IMO.
I cloned to an external usb drive > fitted new drive > started up while holding alt key, choose the external usb clone as the startup OS > cloned that usb drive to the new internal drive> shut dow> unplug usb > startup > bingo!
Used trail version of “Carbon Copy Cloner” to do this.
The posts can also be removed gently with a pair of pliers, if you don’t have the torx T6, as was the situation with me.
FWIW, having replaced dozens of hard drives for clients, I’ve found it very helpful to stick a label or a piece of tape on the new drive with the purchase and/or install date, vendor, and warranty period. This is especially useful because typically the label of the new drive ends up facing down, so you have to remove it to see that information.
Thanks and quite helpful.
I’m looking into replacing the drive with the 1 or 2 TB drive in my early 2011 13” MacBook Pro. But rather than use macOS as the OS, I’m considering making this a Linux machine so I can have a place to practice without having to buy a whole new computer. Does anyone know if I need to still replace the macOS first and then convert to Linux (like what you have to do when modding a classic iPod with RockBox)? Or can I just go ahead and load Linux on there without replacing macOS first?
Weird use case, I know. But I did want to ask before trying it.
-


To reassemble your device, follow these instructions in reverse order.
To reassemble your device, follow these instructions in reverse order.
Cancelar: não concluí este guia.
440 outras pessoas executaram este guia.

33 comentários
Under updated firmware, macbook pro unibody models will not recognize many third-party hard drives. See this discussion: https://discussions.apple.com/message/15...
Awesome guide! Swapped my 320GB hard drive for an 1TB hard drive. Took five mins thanks to iFixit!
hey, do you use SATA 3 for you’re MacBook Pro A1278? is it work good? no problems?
dimdimisra, you use the built in cable that comes in it, because of the proprietary mortherboard connector, you can’t use a regular SATA 3 cable
I feel you should be pointing out a couple of things about the chassis screws that are not obvious to the inexperienced
- the 6 screws that are not along the hinge edge of the body (4 yellow & 2 of the orange) are not perpendicular to the flat surface; they go in at an angle such that their heads are flat in the curve in which they sit. Attempting to hold the screwdriver upright in these heads could lead to damage to the screws, stripping out the "cross"
- attempting to insert these screws "straight" when reassembling will lead to cross-threading and stripping the screw threads
Will I notice a diference in booting speeds?
(actually, real question would be: Is it faster than the original sata, and if so, how much faster and how will it affect me?
Yes almost 5 times faster 20s rather than 1min30s
I did this upgrade as instructed and everything went swimmingly. I used SuperDuper to clone the drive well before opening the mac and removing the original hard drive. I loved SuperDuper but there are also alternatives for cloning. The iFixit kit contains the proper tools too and it's a bargain though the drive can be had for much less elsewhere.
All went well. Entirely doable. I did the memory while I was in there too. So now have 16Gb and a 1TB SSD running! Couple of comments
1: Whoever suggested using a prescription pill day counter for screws was a genius. You should do that too. Telling the shouldered from the unsoldered 3.5mm Phillips 00 screws will drive you nuts otherwise
2: The recovery instructions are a bit old if you've been keeping you OSes up to date. If you have Yosemite or what not, you have had your firmware flashed. So just make a time machine backup on a USB drive; replace everything; and right after you power up, hold Apple-R (if you have WIFI) and it will boot. Use disk utility to partition the drive as bootable (macos journalled with guid), then plug in the USB time machine, and recover from that. Few hours later you are in business.
Thanks iFixit. Great instructions,
I’m sorry, but I don’t understand Apple-r. Are you talking about the command key? I don’t have an apple on my keyboard. Thank you!
I did this with the iFixit provided 1TB SSD. It all went well. It's really an easy task, though it might seem daunting. Just don't "force it" with any of the delicate parts.
The restart of the computer was a little startling. I flipped open the laptop and bam, it started. Might have been an errant press on the power button.
Also, to reinstall, I used "Internet recovery" which worked perfectly, as building a thumb drive boot drive failed on me. Internet recovery saved my world. Took about 4 hours to restore 320G of data on my new drive.
I went to the apple store and they stated that I needed a new hard drive. But, they noticed a water mark that was marked red and said that it voided the warranty and I would have needed to pay even more for them to replace the hard drive. So I bought the hard drive suggested by ifixit and replaced the hard drive. When i start my computer it stay at a apple sign with spinning wheel for a while. I pressed command option R to try to download the mac ox software but the hard drive does not put up under the disk utility screen in order to download it. HELP!
try holding option, command, p and r on boot up. It’s called clearing the NVRAM I think (might be wrong about that ?) the mac soundeffect will play once then twice then let go. This really helped me out with my 2011 MBP after it installed some updates and didn’t seem to be able to load back up.
Excellent guide. My daughter's MacBook Pro had stopped booting up and when she took it to the local Apple Store they recommended replacing the drive. I took the opportunity to upgrade to the 1TB hybrid drive. Easy replacement. I booted up and reinstalled MacOS Lion via WiFi and then upgraded to Sierra. Everything is working fine and now have 900+GB of free space!! Thanks iFixIt folks
This guide, in combination with the youtube video instructions and the youtube video about how to clone the hard drive, worked perfectly. I am now using my much faster and much less full macbook - and loving it! Thanks for all you guys and gals do!
I used this guide to swap out my harddrive with an ssd. My Macbook pro is amazing now! Boot times and loading times are a thing of the past, and Spotlight searches are instantaneous! I won't need a new laptop for quite some time! The swap is easy, I did the whole thing in under 20 minutes.
Anyone know how to do this with a hard drive that's already failed? I don't need to recover anything from it, I just need to get my daughter's 2011 Macbook Pro operational again. I don't think replacing the hard drive will be hard, what I don't understand is how do you get the Mac OS back on it?
Thanks
you can put a OS installer on a USB drive and after you install the new harddrive, hold command R and then follwo directions to boot from / install from USB.
Superb - swapped out my late 2010 Macbook pro 500GB HD w/ a Seagate 2TB HSSD in 20 mins (sure, the Super Duper back-up took ~8hrs prior to) and it's off to the races, fast boot etc.! Brilliant DIY site, couldn't have made it any easier - thanks very much! James
dec tan - you can most likely use a NVMe M.2, but you won't get the actual speeds of an NVMe card, due to SATA limitations. You're better off just getting a regular SATA SSD for this computer.
Troy Taylor - You can use internet recovery (option-command-R) at boot up to reinstall the basic OS to a new hard disk.
Hmmm could I replace the typical HDD with an SSD in a MacBook Pro Mid 2011?
Thanks,
You probably did it already but yes you can. I did it a few days ago and it makes quite a difference, especially in booting.
tsa -
If you don’t already have the means to remotely connect your new hard drive to your computer, the hard drive/tool kit/hard drive enclosure is the way to go, as it gives you the option to clone your old drive to the new. Once that’s done, physically swapping-in the new drive allows you to seamlessly boot up from your new drive. The tool kit alone is easily worth the extra ten bucks, plus you get the USB hard drive docking station that you can use later with any SATA drive as an external drive (for backup?). Memory was upped at the same time, and it’s like I have a new computer!
Fantastic video and step-by-step instructions! Thanks SO much for this! I used your kit that included the hard drive and the tools needed which made things very straightfoward (MacBook and MacBook Pro (Non-Retina) SSD Upgrade Kit). The hardware installation was actually pretty easy, and I am NOT good at mechanical tasks, especially when the screws and tools are so tiny . The OS is installing right now! I am using Mac Internet Recovery.
My only (very) slight complaint is that I could not find anywhere that told me specifically if I needed the extra spacer that comes with the hard drive or not. The manufacturer, Crucial, should just have a list of laptops that require it and ones that don’t.
ottima guida, ottimo risultato
grazie
Best way would be to clone your old HDD with newly formatted SSD…whole process was easy but the cloning took several hours as old HDD was soooo slooow! Once cloned, the swapping of the HDD and SSD was simple, easy and quick. My only regret was paying $100 more by ordering the SSD upgrade and RAM kits from ifixit with shipping cost vs Amazon that was cheaper and free shipping. Didn’t bother returning and ordering from Amazon as the time & hassle would off-set the cost diff - just wished I did the Amazon route to begin with. Oh well…lesson learned!
Great guide. Excellent written instructions. I upgraded my mid-2012 MacBook Pro 13 inch two years ago with 2-8 GB sticks for a total of 16 GB, a replacement battery and a new 1T SSD hard drive and it is still going strong. I just pulled this guide out again and updated a friend’s computer. She’s so happy with the speed and performance improvements! I had no issues with any of the hardware swapping and was even able to restore here touchpad to working order by blowing out the dust and debris when we were in doing the upgrades. I love I-Fix-It!
Issue with fans and apps slow to start up. Since replacing with SSD fans now run at full speed from the moment it starts up. Not ideal but I installed Mac Fan Control to minimise this. The bigger issue is that apps take an age to start up the first time but are x10 quicker after that. I’m running a MBP late 2012 on High Sierra. I cloned the original HD with SuperDuper! which worked great. I formatted the new SSD in APFS - I wonder if this is causing the problems? Anyone had the same issues? Other than that was very easy procedure - under 20mins.
Do I need to use this little "spacer" that came with my SSD in the 13" 2011 MBP?
I changed for the second times the ssd drive in this MacBook Pro early 2011, the previous one stopped working with sudden blocks and it disappeared randomly from the desktop. I prepared an other SSD connected externally with a MacBook Air installing macOS High Sierra and transferring all the data. Mac OS High Sierra is the last operating system that MBPRO Early 2011 supports. It works fine externally in both computer, the Air and the MacBook Pro early 2011 but when I mount inside the MBPRO and boot the system it appears the forbidden symbol. I have resetted everything but still forbidden symbol appears. Dismounted and connected externally it boots fine again...
So I tried installing an other bootable SSD drive that I use to test old Mac machine with macOS 10.11 : It boots fine. I put the SSD with High Sierra inside the mbpro again and appears forbidden symbol. Any idea? I tried also changing the disk data cable inside the MBPRO but the same. Booting from external this disk works fine, inside not
How much weight can I save by removing the optical drive?
gunes314 - Responder
You can save a lot of weight if lets say your installing a solid state drive or putting in a second hard drive but if you know that you use the CD/DVD disc drive a lot then you might just want to leave the drive alone.
Marshall WahlstromHelgren -
Tip: Use one of those weekday pill holders to have a cheep way to store screws you remove and each day of the week can be for different sizes or parts. It has been handy to have (much less expensive than the magnetic mat.
Robert Wacker - Responder
Hello, where can I buy the screws I need in case I lose one of them?
taylornya - Responder
iFixit sells a kit: MacBook Pro Unibody Lower Case Screw Set
Darrell Johnson -
I have one stripped screw... How opening without drill it?! Any suggestions please?
rodrigosady - Responder
I also stripped a couple screws. I wasn’t able to open it up without drilling. After drilling the heads and removing the cover it was easy to hacksaw the tip and unscrew with a standard driver.
Michael Wilkens -
We have a guide for that!
How to Remove a Stripped Screw
Sam Omiotek -
My top tip - make sure you buy good quality Phillips screwdrivers and a magnetic holder. Cheap screwdrivers won’t get the screws undone safely. Without a magnetic holder you have no chance of getting the tiny crews in and out safely.
jeremyyoung - Responder
A good Phillips 00 is your friend here. Also, when reinserting the screws, gently start anticlockwise and you wil feel a click at the start of the thread. This tells you you’re in the right place and less likely to cross-thread through force in the wrong place.
Iain Boyd - Responder
I feel like these are 000 screws. Amazon sales describe them as such and my 000 screwdriver fits better
cam2000deluxe -
Before ordering a new Trackpad remove the existing battery and try clicking the Trackpad. If it clicks OK with the battery out the source of problem is likely a swollen battery, which should to be replaced even if it still works to some degree. From the side of the battery you will likely see the soft part of the battery bulging beyond the hard case.
Patrick Langvardt - Responder
That’s absolutely correct as I can testify. With the battery removed I also adjusted the T6 set screw that adjusts the sensitivity of the trackpad click, evidently someone had cranked mine down tighter than the factory setting.
Gary Register -
Le quatrième paragraphe dans les instructions en français n’est pas correct : ce ne sont pas les 2 petites vis, mais les 7 petites vis qui sont inclinées. Et les 3 grandes sont bien verticales.
Degeorges - Responder
Bonjour ! Merci de votre observation. J’ai corrigé la traduction. iFixit étant un wiki, n’hésitez pas à modifiez si vous remarquez une erreur :) Encore merci de votre attention et à bientôt !
Claire Miesch -
Tip: if you have a magnetic screw mat or similar, lay the macbook over the mat to make sure it catches any screws that may decide to fall of and hide under your table
Moritz - Responder
Funny, it's not her hands that are doing the close ups. :)
Cinemated Man - Responder
What's the difference between the shouldered and non shouldered screws? They look exactly the same to me.
MLNLRD - Responder
the shouldered screws have a space where the threading stops and the head of the screw begins. i don't think the newer screw kits include them. i've lost most of my shouldered screws but the non shouldered screws will work, too. you just need to adjust everything carefully because a shouldered screw will stick out of the case instead of fitting flush if it's in a non-shouldered hole.
postjosh -
There are bateries labeled as "A1322" but marked as "High Performance" and rated 76.56WH/11.6V. Also sold as replacement for the MacBook Pro 13" mid 2012 Model A1278. Does the different rating, in particular the voltage, is compatible? Does it really provides some extra "performance" in any actual way?
Thanks
locutus - Responder
does anyone know where to buy the shouldered 3.5mm screws? it looks like the current kit has substituted the non-shouldered version of the screw.
postjosh - Responder
here's a comparison picture:
shouldered vs non-shouldered
postjosh -
My screws were in a slightly different configuration -- my macbook has never been opened before so I'm not sure why my screws were different from the diagram here. Anyways, the three long screws were in the same position, then, clockwise from the right-middle screw, with s = shouldered and r = regular, I had: s, s, r, s, r, r, s.
Spencer Pennington - Responder