
MacBook Core 2 Duo Fan Replacement

Introdução
Ir para o passo 1Replacing a defective fan is pretty easy and will keep your laptop running cool.
O que você precisa


-
-
Use a coin or spudger to rotate the battery-locking screw 90 degrees clockwise.
-
-
-
Lift the battery out of the computer.
I just replaced the battery as indicated (with a iFixit part), but the computer says there is no battery connected, even after letting the power plug in for more than one hour.
I think I found the way to have the new battery to charge!!!!!
See: https://www.youtube.com/watch?v=jRYIMDQx....
Essentially, you have to follow a very precise order: 1/shut down the computer, 2/take off the magsafe connector, 3/remove the old battery, 4/put back the magsafe connector, 5/put the new battery, 6/power on, each time leaving a few seconds in between.
-
-
-
Unscrew the three evenly-spaced Phillips screws from along the rear wall of the battery compartment.
Lay the screws out in a ”timeline” like a circle, Then when you reassemble just start from the end of the “timeline”
The screws have to unscrewing positions, first they unscrew from the whole body BUT if you move the lid without entirely removing the screws, they will remain attached to the lid. This I find much more recomendable!
What size screwdriver
Edward: Philips 000
-
-
-
Grasp the right end of the L-shaped memory cover, then pull it towards you so it clears the battery compartment opening.
-
Lift the memory cover up and out of the computer.
-
-
-
Remove the following 3 screws:
-
One 11 mm Phillips#00 in the middle of the lower case. (Head: 5mm dia. x .75mm thick)
-
Two 14.5 mm Phillips #00 (Head: 5mm dia. x .75mm thick)
Citação de ryan64:
I couldn't get the top two 11mm screws to come out, even with a magnetized driver. When I tried to keep unscrewing them, they clicked like they were spring mounted, and I didn't have any trouble leaving them in and continuing on.
I use a strong magnet to pull the screws out of their socket.
You need to replace the shorter middle screw first, otherwise it won't tighten later since it won't quite reach the bottom.
for me this was the hardest part especially the two 14.5mm that dint want to come out. keep turning the screw and slightly pressing the case down, once the screw is a little use try using finger, screw and a non metallic point to try to push them out. they arent tight but they are very hard to unscrew i almost gave up, but believe me they come out with patience
-
-
-
Remove the following 3 screws from the rear wall of the battery compartment:
-
One 3 mm Phillips #0. (Head: 2.75 mm. dia.)
-
Two 4 mm Phillips #0 on the either side. (Head: 2.75mm dia.)
On this step, I encountered a problem. The middle screw was screwed in very very tightly. As a result, I ended up stripping the screw despite being very careful. I tried to use a wire cutter to remove the screw, but that did not work. I actually ended up using the wirecutter to cut the bracket off, leaving the screw screwed in. This did not affect anything. I am typing off of my replace macbook top case right now.
The point is, BE CAREFUL! but if something does go wrong, don't fret. There are solutions.
On a Macbook I just tore down, I found that in this step, the 4mm screw was on the left, not the right. I thought maybe someone else had it apart before and accidentally switched them so in staying true to these instructions I tried to reassemble with the 4mm screw on the right. I found it would not go all the way in. I ended up putting it back together with the 2-3mm screws on the right and the 1-4mm screw on the left.
I didn't look closely at these screws when I took it apart, but when I went to put it back together (two weeks later) I found I had two longer (4mm?) screws, and one short one. So I put the longer ones in the two end spots, the short one in the middle; they all seemed to go in okay. (Maybe the screws got changed around the last time the cracked top case was replaced, when the MB was in the Apple shop under warranty last year.)
Me too. I had two longer 4mm screws here, and one 3mm screw. And I didn't pay attention to what holes each screw came out of. I put them back in a random order and it seems fine.
Thomas -
My early 2008 MacBook was the same. 2 x 4mm in the outer and 1 x 3mm in the centre.
Ernie K -
You need to replace the shorter middle screw first, otherwise it won't tighten later.
I needed a tweezers here. These screws are tiny!
If you lose one you may have to remove the RAM (by pulling the appropriate lever) and gently slide out the screw.
oh thanks I thought the screw was lost forever
To confirm what HandyMac and colmcostelloe found, some MacBooks have one 3mm and two 4mm screws in the rear wall of the battery compartment. On the one I worked on, the shorter 3mm screw came from the middle hole.
Citação de BeatJunkie:
To confirm what HandyMac and colmcostelloe found, some MacBooks have one 3mm and two 4mm screws in the rear wall of the battery compartment. On the one I worked on, the shorter 3mm screw came from the middle hole.
Thanks Beat Junkie, this was the situation with my Mac 2.13ghz Mid 2009 that I was putting back together. Thanks for the confirmation! (For the 6th step)
For me (A1181), there were two shorter screws and one longer. The longer went on the left (a shorter screw wouldn't catch). (Not the middle that is currently in the instruction. But that could be model difference.) The middle screw started to strip the head but using a slightly larger phillips allowed me to get it out.
In my late 2006 macbook the central screw was longer than the side screws..
Mine was A1181 model, Core 2 Duo 2.16 GHz. Of course I did not keep track of the screws and ended up with two shorter ones and one longer. Replaced them with the longer one to the right of the three. Got it done with a Wiha PH00 screwdriver. Had better hold than the bit from the precision screwdriver kit.
me too. Got it done with a iFixIt PH00 screwdriver.
Yeah, same for me, #00 worked; #0 suggested in the guide was too big. I didn’t even try #000. For 2.2GHz A1181. My screw config matched the guide, 3mm in middle, 4mm on the sides.
-
-
-
Remove the two Phillips screws from either side of the right wall of the battery compartment (not the ones closest to the battery connector).
-
Two 6.25 mm Phillips #000. (Head: 4 mm. dia. x .5mm thick)
The steps do not tell you what length screw that is needed to be here. What I can tell you that is the screw needs to be 5mm or 6mm, NOT 7.5 or 8mm or 9mm.
Screwdriver PH0
For black 2.2GHz A1181, I used PH #000 as suggested by guide. My screws are both 6mm.
-
-
-
Remove the four indicated Phillips screws from the front wall of the battery compartment. When working from the left, remove the 2nd, 4th, 7th and 9th screws.
-
Four 3.25 mm Phillips #000. (Head: 4 mm. dia. x 4mm thick)
It's recommended to use a PH00 screwdriver instead of the PH000.
The PH000 is too small and you can damage the screwheads.
Yeah, I found PH #00 better too. (For black 2.2Ghz A1181.)
I used PH0 for this
Is there a way I can cut the bracket off? I completely stripped one of the screws?
I’ve done this often enough that I marked the screws to remove with red marker.
-
-
-
Remove the following 4 screws from the back of the computer:
-
Two 11 mm Phillips #00, with Shank (2.2mm dia. x 2 mm len.) (Head: 3.2 mm. dia. x .5mm thick)
-
Two 7.25 mm Phillips #00, with Shank (2mm dia. x 3.75 mm len.) (Head: 3.2 mm. dia. x .5mm thick)
I cannot get the two outer screws out for the life of me- and afraid of stripping them. Already see I'm doing some damage. Help? What can I do?
Are you sure you have a proper screwdriver? From my experience you really need to use the correct size and not just something that seems to fit.
Olivia, you can screw back the longer screws that go on the inside. In the photo marked with orange. Then open and close the lid of the MacBook a few times. This will fit the 4 screws more properly in the steel inner-frame and they can come a little bit loose.
Close the lid again. Leave the inner screws untouched and begin with the outer screws (marked with red) with indeed a perfect matching screwdriver head (with a big and long grip for your hand). This worked for me perfectly without damage. Success!
-
-
-
Remove the two Phillips screws from the optical drive (right) side of the computer:
-
Two 5.2 mm Phillips #00, with shank (2.3mm dia. x 3.25 mm len.) (Head: 3.2 mm. dia. x .5mm thick)
The screw farthest from the optical drive would not come out, all other screws came out fine with my screw driver and the screw looks ok, any tips on how to get the screw out?
With some of the screws that can happen. I had it too. This did it for the MacBook I was repairing: 1. Open the MacBook. Then press firm but gentle on the upper case with your hand or fingers while trying to loosen the screw with your screwdriver. 2. I used a different screwdriver from the same size diameter but with a much larger hand-grip. Success!
-
-
Ferramenta utilizada neste passo:Plastic Cards$2.99
-
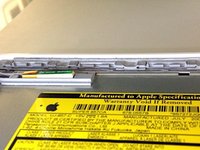
Use a plastic opening tool, an expired plastic credit, or a similarly-thick card to pry up on the upper case, starting in the upper-left corner and working around to the front of the computer.
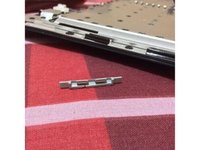
As is reported above, there a 4 friction tabs that connect to the keyboard. If they do not stay in place and stick to the keyboard, the keyboard will not go back on. Just remove them and put them in the clips, with the solid clip wall to the outside of the unit, and put the keyboard back on. Do this before reconnecting the keyboard.
The front left had an annoying little metal strip between the outside of the case and the tab. It's very easily bent, so the tab was caught on it. I spent a good deal of time trying to push and pull various things (and even just yank the @$!^ thing off), but eventually I found that if you undo the two screws you are told not to in step 7, the battery connector can be pulled up and out, leaving enough horizontal room to pull out the metal strip (with a little bit of coercion). I left it out when I put everything back together.
Thanks for the tip. Saved me!
Joe -
Because this step requires some force, make sure to double check that you got all your screws out. I finally got my gumption up to apply the necessary force required to pull up the upper case, and after 5 minutes of pulling, I look and see that the reason it wasn't coming up because I missed one screw. Ugh.
Also, before you just shove your hands under the upper case, prying about, think twice: I cut my finger pretty bad on a sharp piece of metal.
When reassembling, take some care to align the tabs on the right hand side next to the optical drive. Rock and slide these tabs into position. Then work from right to left, as the rest of the case is quite easy to put back together.
I took my mac apart yesterday to clean out the trackpad properly and after getting some 'help' from my grandfather (he lost 2 screws and snapped off a bit of the uppercase but i didn't have the heart to ask him to leave it alone) i tried putting the uppercase back on. it fits perfectly but the middle section closest to the screen appears slightly raised and when i go to screw in the four screws on the exterior of the laptop i can't because the hole is not at all aligned (and two of those four screws are very long). anyone know why this might be? can it be fixed/is it a common problem?
If the upper case sticks above the optical drive, don't pull straight up, but up and to the left at the same time.
Wow, pulling both up and to the left made all the difference for me, to unstick the keyboard around the optical drive.
I think it is a mistake to separate the keyboard from the clips at the right side (above the optical drive) at all! Instead, after freeing the other three sides, just slide the keyboard slightly to the left, and leave the clips attached to the keyboard. For reassembly, just put the keyboard in its approximate place and slide it to the right to get those clips into position. Be sure the keyboard is really snug against the machine’s case. Then press the other three edges of the keyboard down.
jeh -
On the right side above the optical drive there are little plastic braces that latch the upper case to the main body. This is the reason why the upper case might stick here. If the above step is not working, also try to gently push the upper case sideways away from the optical drive after freeing all other sides. When reassembling make sure the braces are in their slots of the main body and not attached to the upper case. If you cannot fit the upper case evenly over the optical drive, that's probably why. In this case carefully remove them and slide them back into their slots before lowering the upper case.
this guide was awesome. this step was easy for the broken macbook i salvaged and noticed because i got a factory replacement keyboard quite recently on my macbook in use, the 4 clips above the optical drive were TIGHT - it took quite a bit of pulling up before it came loose!
-
-
-
While holding up the upper case, pull up the black tab on the connector end of the silver ribbon cable away from the connector's socket on the logic board.
I tried to remove the blacktab from the logic board, however, the black tab tore apart. The logic board is okay but the keyboard connector is torn. It has some silver wires passing through a whit plastic housing. It is the first generation of MacBook Core Duo. Do you think it can be repaired?
After a sucessful install of the keyboard, the select (mouse buttun equivalent) was found to not operate consistently. I called support and they are shipping a new one out to me. THIS is why I buy from ifixit - sure I can get a part for less elsewhere - but I would not get the service I get with ifixit - THANKS guys!!!
Note - I agree, this was VERY easy - great pictures, perfect explanations...
Citação de carlos:
not sure if this is the place to ask but my mac. doesn't start properly now it turns on and the little light on the right side turns on but keyboard leds don't and display doesn't either any ideas please?
Did you ever find an answer for this question? My computer is doing the same thing. Thanks.
Citação de E Chambliss:
Did you ever find an answer for this question? My computer is doing the same thing. Thanks.
no i never did couldn't get help it blows to hear someone else had the same problem...im using a windows(yuk) but im getting a new mac next paycheck. if you figure it out let me know so i can fix my other one and maybe give it to my parents
Citação de carlos:
no i never did couldn't get help it blows to hear someone else had the same problem...im using a windows(yuk) but im getting a new mac next paycheck. if you figure it out let me know so i can fix my other one and maybe give it to my parents
Hello, I'm following this procedure because my MacBook isn't turning on due to a failure in the MagSafe DC In board, it was not charging the battery and therefore no power going in. The case was broken duirng warranty and also the MagSafe power adapter was replaced. Now it is failing again. This is an old late 2006 MacBook. Does your Mac powers on, do you hear the chime sound? or you are stuck with a hardware failure?
Citação de Francisco:
Hello, I'm following this procedure because my MacBook isn't turning on due to a failure in the MagSafe DC In board, it was not charging the battery and therefore no power going in. The case was broken duirng warranty and also the MagSafe power adapter was replaced. Now it is failing again. This is an old late 2006 MacBook. Does your Mac powers on, do you hear the chime sound? or you are stuck with a hardware failure?
my MacBook charges the battery and powers on i dont hear a chime and it turns on but never starts
Citação de spi:
When changing the topcase remember to change the sticker with the serial also! This might be important when further service or bigger repairs by apples service are needed. The serial also helps you with identifying your MacBook!
How do you do it? I can't get it out
Superb guide thank you guys
This takes some nerves if there is no tab, but be confident and just prise the connector straight up.
Clips removal: its hard with finger to pull. It's better and easy off with a pry tool (I used a flat twiser) to pry from the bottom gently for each clips. It was so smooth and easy.
After I clean everything nice… put the cable back and DO NOT TURN ON. What the !&&* happens!? Ideias my friends? :(
Sorry my bad english!
Getting the upper-case/keyboard off was a bit nerve-wracking. Just work away at it carefully, bit by bit.
A small torch (flashlight for our American friends) was handy to see what was happening underneath the upper-case. Otherwise too dark.
I used a photographic lens-cleaning blower (with the rubber squeeze bulb, just the blower, no brush) to get away the dust. Probably not as effective as canned air, but it worked well enough. I’d recommend avoiding touching anything with the tip of the blower. Keep it a few mm away.
After removing the keyboard I noticed that the side clips were not attached to the body but rather to the keyboard still. Easily removed but something to note.
-
-
-
Use a spudger to disconnect the orange optical drive cable from the logic board.
You mean just pulling it up? I'm not sure about this step coz it's kinda stuck there hard.
Yes. The connector is similar to the keyboard connector.
-
-
-
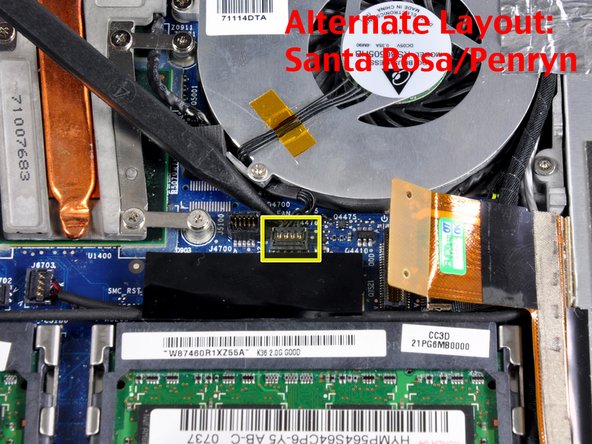
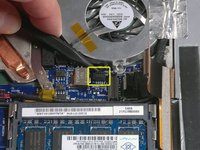
Use a spudger to disconnect the black fan connector from the logic board.
CAUTION! While gently disconnecting with the spudger, I popped the soldered connection off the logic board. It doesn't look like it is supposed to unplug. Now looking for a professional repair.
Any success with professional repair? I've done exactly the same thing - gutted I didn't read the comments first =( off to genius bar tomorrow but not sure they will be helpful!
I did the same thing on my 2007 (while prying the black fan connector free, popped the soldered bit off the logic board). So disappointed. My "quick repair" just turned into an expensive ordeal.
any luck? final cost? could they fix it at the mac store?
yup, did the same thing here - i broke the soldered bottom part of the connector off the logic board. i think the key to getting it off correctly is to use the spudger from the back to loosen the connector, where the wires are. if you use the spudger from the front, as i did, then it's easier to break the whole connector off -- or that's my guess at least.
looking now to see if i can solder it back by myself.. ;Z
broke the same thing on my 2007 macbook but i secured it with some adhesive...
http://www.ks-klebstoffe.de/pd-197277085...
although it was broken it works just great in the end without any problems! ;)
what type of adhesive is it, just any type of multipurpose glue? I'm in the states and don't want to import if I don't have to. I have thermal paste as well and wasn't sure if I could use that and not disrupt the connection. Did you put the glue on just surrounding areas or just directly over the connectors?
soundly -
Okay it seems a lot of us have had this thing break at this step. Any suggestions for how to fix it? The guide itself is a little remiss for not Cautioning how fragile this step is. The user who mentioned using an adhesive didn't give the exact name of what they used. But I think I tracked it down through the WayBack Machine. The product is "10 g K+S multi-purpose adhesive; 10 ml KS-Rapid accelerator; 2 fine dosing tip; 1 spare dripping tip." However, the main page and instructions are all in German.
-
-
-
Peel up the silver foil tape between the fan and the optical drive.
After i have repaired my macbook several times, this silver tape is getting quite raped.
What is the function of it?
Just to keep the cables under it in place or does it also play a role as a cable, to connect the optical drive with the fan?
Anyway, thanx a lot to the IFIXIT team. I do not only enjoy, to keep my thing running longer, i also enjoy repairing itself :-)
-
-
-
Remove the following 2 screws:
-
One 3 mm Phillips on the right side of the fan.
-
One 6 mm Phillips on the left side of the fan.
Great guide! It says to remove the 3 and 6mm screws with a phillips on this step but it doesn't say which phillips is the best size. I have 3! Is this an oversight or should we assume phillips #0? Thank you.
Right, edunph! The PH0 screwdriver firmly sticks in these screws, just perfectly to lift them.
-
-
-
Lift the fan and its attached mounting bracket up and out of the computer, being careful not to rip the black felt tape.
I got the old fan out without ripping the tape--the (really simple) trick is to start at one end and go reaaallly slowly--but i tore a little chunk out of it while trying to get the new one in. I would recommend using the spudger or something to hold the tape up while you put the new one in. A final step on removing/replacing the fan would be helpful for newbies like me.
Citação de javier FJ:
what is the important of the black tape, i failed too and im worried, what can i do?
It looks to me like it just keeps more of the fans' output from blowing back inside the laptop. I tore it too. I put it back as best I could and then covered the entire black tape with masking tape to seal the holes.
Citação de karllamberg:
It looks to me like it just keeps more of the fans' output from blowing back inside the laptop. I tore it too. I put it back as best I could and then covered the entire black tape with masking tape to seal the holes.
thanks for the tip man, i was misforgoten big thanks for ifix team, great work !
Very cool, thank you. I managed to clean my fan and removed like half a ton of brown dust. Ugly as &@*! because of the pretty smoky environment the book sometimes operates in ;)
I have just fired up half a dozen rather huge programs and the book runs just cool and calm again.
Thanks a million!
This was a fantastic guide and really helped a ton. I play World of Warcraft on my late 2006 MacBook and it recently got to the point where I couldn't play the game for more than a few minutes before the temp skyrocketed to over 190 degrees and the game became unplayable with constant stuttering. Now it runs cool and my framerates are fantastic again even in 25 man raids. Thanks iFixit!
Excellent guide. As long as you pay attention and keep everything organized you can't go wrong. Out with the old 2006 fan, in with the new 2010 one... Thanks a lot for the guide and for the fan (which, at around $80, seems a bit overpriced but hey, the MacBook's alive and kicking again).
This worked for me and seemed a lot easier as it requires a not so fine movement: once you unscrew the fan, don't remove it entirely; just pull it up enough so you have space to insert the new one but without having to remove it from the black tape. Install the new fan and the two screws and then, pull the old fan down and towards you slowly and as horizontal as you can; if you do it like this the same movement of removing the tape will also place it over the new fan, and in it's natural position. Then just a press with the finger to firmly stick it to the new fan and you are done!
-


To reassemble your device, follow these instructions in reverse order.
To reassemble your device, follow these instructions in reverse order.
Cancelar: não concluí este guia.
307 outras pessoas executaram este guia.

23Comentários do guia
My wife's MacBook has been overheating for some time, and then shutting itself down. Your instructions were great, but I did note that I needed to unscrew the cable tie near the speaker in Step 17.
The system had some dust in it, used the air can to spray it all out. Dust was on the heatsink vents, too. Closed it all up, and peak temps during a software install that crashed it three times yesterday was 145F - yesterday it was passing 170F and crashing.
Thanks for the instructions, ifixit!
Download and print out the PDF version of the repair guide. Tape the screws to their corresponding image in the guide so that you can't go wrong!
what a great idea! i've been thinking about a solution for organizing screws. that's genius!
Victoria -
Good Idea. I generally sketch up rough diagrams and putsmall pieces of double sided tapes and stick the screws on my drawing.
Very easy to do and the guides are spot on. Took me about 20 minutes to do and no hairy moments at all.
I recommend using an ice cube tray, and put the screws from each step in a different compartment as you go along. Not that there are that many screws but it makes life easy.
'Hardest' step for me was reconnecting the fan power plug, is quite small and I kept trying to put in on upside down..not so easy if you have big fingers.
Thanks for the guide! You've saved me from unscrewing many unnecessary screws and allowed me to perform this repair without damaging anything (except the brittle old felt tape, no way was that coming off, I used black photographers tape as a replacement). My 4 year old MB was making horrible noises, overheating and was almost unusable. I found an inexpensive fan on eBay ($13), and in less than half an hour it is running like new. I don't know what the quality is like compared to a part ordered from Apple, (only time will tell) but for now it is working great.
This was definitely a moderately complex do-it-yourself fix. As a 51 year old female, I am moderately mechanical and it took me an hour. I printed the instructions and the comments from users and used an ice cube tray for the screws. In Step 5, the two 14.5mm screws would not come out, so, like others have mentioned, I loosened them and left them in. In Step 11, I used a plastic flat pick to pry the cover off, it was hard near the on/off button on the top right but it did work after a while. I had no problems getting the cable connector nor the fan connectors off, but for both these items and the orange optical drive connector, it is critical to press them back firmly in place when re-assembling. In Step 18, a tweezer or bent nose plier are helpful. In Step 19, my black tape ripped so I used a piece of masking tape to hold everything together. Highly recommend getting the right screwdriver and something to blow the dust out of the case.
When I took the old fan out I saw significant build-up of dust on the left side (as seen in the pic of step 18. Blew it all out, cleaned up the heat sink and all other dust. BUT when I went to replace the 6 mm screw on the left, it would not seat into its threads. I had to take out the fan again to find out what was wrong: The threads had come loose from their housing, a plastic housing holding brass threads. The plastic had cracked and released the brass threads. I guess the overheating on that side due to the excess dust had caused it. Anyway, nothing to do but to clean out the pieces of plastic and remove the brass threads so it wouldn't rattle around inside the computer. I just left out the 6 mm screw and hoped that the one on the right and the 11 mm screw from step 5 would hold it well enough. So far seems to be good.
BTW, it was impossible to get the old fan out without tearing the black felt tape. I put it back as best as I could and sealed the tears with a piece of paper tape (first aid-type) (assuming that it should be non-conducting).
Hi, Thanks for the guide! I took the Macbook apart and the fan off for the sole purpose of spraying the computer free of dust from the inside. It's easy to dissassemble... as long as you're very organized with the screws. Lifting the tabs near the optical drive was difficult.
However putting it back together was kind of a bugger. The whole keyboard assembly sort of expanded and deformed a little bit, probably because of the heat/cold cycles. I had a hard time with the clips below the optical drive (I actually broke one), and fitting the screws back was a bit difficult. The computer seems to run a bit cooler, about 5 or 7º C below usual when idle.
Nevertheless, I succeeded, and left behind my fear to strip my compute to bare guts. Thank you iFixit.
Hi! I can't remove the screw in the middle with a Philis #00. Do you believe a #000 wold work better?
Just changed the fan in my 2007 MacBook and it's so quiet now. It was easy once I read the online instructions, then went to the Android ap on my cell phone and followed the guide step by step as I took the computer apart. I had taken it apart before to clean the fan, but these instructions were much better. The last part about the foam tape: mine would not lift off so I had to rip it along the edge and replaced it with blk. electrical tape. I also used a metal nail file instead of a spludger and it also worked well shifting wires out of the way without having a sharp edge to do damage. Will be looking into adding some speed to this laptop too. We'll see.
Thanks a bunch!
Ordered my fan yesterday it arrived today. Followed these steps it was so easy. My computer has been thru !@#$ and back a few times it's an early model 2009 MacBook and the fan started to sound like that jet so many have referred to would overheat and shutdown. I've never attempted to fix a computer so was a bit nervous but it was a fun project. Can't imagine how much I saved if I were to take it into a repair shop. Thanks for being so fast with delivery and the instructions! See if we can get a bit more life out of the Ol girl!!
I used your guide with success as soon as I received your used fan by mail. Your guide was easy to follow and to execute. I did the replacement in about half-hour. The noise still persists, but the heating and the consequent turn-off stopped. Is there anything that I might do to stop the noise? Is it the screws too tight? too loose?
UPDATE!!!
So after a short while, the fan accelerated and the noise just stopped!!! It's working great!!!!
I am not technically inclined, so I blocked my whole Saturday today for this (for me) big project. I made it a family fun time and my three older kids ages 8 through 5 helped. I made sure to go slow and label every screw and I am glad to report that I now have a very silent MacBook going strong after 10 years! :) Success would have not been possible without this very detailed guide and I thank you guys for it. Thanks, Alejandro.
My White Macbook (Mid 2009) was just too loud, no matter what I did, as if there was a small lawn mower is living inside the laptop. I suspected the CPU fan, so I followed this guide, and now everything is super-quiet! It turns out, I didn't have to replace the CPU fan. After disassembling everything, I took out the CPU fan. There were a lot of dust from years of neglect on the fan as well as the heat sink/air-flow area, and I cleaned as best as I could using Q-tips. There were clumps of black dusts. I also cleaned the inside of the fan, since it was very easy to disassemble. After removing all the dust and cleaning, I put everything back together.
Now, it's like night and day. I can't even hear the fan, even if I tried. What a change. It brought my Macbook from dead. . Thank you, iFixit, for such a thorough guide for repair.
cleaning the fan rather than changing it: great tip, thanks!
oluc -
I had a very noisy rattling fan, with probably the fan impeller rubbing against the fan housing.
I removed all the accumulated dust in the laptop. I also opened the fan (two small screws), cleaned the fan impeller. After that it was still rattling. I lubricated the fan axis (with WD40 silicon formula, though I guess any lubricant would do).
Now my fan is silent as if it was new.
(I guess dust and dirt accumulated on the axis, and was unbalancing the fan impeller, then rubbing its housing)
I used this guide plus the Thermal Paste guide to resolve my MacBook RRS (Random Restart Syndrome) issue. My MacBook would randomly restart after the fan kicked into high speed. When I removed the heatsink I discovered an an irregular patch completely free of thermal compound of about 15-20% of the area on one of the processors. I removed and re-applied the thermal paste. I ran a memory test utility overnight that previously caused a restart after a couple of hours, and the probelm seems to be solved. TIme will tell.
ServiceDocs - Responder
This guide was seriously helpful, so thanks for putting this together. I found a thick ribbon of dust/muck whatever between the fan outlet and the exhaust port that was almost as dense as felt. My fan must have been fighting like crazy trying to pass air through that blockage, which explains the high temps and excessive fan noise. Wish I'd done this sooner...
Thanks again!
skraggle - Responder
Just R&R'ed the fan in my black MacBook Core 2 Duo tonight. Took me 30 minutes tops and I was taking my time. These instructions are SPOT ON! Great job ifixit.com! Two thumbs up!
Follow the instructions exactly as you see and have a piece of paper taped to the table next to you that you can outline all the screws you took out so you know where they go back in. I expected this to be a LOT harder, but it was one of the simplest repairs I've ever done to ANY computer!
mikeutter - Responder
Piece of cake--or should I say gum. If you don't have a magnetized screwdriver, load up a stick of gum and chomp on it until it's needed then use a bit to retain screw on the driver. And if you should tear the black tape, or if the silver tape won't stick any more, just bubblegum it together. The instructions were clear and correct, which made for a very simple repair.
Mike Woodruff - Responder
My battery does not pop out when after step 1. Any idea why, and how do fix it?
Calvin - Responder
Will not drop out even if you turn it upside down?
skraggle - Responder
Somehow, now my isight camera doesn't work and the light is always on. Cannot figure out what I did wrong.
josefsalyer - Responder
Somehow the plastic disc with the slot for a coin got dislodged from the case, and I can't seem to get it open now. Any tips/links on how to open this without the aid of the plastic disc?
Peter Wood - Responder
i broke my disc off as well. I used two toothpicks to rotate the thing. hi tech.
howard bederman -
Outstanding guide - thank you!
owen bullock - Responder
My computer will not charge when plugged in. It will stay on as ling as the plug is in the wall however if the power source gets disconnected it will shut down immediately. I removed the battery and put it back in that did not help. It worked and charged fine 2 days ago. I have a backpack with a laptop storage area. I went to hang the backpack up and it fell and ever since the battery is not functioning. Is there some fix I can try or is my only solution to replace it? I would have thought that dropping it would affect more than the battery?
Beth Tomasek - Responder
Better leave the back pack where it cannot fall. Hindsight is so much better than foresight . I learned the hard way too!
Loy Lum - Responder
Many of the tiny screws in this project were quite sticky. I found some blue Loctite residue that must have been when the Apple repair shop worked on the laptop years ago. I have found that it is important to hold the correct driver firmly down in the screw and then just tweak the driver in short bursts to loosen it before unscrewing it with a smooth turn.
Patrick Langvardt - Responder
Be really careful while doing this to not use too much force while doing this step, because the plastic disc can break off and it can be a cosmetic issue along with functionality issue. This happened to me first hand so please take my word for it…
[deleted] - Responder
Probably worth mentioning at this stage that the caddy you propose to use should not have lugs on the front corners, like those used in unibody 1278 and onwards.
harwood - Responder
Hehe, still my mac os running! After, already bit more than 10 years of use!
I put new heat paste now for the second time. Maybe this helped for staying young so long.
Thanx for all the repair guides!!!
Fabien - Responder