Ir para o conteúdo principal
KitchenAid KSM150PSER Speed Control Plate Replacement

KitchenAid KSM150PSER Speed Control Plate Replacement

Richa Gadgil

Richa Gadgil e 3 outros colaboradores

Última atualização em September 23, 2024

25 minutos
Moderado

Introdução

Ir para o passo 1

Your device power could be malfunctioning because of a faulty speed control plate. Learn how to access it with this guide.

O que você precisa

A iFixit ganha comissão quando você compra por estes links.
  1. KitchenAid KSM150PSER Speed Control Plate Replacement, Speed Control Plate: passo 1, imagem 1 %32 KitchenAid KSM150PSER Speed Control Plate Replacement, Speed Control Plate: passo 1, imagem 2 %32
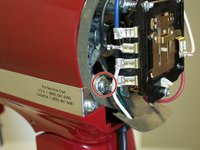
    • Using a Phillips #2 screwdriver, remove the 10mm screw on the back cover by rotating it counterclockwise.

    • The back cover is now free. Remove it by pulling back and up on the cover.

  2. KitchenAid KSM150PSER Speed Control Plate Replacement: passo 2, imagem 1 %32 KitchenAid KSM150PSER Speed Control Plate Replacement: passo 2, imagem 2 %32 KitchenAid KSM150PSER Speed Control Plate Replacement: passo 2, imagem 3 %32
    • Using a Phillips #2 screwdriver, remove the 5mm screws holding the trimband to the top housing by rotating them counterclockwise.

    • Pull the trimband off the housing by grabbing each side and pulling it off the front.

  3. KitchenAid KSM150PSER Speed Control Plate Replacement: passo 3, imagem 1 %32 KitchenAid KSM150PSER Speed Control Plate Replacement: passo 3, imagem 2 %32 KitchenAid KSM150PSER Speed Control Plate Replacement: passo 3, imagem 3 %32
    Ferramenta utilizada neste passo:
    Tweezers
    $4.99
    • Using a Phillips #2 screwdriver, remove the 12mm screw by holding the grounding wire in place and rotating it counterclockwise.

    • Using pliers or tweezers, remove the connectors attached to the speed control plate.

  4. KitchenAid KSM150PSER Speed Control Plate Replacement: passo 4, imagem 1 %32 KitchenAid KSM150PSER Speed Control Plate Replacement: passo 4, imagem 2 %32
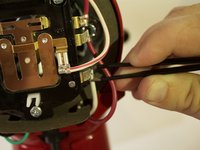
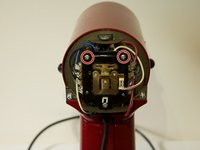
    • Remove the seal from the back of the mixer. Then unhook the spring from the bottom of the speed control plate by using tweezers and pulling it back and out of the plate.

    • Take a rag or towel and hook the spring on the towel so that the hook doesn’t spring back inside the mixer.

    Guten Tag!
    Wenn die Feder ins innere der Maschine zurück gesprungen ist,

    gibt es eine Anleitung, um sie wieder funktionstüchtig zu machen??????
    Vielen Dank für eine Info!

    Raffiraffi - Responder

    @raffiraffi Ich fürchte, dass die Haube nach oben weg muss. Wahrscheinlich geht das ganz ähnlich, wie bei diesem Modell.

    VauWeh -

  5. KitchenAid KSM150PSER Speed Control Plate Replacement: passo 5, imagem 1 %32 KitchenAid KSM150PSER Speed Control Plate Replacement: passo 5, imagem 2 %32
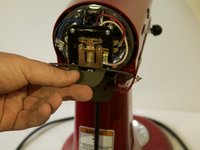
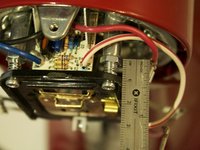
    • Using a Phillips #2 screwdriver, remove the two adjustment screws by rotating them counterclockwise.

    • Before beginning to remove the screws, use a ruler and measure how far the screws are in. These screws determine the speed of the mixer, and not screwing them back in to the same position will change the speed of the mixer.

    What is the default measurement for the screws? I didn’t know I had to do this and already messed around with the screws.

    Nicole Jensen - Responder

    Problem was that lever would not stay in off position without finger pressure and motor would run as soon as plugged in. In shifting the lever,I noticed a slight variation in the grey fork gizmo that protrudes above the bottom screw. That screw protruded 9/32”. I tightened it to 6/32’ and lever turns off the motor.

    David L Kline - Responder

  6. KitchenAid KSM150PSER Speed Control Plate Replacement: passo 6, imagem 1 %32
    • The control plate can now be removed by pulling back on the plate.

Conclusão

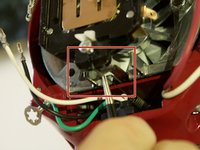
To reassemble your device, follow these instructions in reverse order.

9 outras pessoas executaram este guia.

Richa Gadgil

Membro desde: 01/24/18

331 Reputação

Autoria de 1 guia

Equipe

Cal Poly, Team S2-G5, Livingston Winter 2018 Membro de Cal Poly, Team S2-G5, Livingston Winter 2018

CPSU-LIVINGSTON-W18S2G5

4 Membros

Autoria de 11 guias

1Comentário do guia

Thanks for this, but a quick question, when the mixer is switched off, the metal bar on the back of the speed plate at the bottom, is that supposed to rest on the two prongs that stick out towards the bottom of the inside of the mixer? Thanks.

Mark R (dflipb) - Responder

Comentar

Visualizações:

Últimas 24 horas: 3

Últimos 7 dias: 32

Últimos 30 dias: 223

Ao todo: 21,215