
Meta Quest 2 Controller Joystick Replacement

Introdução
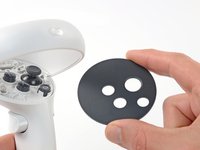
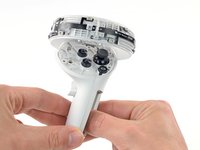
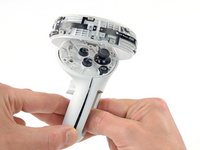
Ir para o passo 1This guide shows how to remove and replace a drifting or broken joystick (aka thumbstick) for your Meta Quest 2 controller.
If you're experiencing controller drift, or your joystick isn't responsive, you'll likely need to replace the joystick.
The joystick is nested behind the controller board, requiring you to disassemble the entire controller to access it.
This guide is written with the right controller. If you're repairing the left controller, you can still use this guide, as the procedure is identical.
O que você precisa


-
-
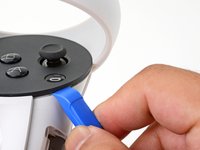
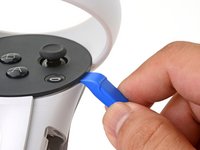
Use your fingers to slide the battery cover down towards the strap end of the controller.
-
Remove the battery cover.
-
-
-
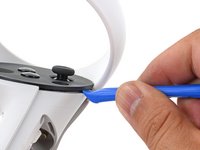
Use your fingers to grasp the wrist strap near the anchor peg.
-
Lift the wrist strap anchor peg straight out of its recess.
-
Remove the wrist strap.
-
-
-
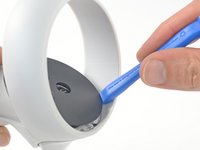
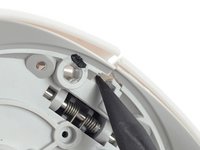
Heat an iOpener and apply it to the bottom edge of the controller faceplate for a minute.
-
-
-
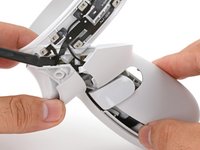
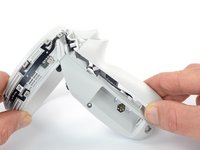
The controller faceplate is secured with adhesive and three friction pegs.
-
Press the edge of an opening tool into the seam between the controller faceplate and shell, near the Oculus button.
-
Slide the opening tool to the base of the ring shell to loosen the adhesive.
-
-
-
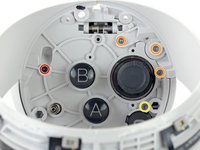
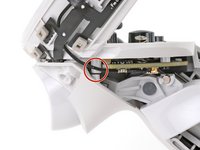
Use a Torx T5 driver to remove the four screws securing the controller ring shell to the controller:
-
Two 4.7 mm‑long screws
-
Two 5.9 mm‑long screws
those top screws in red are in very tight, and at an angle that prevents using a long screwdriver. I've found the only way I could get them out is using a bit, held down by my finger at the appropriate angle, while turning it with pliers.
I wasn't able to remove the screws in red with a T5 bit, but switching to a T4 bit did the trick for me
same, used T4 instead
Can also confirm, T4 is a good fit and doesn't feel like it might damage the screw or bit like T5 did.
-
-
-
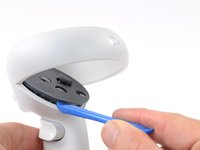
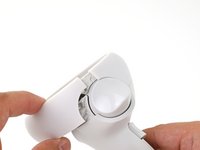
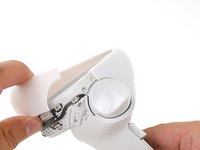
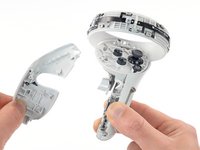
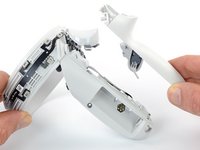
Use your fingers to grab the end of the ring shell that doesn’t have the white alignment square.
-
Gently lift the ring shell up and away from the controller to unclip it from the controller.
-
Remove the controller ring shell.
-
-
-
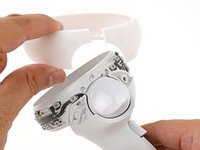
Use a Torx T5 driver to remove the five screws:
-
One 11.5 mm‑long screw
-
Three 5.9 mm‑long screws
-
One 18.2 mm‑long screw
-
-
Ferramenta utilizada neste passo:Tweezers$4.99
-
Use tweezers and your fingers to peel the battery information label out from the battery compartment.
-
-
-
-
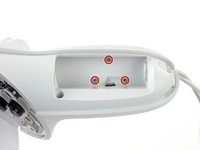
Use a Torx T5 driver to remove the four 5.9 mm‑long screws securing the side shell to the controller:
-
Three screws inside the battery compartment
-
One screw near the corner of the battery compartment
-
-
-
Guide the looped part of the side shell through the screw post gap.
-
Remove the side shell.
im having trouble on this part when i assemble this part the grip button get stuck and refuses to come back out unless i loosen up the side shell.
-
-
-
Spread the screw post wide enough to loop the side shell back around it.
-
Be careful not to pinch the antenna cable or the tracking flex cable as you reposition the side shell.
-
-
-
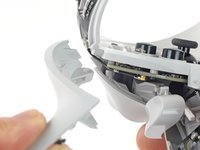
Use a spudger or an opening pick to gently pry the shell from the battery compartment side first.
-
Once it pops open, turn the controller over to remove the front shell.
-
-
-
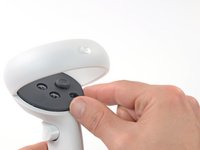
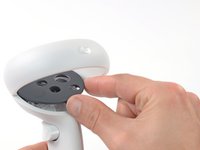
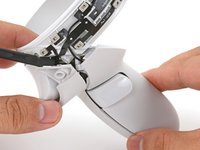
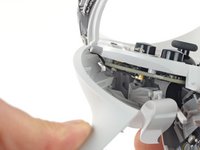
Grasp the front shell near the bottom of the controller.
-
Lift and pull the bottom edge of the front shell outwards slightly to clear the plastic alignment peg.
Note: Clearing the alignment peg should not be difficult if you open the cover from the other side first as shown in my edit.
Thanks Seby for your contribution! I've formatted the steps a little to include your step.
-
-
-
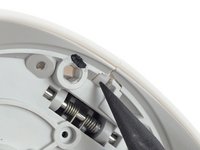
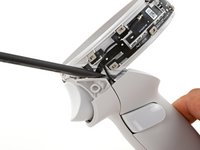
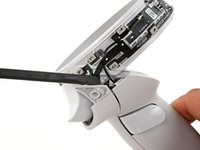
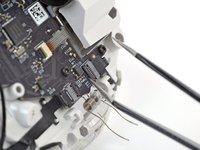
Use a driver bit (such as the Torx T5) or the point of a spudger to push the front trigger pin out from the side shown. Pushing from the opposite side can cause the pin to rip the sensor cable.
The pressure required to remove this pin is a ton, and I have sadly now had to learn that the force needed can exceed the tolerance of critical board components. There is a community made tutorial from ages ago that, while admittedly more tedious, circumvents this entire step. Oculus Quest 2 Controller Disassembly . I am incredibly frustrated that this tutorial doesn't even mention the risk the step poses to the controller. Granted, the tolerances of the spring holding the pin in place may vary so the original author's force required may have been much different.
-
-
Ferramenta utilizada neste passo:Tweezers$4.99
-
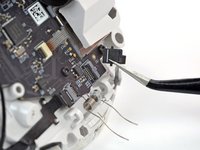
Hold the front trigger with your finger to prevent the trigger from flying out.
-
Use tweezers or your fingers to pull the trigger pin out.
You might need to push it a bit to get enough grip with the tweezers first. But be very careful to not push it towards the left (towards the flatcable) because it will go right through that flatcable if you're not careful. So push it from the flatcable side in the other direction. The torx screwdriver you've been using works fine for that purpose.
When pushing it back in, also make sure you don't push it too far towards the flatcable again. Mine slipped and it almost broke.
-
-
Ferramenta utilizada neste passo:Tweezers$4.99
-
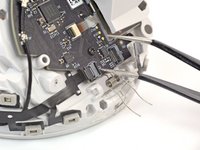
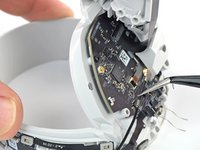
Use a clean fingernail or tweezers to flip up the ZIF socket's lock bar securing the outer tracking flex cable.
-
-
-
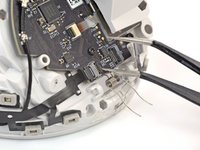
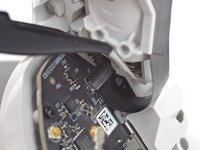
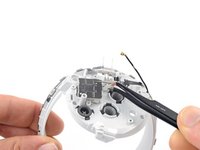
Insert one arm of a pair of tweezers under the metal neck of the antenna cable.
-
Pry straight up to disconnect the antenna from the controller board.
-
Gently pull the antenna to unclip it from its grounding clip.
-
-
-
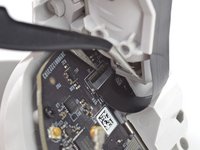
Use a clean fingernail or tweezers to unlock and disconnect the interconnect flex cable from its ZIF socket.
-
-
-
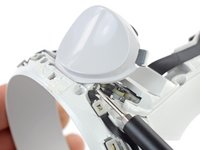
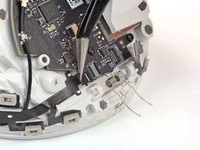
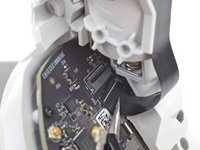
Use your fingers to twist the battery shell slightly so that its edge near the thumbstick clicks out of place.
-
-
-
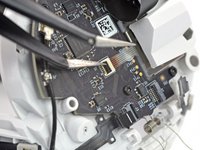
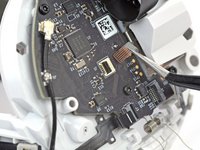
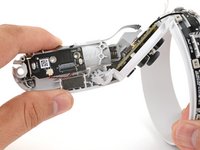
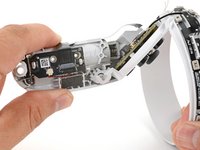
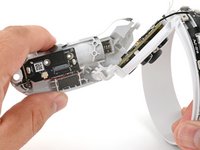
Use a Torx T5 driver to remove the four 7.5 mm‑long screws securing the controller board.
-
-
-
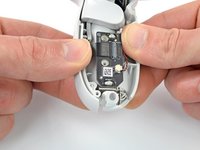
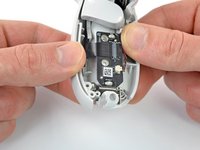
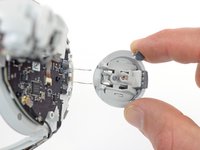
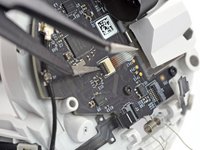
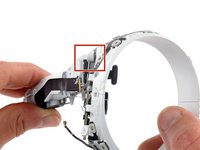
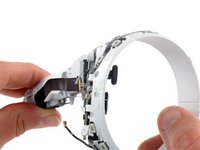
Use your fingers to lift the controller board out of the shell and remove it.
If the joystick spring came out during disassembly - make sure to put it back under the board before screwing it in!
-
-
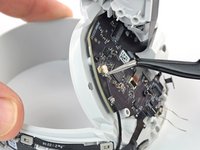
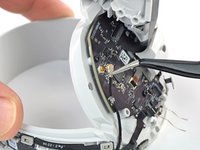
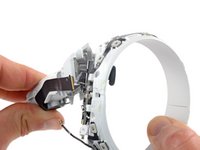
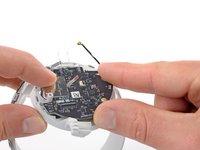
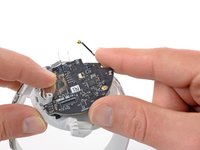
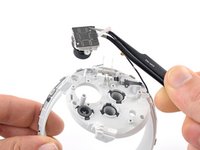
Ferramenta utilizada neste passo:Tweezers$4.99
-
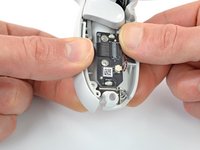
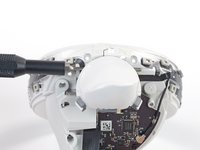
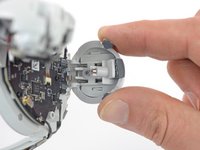
Use your fingers or tweezers to remove the joystick.
Make sure that you transfer the spring from the old joystick to the new one if the ones you buy don't come with a spring
How do remove the joystick cap and spring?
I just removed the spring
-


To reassemble your device, follow these instructions in reverse order.
Take your e-waste to an R2 or e-Stewards certified recycler.
Repair didn’t go as planned? Try some basic troubleshooting, or ask our Answers community for help.
To reassemble your device, follow these instructions in reverse order.
Take your e-waste to an R2 or e-Stewards certified recycler.
Repair didn’t go as planned? Try some basic troubleshooting, or ask our Answers community for help.
Cancelar: não concluí este guia.
29 outras pessoas executaram este guia.


10Comentários do guia
When replacing the joystick, make sure you place the metal cover on the right side, the joystick goes under the circuit board, and make sure the little metal flap is bent enough, also make sure the screws are tight.
id recommend this video so you get more what i mean, although it doesn't show exactly that i mean.
https://youtu.be/kQ2-XYEbOKY?t=98
otherwise you wont have the touch pad on the joystick, it'll still work good, just no sensing if you have your finger on it
You dont need to remove the pin/take of the tigger, if youre carful and paitent
id say its safer to leave it in
Can confirm. I looked at this guide before looking at any videos (all of which do not take the trigger out) and I must have bent the pin/spring when putting it back in because my trigger won't go back up now. I also broke the front shell alignment peg when going back to try to try again. Please update this guide so this doesn't happen to anyone else.
thank you for the guide, i am yet to do it, why is the anolog the first last thing to come out when they are notorious to breaking
I know right, seriously this is one of the worst repair jobs I've done lately.
T-S -
Nooooo! I did everything perfectly but once I reached step 11 going backward for re-assembly I read the first two bullet points and for some stupid reason assumed it was going in Longest --> shortest screw length, Ughhh was rushing through it thinking this was the easy part!
I stupidly tried the 18mm in the 11mm and it broke off, no chance of ever removing that...
Put everything back together anyway and it works quite well even with those both missing, only issue is the buttons sit a little lower then normal and the touch sensitivity is not perfect for light touching. This is not used in any games I play so I'll likely leave it as is for now. Still infinitely better than with drift but that is annoying.
Anyway, the guide is extremely good, just don't be like me and read the instructions carefully and you will be fine. I Actually started off with a video teardown and then switched to this as this was more clear.
What I always do is putting some duck tape upside down (sticky tape up, with the edges folded down) on the table, drawing an outline of the part I'm working on, and sticking each screw in the drawing where it came from. This way you will keep each screw exactly in the same hole it came from and you don't have to figure out which is which.
This can be especially dangerous in phones, there was a screw in the iPhone 5S where if you put a 1mm too long screw in the wrong hole you would grind out the motherboard underneath and break it forever :(
Now, lately this is less needed because a lot of vendors have been smart enough to use pretty much the same screws everywhere, not just simplifying their repairs but also their SKUs for manufacturing. Unfortunately, meta is clearly not one of those. Neither is Nintendo for that matter, I've never seen as many different screws in the same device.
T-S -
This guide is excellent. My son had been bugging me for a while to address the issue of drift on his controllers. I tried cleaning them and it wasn't quite enough to resolve it. I looked at joystick replacement but was a little intimidated but the complexity. This guide helped me through and I replaced both joysitcks in under and hours each. Well done on the guide.
Wow this was such a pig of a job....
How to tell me you want me to buy a new 79 euro controller without telling me you want me to buy a new 79 euro controller.
PS: Make sure you test the new stick before reassembly. My first one only worked in the bottom half of the circle somehow. I did a quick test to see if it responded but didn't check the full range of motion. Luckily my $10 kit came with 2 sticks and the other one worked fine.
T-S -