
Lenovo IdeaPad Gaming 3 15IMH05 SSD Replacement

Introdução
Ir para o passo 1Use this guide to upgrade or replace the M.2 solid-state drive (SSD) in a Lenovo IdeaPad Gaming 3 15IMH05 laptop. This laptop is only compatible with NVME SSDs, and is therefore not compatible with SATA SSDs.
Before you perform this repair, back up your existing SSD if possible. If you are replacing the SSD where your operating system is installed, familiarize yourself with a disk cloning utility so you’ll be ready to migrate your data to the new SSD.
Finally, be sure to completely power off and unplug your laptop. Make sure the laptop is not in standby, sleep, or hibernation mode.
O que você precisa
Kits de conserto
Estes kits contêm todas as peças e ferramentas necessárias para executar este guia.


Peças


Ferramentas


Exibir mais…
-
-
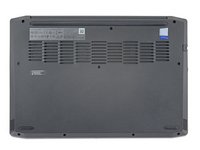
Use a Phillips #1 screwdriver to remove the following ten screws securing the back cover to the frame:
-
Six 7.6 mm PH1 screws
-
Four 5.7 mm PH1 screws
-
-
-
Insert the rounded edge of an opening pick between the back cover and the frame in the lower right corner.
-
-
-
Angle the pick to about 45˚.
-
Slide the pick along the front edge to release the clips securing the back cover to the frame.
-
-
-
Insert the rounded edge of an opening pick between the back cover and the frame on the right edge.
-
Angle the pick to about 30˚ and slide down the right edge to release the clips.
-
-
-
Repeat the same procedure on the left edge to release the clips.
-
-
-
Use the pointed edge of a spudger to push each side of the battery connector to loosen it.
-
-
-
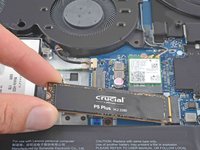
Use a Phillips #1 screwdriver to remove the 3.3 mm screw securing the SSD to the motherboard.
Hi Daniel,
The M.2 SSD screw is a 3.3 mm long PH1 screw. -
-
-
Grip the edges of the SSD near the screw indent.
-
Gently pull to remove the SSD.
-


To reassemble your device, follow these instructions in reverse order.
Take your e-waste to an R2 or e-Stewards certified recycler.
Repair didn’t go as planned? Try some basic troubleshooting, or ask our Lenovo IdeaPad answers community for help.
To reassemble your device, follow these instructions in reverse order.
Take your e-waste to an R2 or e-Stewards certified recycler.
Repair didn’t go as planned? Try some basic troubleshooting, or ask our Lenovo IdeaPad answers community for help.
Cancelar: não concluí este guia.
5 outras pessoas executaram este guia.

Equipe

10Comentários do guia
perfect explanation, operation worked like a charm.
same doubt...
Aldrin -
is it possible ? help us AND THANKS FOR ALL.
It is possible, as I'm in the process of doing it. The original M2.NVME is a short one, I began by removing it as I could see the original short screw stand off could be unscrewed, leaving one for the standard longer length M2 drives. I thought I'll put the short M2 drive in the 2nd slot (higher up) but then noticed that stand-off wasn't in the right place either. Then I noticed the unused higher up slot stand-off could be slid right, removed and there was the same clamp system to the left where the stand-off could be resituated.
I now have 2 M2.NVME drives in, cloned the smaller to the larger and can format the 2nd if I want.
Can I use 2 M.2 SSDs drives altogether with my original 1TB HDD.I've already tried this many times but unfortunately I always fail. The new SSD m.2 2280 either is not detected or has errors such as name and size change! Thanks
Hola, necesito cambiar el disco duro hdd ya que se arruino, sabes si puedo cambiarlo por un disco duro ssd? este debe ser sata?
it is possible than you can do the same steps for 15ACH6?
Hi allan, we've written SSD replacement guides for the Legion 5 15ACH6H. It's a different model than the 15ACH6 and there may be some minor visual discrepancies but the procedure is the same.
u can add another nvme ssd but short one the nvme m.2 2240 ssd will work
and u dont need to remove the hardrive or the present ssd