
How to Remove a Stripped Screw

Introdução
Ir para o passo 1Stripped screws are a nightmare for any repair enthusiast. Try as you might, some screws just do not want to come out. Frustration takes over and before you know it, that once "+" shape has turned into a "O". Never fear; we've got your back. This guide will walk you through how to use a rotary tool to remove a stripped screw by cutting a small slit in the screw head, allowing you to remove the screw with a flathead screwdriver.
Techniques:
Always wear safety goggles when using a rotary tool to prevent injury from debris or sparks.
O que você precisa
Ferramentas


Exibir mais…
Vídeo de Apresentação
-
-
Your screw is stripped, and your screwdriver is no longer sufficient. Before busting out the heavy hitters, try the following:
-
Use different screwdrivers. First try slightly smaller or larger head sizes, then a flat head screwdriver, to see if you can get it to catch on some part of the stripped screw.
-
If either of these techniques are fruitful, congrats! Your screw is free.
-
-
-
Stretch a rubber band over the stripped screw.
-
Insert a properly-sized screwdriver, and give it a turn.
-
-
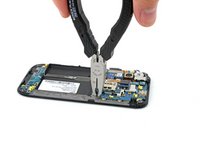
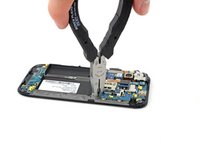
Ferramenta utilizada neste passo:Screw Extracting Pliers$19.99
-
If the screw head is accessible, try a pair of screw extracting pliers. If you can get a good grip, turn the pliers and the screw should turn along with it!
-
Once the screw is loosened a bit, you can probably back it out the rest of the way using a screwdriver.
-
-
-
Still stuck? Try adding a dab of superglue to the top of the screw.
-
Set your driver into the screw head, and allow the glue to dry.
-
Using a firm grip and downward pressure, give the driver a twist to remove the screw.
-
-
-
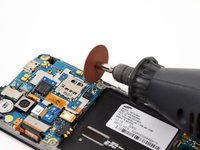
Attach a thin cutting disk to your rotary tool. Before you cut anything, make sure the disk is secured well.
-
-
-
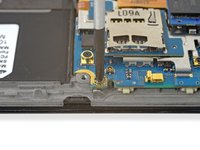
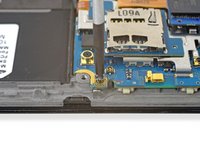
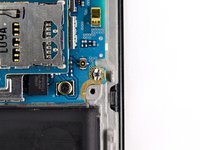
Use a flathead screwdriver to remove the screw from the device.
-
The size of the driver will depend on the size of the screw, but use the largest size that will fit in your cut.
One technique that wasn't covered here but has worked wonders for me is to use a small dab of hot glue and hold the bit in it until hardened. The hot glue grabs any small imperfections and of course forms perfectly around the bit. A drop of oil in the treads helps too for tough cases. It works for basically any type of screw (even one you don't have quite the right size bit for). The downside is it's a bit tedious to do if there are many damaged screws. That's when it's time to invest in a proper damaged screw bit like shown here geometry dash 2.2
-


Check out the video in the intro for some additional tips on dealing with stripped screws. Always use a high-quality screwdriver. Low-quality screwdriver material will cause damage to screws.
Check out the video in the intro for some additional tips on dealing with stripped screws. Always use a high-quality screwdriver. Low-quality screwdriver material will cause damage to screws.
Cancelar: não concluí este guia.
265 outras pessoas executaram este guia.
Gear Up For Future Repairs
Shop all


19Comentários do guia
This isn't helpful. If you can't afford a decent screwdriver in the first place chances are you won't have a rotary tool handy? maybe think of something a bit more practical.
OR many you're repairing something with a screw that's already been stripped?
Think outside the box, and don't be so negative.
Uh, there are a number of options here, the rotary tool is given as the last resort.
Marama -
It’s very helpful for me when I repair items that have been badly repaired by other people.
If you can’t afford a decent repair tool set, you should’t be doing any repairs at first place! The aftermath will become a nightmare to fix for anyone with good tools.
You could also try Bit-Biter. The unique formula multiplies friction between a slipping driver and fastener head, creating enhanced gripping power during installation and removal processes. Stripped, rusted, or damaged fasteners and drivers become workable again! http://bit.ly/19PJn3w
The link has changed if you wanted to try Bit-Biter http://bit.ly/1nMo35w we updated our website and the previous link does not work. www.tectorius.com
Jeanne -
Try a product called ScrewXtreme, it repairs these in seconds, www.gordushinha.com for more info
thanks for the great ED guide line i got married and my friend used one guide from http://theedreverserreviews.com/ but i will try you words :)
I am trying to replace a breaker for my A/C and I can't get the screws that hold the wires in the old breaker. I think both of them are stripped. I bought a cordless drill this morning on the way to work and it is charging now but if it doesn't work I am wondering if I have to have these screws out to get the breaker out. It seems like the screws are holding the breaker in as well as holding the wires in the breaker. I am asking because if they are not holding the breaker in the panel then would it be possible to take the breaker out and cut the wires off close to the breaker and peel down the insulation and put them in the new breaker? This is Houston, mid-March, it's getting hot! HELP!
sheet metal screws - https://www.fastenere.com/
If you don’t have rotary tools, a hacksaw still always works.
Thank you. The super glue did the trick. Much appreciated.
Thank you. The super glue did the the trick. Much appreciated.
In order to change the module, you must first identify which module needs to be changed. Once you have identified the module, you need to access the module's settings. To do this, go to the "Modules" tab, and then click on the "Settings" button for the desired module. In the module's settings window, there will be a drop-down menu labeled "Module Mode." Select the "Change Module" option from this menu. Finally, select the new module that you want to use from the list of available modules and click on the "OK" button.