Ir para o conteúdo principal
Participe da comunidade de reparos - Criar conta
Desktop PC Front Fan Replacement

Desktop PC Front Fan Replacement

David Lennon

David Lennon e 4 outros colaboradores

Última atualização em 24 de dez de 2023

10 - 15 minutos
Fácil

Introdução

Ir para o passo 1

Internal fans keep a computer at a stable temperature while operating. A faulty fan can cause a computer to overheat. It is important that all fans are in working order. Replacing a fan is an important skill for desktop PC users.

O que você precisa

Ferramentas

  1. Desktop PC Front Fan Replacement, Left Panel: passo 1, imagem 1 %32
    • Unplug the computer from the power supply before any maintenance or disassembly.

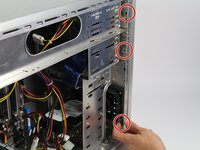
    • Remove the two Phillips #2 head 5mm screws from the back side of the computer case. You only need to remove the screws that hold down the panel.

    • These screws can usually be removed by hand.

    • Be sure to wear an anti-static bracelet or use an anti-static mat to ensure important components are not damaged by static electricity.

    This depends on the model of system. Some systems have a lever/latch to pull to release the cover. Many Dell and HP models use latches to open the covers (no tools required to open the system). Some systems need a screwdriver to remove the screws. Some are Phillips screws, others may be Torx.

    Dave Ellefson - Responder

    This is correct.

    DistroHopper39B -

  2. Desktop PC Front Fan Replacement: passo 2, imagem 1 %32 Desktop PC Front Fan Replacement: passo 2, imagem 2 %32
    • Next, remove the side panel of the computer case to allow access into the computer. Slide the panel towards the back of the computer and lift it up to remove.

    • If there is a fan mounted on the side panel, make sure to unplug the cable before fully removing the panel.

  3. Desktop PC Front Fan Replacement, Front Fan: passo 3, imagem 1 %32 Desktop PC Front Fan Replacement, Front Fan: passo 3, imagem 2 %32
    • Push to unlatch three grey connectors on the front panel.

  4. Desktop PC Front Fan Replacement: passo 4, imagem 1 %32
    • Disconnect the front panel from the computer face.

  5. Desktop PC Front Fan Replacement: passo 5, imagem 1 %32
    • Remove four Phillips #2 head, 5mm screws holding in the fan.

  6. Desktop PC Front Fan Replacement: passo 6, imagem 1 %32
    • Slide the fan out from the side of the casing.

  7. Desktop PC Front Fan Replacement: passo 7, imagem 1 %32
    • Disconnect the power cable from the fan.

Conclusão

To reassemble your device, follow these instructions in reverse order.

39 outras pessoas executaram este guia.

Gear Up For Future Repairs

Shop all

David Lennon

Membro desde: 04/14/15

10.126 Reputação

Autoria de 10 guias

Equipe

Cal Poly, Team 4-5, Maness Spring 2015 Membro de Cal Poly, Team 4-5, Maness Spring 2015

CPSU-MANESS-S15S4G5

4 Membros

Autoria de 45 guias

1Comentário do guia

My two bottom connecters holding the face of my pc case have screws in them. Problem is that I can't fit a screw driver in the gaps to remove the screws! Any tips?

Jimmy Jam - Responder

Comentar

Visualizações:

Últimas 24 horas: 4

Últimos 7 dias: 25

Últimos 30 dias: 131

Ao todo: 29,675