Introdução
The iPhone 8 Plus home “button” is actually a solid-state sensor, which also includes Touch ID (fingerprint recognition) capability.
Most replacement home buttons won’t work, so check carefully before starting your repair. Your iPhone’s original home button is uniquely paired to the logic board at the factory—and without Apple’s proprietary calibration process, even a genuine replacement home button from another iPhone won’t work. To fix a broken home button, you should install a specially-made, universal-style home button. Note that these replacements only work as a button; Touch ID will not function.
If you are only replacing a broken screen, you can use this guide to carefully remove and transfer your working original home button to a new screen, preserving all functions, including Touch ID.
During this procedure, to avoid accidentally straining or tearing the display cables, it's best to completely detach the display assembly before beginning repairs on the home/Touch ID sensor. But if you are comfortable doing so, you may skip the display assembly section of this guide and go straight to the home/Touch ID sensor section.
O que você precisa
-
-
Power off your iPhone before beginning disassembly.
-
Remove the two 3.5 mm pentalobe screws from the bottom edge of the iPhone.
-
-
-
Measure 3 mm from the tip and mark the opening pick with a permanent marker.
Got to step 2 and realized the fix kit doesn't include an opening pick! Looks like a guitar pick, and I have those lying around. Is that expected? Looks like the pick is used in many steps below. There's a little blue crowbar that isn't mentioned in the instructions. Perhaps that replaces the opening pick?
Hi! I can't see which guide you were using when writing this comment. Can you reply here with which guide and fix kit you used?
I see you posted this in Meta. I hope it's resolved soon! In the meantime, a guitar pick may work well enough for your repair.
what fix kit?
My fix kit didn't include an opening pick either
My AliExpress refurbished screen came with a pick that has a coin-like circle that pops out, so no modification was necessary
-
-
-
Lay overlapping strips of clear packing tape over the iPhone's screen until the whole face is covered.
-
If you can't get the suction cup to stick in the next few steps, fold a strong piece of tape (such as duct tape) into a handle and lift the screen with that instead.
-
-
-
Pull the blue handle backwards to unlock the Anti-Clamp's arms.
-
Slide the arms over either the left or right edge of your iPhone.
-
Position the suction cups near the bottom edge of the iPhone just above the home button—one on the front, and one on the back.
-
Squeeze the cups together to apply suction to the desired area.
-
-
-
Heat an iOpener and thread it through the arms of the Anti-Clamp.
-
Fold the iOpener so it lays on the bottom edge of the iPhone.
-
Wait one minute to give the adhesive a chance to release and present an opening gap.
-
Insert an opening pick under the screen when the Anti-Clamp creates a large enough gap.
-
Skip the next three steps.
-
-
-
Use a hairdryer or prepare an iOpener and apply it to the lower edge of the iPhone for about 90 seconds in order to soften up the adhesive underneath.
6/14/23 I did this repair but used a heat gun on low for 60 seconds. This allowed me to open the case as the instructions say, but in the end the Home button failed. I probably over heated it. I used this "go around" for a virtual Home button. I don't care about touch ID:
-
-
-
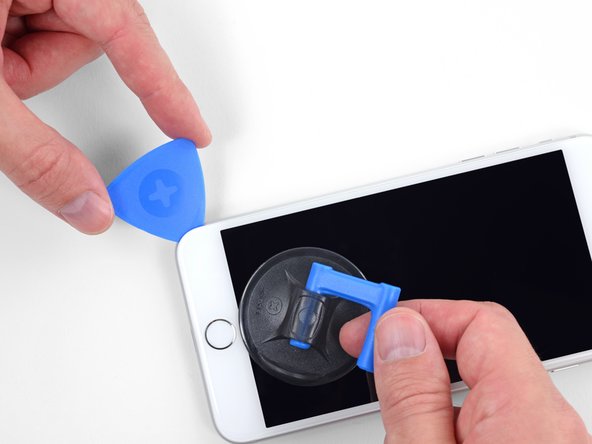
Apply a suction cup to the lower half of the front panel, just above the home button.
Using just the single suction cup that is included in the battery replacement kit probably wouldn’t open the device. An iOpener and an iSlack should be the recommended method. However, you can get it open with just the single suction cup and iOpener, but does take a lot of time.
Get an iOpener and iSlack with the battery replacement kit.
I used a flat x-acto (#18) blade knife tool to gently pry back the screen enough to allow me to insert the pick near the bottom corner. I then worked the pick under the screen as mentioned in steps 5 & 6 below then. This worked really well for me.
I used the suction cup without heating the phone - the adhesive came away quite easily without applying any heat. Maybe due to age of phone (nearly 4 years old). Worth trying.
My screen was very shattered, and was quite hard to get suction, as my tape was very low quality. However, after pulling it up a little bit, I was able to insert a regular razor blade into the very small gap and used that as a lever.
Oh my goodness! Don't do that again. You can definitely damage something in the phone if you use a sharp metal razor blade..
cytur -
-
-
-
Pull up on the suction cup with firm, constant pressure to create a slight gap between the front panel and rear case.
-
Insert an opening pick or other thin pry tool a few millimeters into the gap.
After multiple tries and using a very hot iOpener, it will not open.
In sheer frustration, I pulled out my trusty pocket knife and managed to lift the bottom of the screen slightly, but in the process, cracked the glass from the bottom to the home button. The case is open now.
-
-
-
Slide your pick around the corner and up the left edge of the phone, moving towards the volume control buttons and silent switch, breaking up the adhesive holding the display in place.
-
Stop near the top left corner of the display.
Do not go over the top otherwise you can crack the screen. Sadly happened to me :(
The instruction should be:
“Stop near BUT BEFORE REACHING the top left corner of the display”
-
-
-
-
Re-insert your tool at the lower right corner of the iPhone, and slide it around the corner and up the right side of the phone to separate the adhesive.
I had really good luck using a hairdryer on some of the more stubborn portions of adhesive.
-
-
-
Slide an opening pick underneath the display along the top edge of the phone to loosen the last of the adhesive.
Be very careful at this step. The glass at the top will break very easy when the display is lifted too much.
-
-
-
Open the iPhone by swinging the display up from the left side, like the back cover of a book.
-
Lean the display against something to keep it propped up while you're working on the phone.
Das “links” ist auf dem Foto rechts.
-
-
-
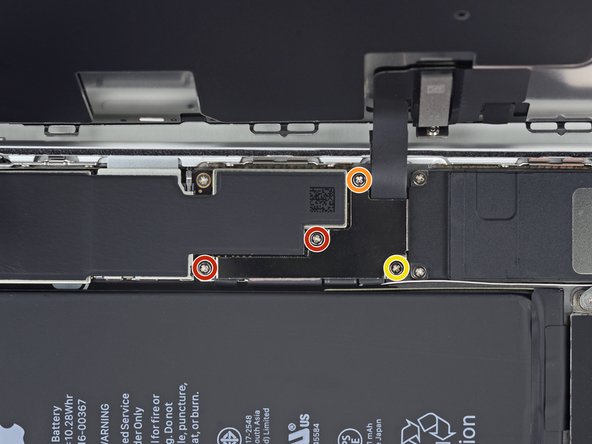
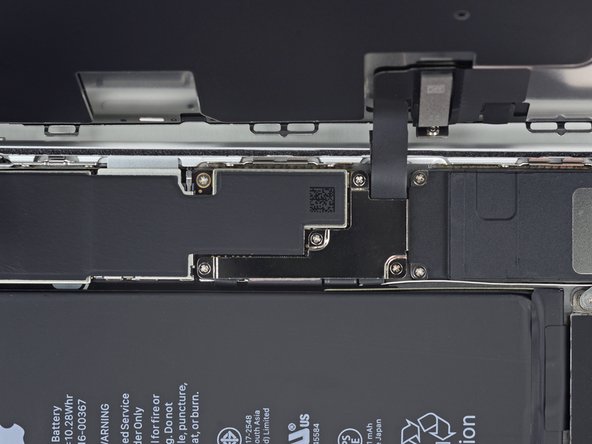
Remove four Phillips (JIS) screws securing the lower display cable bracket to the logic board, of the following lengths:
-
Two 1.3 mm screws
-
One 1.4 mm screw
-
One 2.7 mm screw
The Phillips screwdriver bit is the PH000. The measurement refers to the screw length.
-
-
-
Use the point of a spudger to pry the battery connector up from its socket on the logic board.
-
Bend the connector cable up slightly to prevent it from accidentally making contact with the socket and providing power to the phone during your repair.
When I reassembled the iPhone 8 Plus, I had to plug it into a Lightning cable to wake it up (just pushing power button wasn’t sufficient).
-
-
-
Use the tip of a spudger or a fingernail to disconnect the large lower display connector by prying it straight up from its socket.
I got hold of a iPhone 8 Plus with cracked screen that I am planning to fix.
Here is my problem:
When I tried to take out the screen from my phone, (step 15-18) I was curious about the new screen, so I tried to connect it. It was completely dead! Then I tried the old cracked one, and suddenly that was dead to! This is a phone that some fool has been inside earlier and changed battery, but I suspect he has done some more really stupid things. The Taptic Engine is living its own life and vibrating every time I slightly touch the home button. (I have a new Taptic Engine) The phone is also full of dust and small particles that does not belong there. One tri-point Y000 screw (step 18) is even missing! Now the biggest problem is that both screens are black! I know the phone is on, because I hear voice command speak when I turn on the power. The screen worked before I tried to change it? And one last thing: My new LCD screen came with new flex cables. Is it possible to switch over, so I can use the old ones?
Hi,
Is your problem solved?
Be careful of damaging MOSFETs by the LH side of the large lower display cable. After replacing the battery and turning the device on, the phone showed low charge and didn't have a charging symbol even after plugging into multiple cables and chargers. Turns out I had damaged the logic board attempting to disconnect the connector.
-
-
-
Disconnect the second lower display cable connector, directly behind the one you disconnected in the previous step.
I used the other end of the spudger on this connector and it seemed to work a little better for me. I came in from underneath the top-right edge instead of the bottom right.
-
-
-
Remove the two tri-point Y000 screws securing the bracket over the front panel sensor assembly connector:
-
One 1.0 mm screw
-
One 1.2 mm screw
una vite da 1mm e due viti da 1.2 mm???
Ciao Matteo! Grazie per l’osservazione. Ho appena modificato il testo :) La traduzione è aperta a tutti. Hai quindi la possibilità di fare le tue suggestione direttamente nel testo e sei il benvenuto se vuoi usare di questa possibilità nel futuro. Grazie ancora per la vigilanza! Saluti, Claire
The tool kit does include a 1.0 or1.2mm screwdriver! How am I supposed to remove those screws?
Bought the screwdriver that supposedly fits these screws and it still doesn’t work.
My bracket looks different. Can’t get these screws out.
kit came with wrong bit. i received 2x P02 (penta tips) and no tri point y000.
-
-
-
Use the tip of a spudger or a fingernail to disconnect the front panel sensor assembly connector from its socket.
-
-
-
Remove the display assembly.
Should there be a step somewhere in here to point out when to remove the blue plastic from the new iFixit screen?
-
-
-
Remove the four Y000 screws securing the bracket over the home/Touch ID sensor:
-
One 1.2 mm screw
-
Three 1.3 mm screws
The 1.2mm screw on the home button stripped for me. I ended up bending the bracket on each side in order to remove the home button. I then bent it back as best I could during reassembly and screwing it down.
-
-
-
Pry under the left edge of the home button cable connector to disconnect it from its socket.
I accidentally severed the cable, now my sensor is disabled. So far this was the most delicate cable I encountered because it was so small.
-
-
-
Flip the display assembly over. Use a hairdryer or prepare an iOpener and apply it to the lower edge of the display for about 90 seconds in order to soften up the adhesive underneath.
-
-
-
Use an opening pick to gently separate the adhesive holding the home/Touch ID sensor cable to the back side of the display panel.
This did not work for me…. ended up breaking the connector from the home button. Most likely messed up the customer’s iPhone… the adhesive would not pry up with just pick… does iFixit offer a home button replacement?
did not work for me either, also ended up breaking the connector, just use the tweezer to separate it. do not use opening pick!!!!! it’s too thick for it!!
Isopropanol and heat will loosen the adhesive and its possible to gently remove with plastic pick, metal tweezers risk damaging the Home button cable and disabling the Touch facility.
Pretty easy to follow instructions if you have patience and careful hands. If you have clumsy hands you will not succeed in fixing any small electronics. There are some small things you should use to help you succeed at fixing small electronics, like some scotch tape or other clear tape to hold some of the cables in place while you work on small electronics items, also a small heavy bottle or object to propped the iPhones cases against to hold them from falling over so that your hands can be free to perform your tasks. Great job you are doing iFixit personel and I am with you all the way with fighting for our rights to fix our electronics equipment.
Isopropanol in conjunction with the heat really did the trick here. Heat up first, then use plenty of the alcohol to pry it up carefully using the pick.
Heat dryer on high worked for me.
I heated the tip of a thin knife with a hot air gun and slide it under the flexible cable. When I hit resistance I reheated the knife. Keeping it parallel to the board while doing this. After 4 heatings the knife moved the rest of the way and the cable lifted easily off of the iPhone back. This method left enough glue on the cable that it restuck fine when moved to the new iPhone.
Apple loves to make this the most difficult thing. I've been successful many times, and not so on other repairs. I just finished a repair and everything was in tact, but sadly it didn't work. Took a part and put back. So I turned on the assistive touch home button. They will be getting a new phone soon, so not a big issue except Pride.
-
If your replacement screen did not come with a front camera and sensor cable, follow these steps to transfer them over.
Compare your new replacement part to the original part—you may need to transfer remaining components or remove adhesive backings from the new part before installing.
To reassemble your device, follow the above steps in reverse order.
Take your e-waste to an R2 or e-Stewards certified recycler.
Repair didn’t go as planned? Try some basic troubleshooting, or search our Answers forum for help.
Cancelar: não concluí este guia.
54 outras pessoas executaram este guia.
7 comentários
aiuto mi son cadute e quindi perso
sensore home/Touch ID Una vite da 1,2 mm Tre viti da 1,3 mm
dove le trovo?
Every time I have tried to transfer the home button from the broken screen to the replacement LCD - the home button has not worked. No tears in the cable. The connector is attached. Screw isn’t too tight. What could I be missing?
ATTENTION: Don’t screw in that one screw over the home button too much, or the button breaks! I just found one proper explanation for it in this YouTube video (https://www.youtube.com/watch?v=rDVnp90a...). Basically, that one screw that goes over the Home button should not be tightened too much, so that the metal plate doesn't bend (which it did for me).
This was truely helpful.
Anybody have the issue where the button works when the phone is in 2 pieces, but when you assemble the screen onto the phone body, the button no longer responds after a restart??
Power on phone while in 2 pieces -> home button is working
Attach screen to phone body -> home button is still working
Restart phone with phone assembled -> home button not responding
Hallo Zusammen
Wird bei diesen Mikroschrauben nur das Gewinde gemessen oder die gesammte Schraube inkl. Schraubenkopf? Ich frage, weil mir die Schrauben des Homebutton weggespickt sind 1.2 und 1.3mm...
Danke
LG
Hallo Alex!
We measure the entire screw for our guides.


what do I do about super stripped screws?
Ean Palacios - Responder
I’m sorry, your comment slipped past my radar earlier. For future fixers that might see this and ask the same question, you can check out our stripped screw guide for some detailed advice.
Adam O'Camb -
Do you need a toolkit like the essential toolkit
Adam Palmer - Responder
Hi Adam. Having a tool kit with all of the listed parts above is best. The screw heads are very small and each set of screws needs a very specific type of driver to remove them without stripping any of them.
Kyle Luksa -