
ROG Strix G15 G512LI M.2 SSD Replacement
O que você precisa
Kits de conserto
Estes kits contêm todas as peças e ferramentas necessárias para executar este guia.


Peças


Ferramentas

Exibir mais…
-
-
Remove the screws from the compartment cover, As show in the diagram, unscrew the screws labeled "A" first. before unscrewing "B", Don't remove screw "B" from the cover.
-
-
-
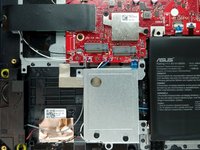
Remove the panel, but be careful as there are 2 cables linking the RGB light bar to the motherboard, carefully and gently detach them from the motherboard and lift the panel.
How do you remove the panel!? It looks like it will break. (Honestly have no idea why there are clips securing the bottom on this. They have ELEVEN screws in it! It ain't gonna move, not even for a 200lb gorilla like me lol
Nevermind. Got it open, but was scared of breaking something.
The side vents (intakes or exhaust, not sure) have two clips each, so you need the little blue triangles to wedge in there and pop them loose.
-
-
-
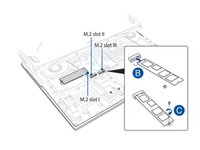
Locate the M.2 SSD slots, the First and Third slots both support SATA and PCIe NVMe M.2 SSDs, and the second M.2 Slot only supports PCIe NVMe SSDs
-
Next, Insert the NVMe SSD, and screw the SSD into place with the retaining screws
-


To reassemble your device, follow these instructions in reverse order.
To reassemble your device, follow these instructions in reverse order.
Cancelar: não concluí este guia.
Uma outra pessoa concluiu este guia.
2Comentários do guia
are the m.2 nvme slot PCIe 3.0x4 and are they all the same speed or type?
I have a problem taking the bottom cover off, based on the diagram shown the top right of the cover will not come off, i tried lifting it up but it seems like its gonna break.
Galaxy NoahPlayz - Responder
Turned out that the screw wouldn’t let that corner out, however it ended up costing the cover to be broken, i kept unscrewing it and nothing, i think something was wrong with the structure of the screw itself, i cant get it out though.
Galaxy NoahPlayz -