
PlayStation 2 Optical Disc Drive Laser Assembly Replacement

Introdução
Ir para o passo 1Replace the laser assembly in your optical disc drive. Replacing the laser requires you to have or purchase a new laser.
O que você precisa


-
-
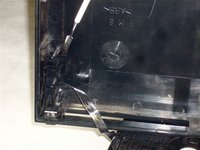
Use the flat edge of a metal spudger to pry the eight flat screw covers out.
-
Remove the following eight screws securing the top cover to the bottom case:
-
Four 55.4 mm Philips screws
-
Four 18.0 mm Phillips screws
-
-
-
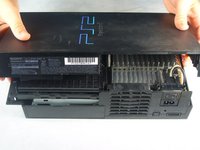
Lift the top cover off the bottom case.
-
Carefully remove the power cord that attaches the top and bottom halves by disconnecting the power cord assembly from the top case.
If you have a 5000x model, then the power and reset buttons are attached to the console, not the lid. Therefore there won’t be a cord
-
-
-
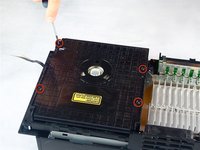
Remove the four 6.4 mm Phillips screws securing the top lid of the optical disc drive.
-
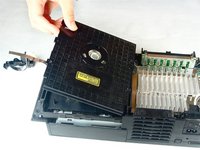
Lift and remove the lid from the optical disc drive.
-
-
-
Remove the two 7.2 mm Phillips black screws securing the metal silver rails that hold the laser in place.
where can someone buy replacements for these in this day and age
eBay is a good place for it
Nicholas -
-


To reassemble your device, follow these instructions in reverse order.
To reassemble your device, follow these instructions in reverse order.
Cancelar: não concluí este guia.
35 outras pessoas executaram este guia.

Equipe

Cal Poly, Team 19-1, Maness Fall 2009 Membro de Cal Poly, Team 19-1, Maness Fall 2009
CPSU-MANESS-F09S19G1
4 Membros
Autoria de 35 guias
8Comentários do guia
just did the laser replacement, however the playstation still identifies "no data" when game is inserted. it says "reading disk" for a few seconds then nothing else happens. thought?
Have you removed the security solder blob? All new Lenses have this somewhere in the circuitry.
I noticed that many times when you replace a lens it throws of the rotary motor. Some ps2 consoles have only 1 hex adjustment yet others have 2. If you have the covers off and just replaced the lenses you should always plug it back in w/ the top off still and adjust it until you see the disc spinning rapidly and laser is moving back and forth. Another way for calibrating is to remove said disc and if lens and ribbon move all the way forward and all the way back 3 or more times then you are almost done. At that point plug in tv chord and place in a disc if the PlayStation 2 logo comes on and disappears in less than 3 seconds carefully replace all parts and your good to go.
Could you please add the parts you would need to replace this to the parts portion.
Nice guide by the way.
My ps2 doesn't spin the cd what can i do to fix it
I have two PlayStation 2 SCPH-50003. Both used, don't have any mode chip on it! One of them play all game PlayStation/ PlayStation 2 black blue and silver discs.
The other played SSX 3 and Tomb raider legend but videos where slow and gameplay had problems. Just tested it and minutes later stoped working.
I Ibought2 lenses KHS-400C. I removed the solder spot from both of lenses. I tried both of them and none of them worked! I tried from the other working PlayStation 2 and didn't worked either! I tried all 4 KHS-400C on the working console and they all worked!
What else can cause Disc read error? Moreover I replaced the drive with motors and eject mechanism from the working one to the non working with no change!
Thx i have a problem with that's
Before proceeding to step 2, Take a look at your PS2, some PS2's have 10 screws (and screw covers) instead of 8 (i found them underneath the optical drive), these instructions have mislead me and i ended up breaking my top cover for my PS2.
Tristan - Responder
Ich möchte daraufhin weisen, daß es bei der SCPH-50004 zwei verschiedene Schraubabdeckungen gibt.
4x Kreuzförmig 4x rechteckig
Sowie eine silberne schraube die sich an der unterseite aufhöhe des Reset-Knopfes befindet.
Christian Lehnhardt - Responder