Ir para o conteúdo principal
Nokia 6 Home Button Assembly Replacement

Nokia 6 Home Button Assembly Replacement

Chrissy Robins

Chrissy Robins e 6 outros colaboradores

Última atualização em January 10, 2025

30 - 50 minutos
Moderado

Introdução

Ir para o passo 1

Use this guide to replace a faulty home button assembly in your Nokia 6 smart phone.

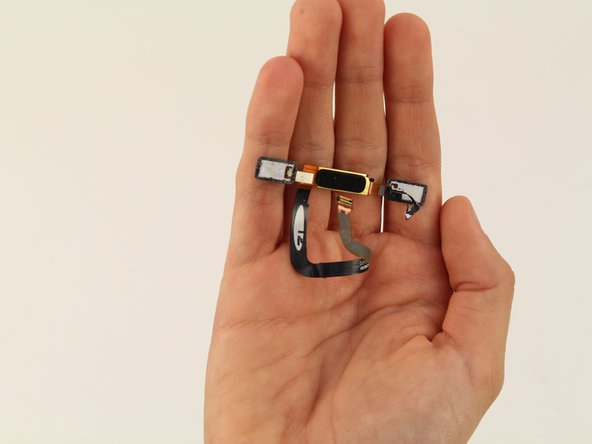
The home button assembly is the component of the device that is responsible for navigation and bio-metric authentication. Your home button may need to be replaced if it is becoming unresponsive making it harder to navigate the device.

This repair makes use of a heat gun to weaken the adhesive of the smart phone. If you are unfamiliar with using heat guns, consult this guide.

For your safety, make sure to power down the device before beginning the repair.

O que você precisa

Ferramentas

Exibir mais…

  1. Nokia 6 Home Button Assembly Replacement, Display Assembly: passo 1, imagem 1 %32 Nokia 6 Home Button Assembly Replacement, Display Assembly: passo 1, imagem 2 %32 Nokia 6 Home Button Assembly Replacement, Display Assembly: passo 1, imagem 3 %32
    • Power off your Nokia 6 before beginning disassembly.

    • Insert the SIM card ejection tool into the hole on the left side of the phone.

    • Remove the SIM card and microSD card.

  2. Nokia 6 Home Button Assembly Replacement: passo 2, imagem 1 %32
    • If your display glass is cracked, take precaution by taping over the display to prevent further breakage and harm.

    • Lay overlapping strips of clear packing tape over the Nokia 6's display until the whole screen is covered.

  3. Nokia 6 Home Button Assembly Replacement: passo 3, imagem 1 %32
    • To soften the adhesive, use a heat gun and heat one edge of the phone for five minutes.

    • To use the heat gun, plug it into an outlet.

    • When the heat gun is plugged in, the heat gun automatically turns on and will start blowing hot air.

  4. Nokia 6 Home Button Assembly Replacement: passo 4, imagem 1 %32
    • Take a Jimmy and slide it under the glass after the adhesive has been softened.

    • Place a pick under the glass after lifting with the pry tool so that the screen won't re-adhere to the frame again.

    • Make sure to not touch the LCD edge underneath the glass layer with the metal pry tool or the cards. This can damage the ribbon cables underneath and compromise the structural integrity of the phone itself.

    • The corners of the screen are the most fragile part of the screen. Make sure that the entire edge of the screen is dislodged from the frame before prying at the corners.

  5. Nokia 6 Home Button Assembly Replacement: passo 5, imagem 1 %32
    • Lift the screen off of the phone.

  6. Nokia 6 Home Button Assembly Replacement: passo 6, imagem 1 %32 Nokia 6 Home Button Assembly Replacement: passo 6, imagem 2 %32
    • Use a Phillips #000 screwdriver to remove the 1 mm x 1.4 mm screw holding down the metal bracket over the screen ribbon connector.

  7. Nokia 6 Home Button Assembly Replacement: passo 7, imagem 1 %32
    • Remove the metal bracket with a tweezer.

  8. Nokia 6 Home Button Assembly Replacement: passo 8, imagem 1 %32
    • Use a spudger to disconnect the screen ribbon connector and free the display assembly.

    • The corners and edge of the LCD are fragile. Be careful attaching it to the back of the phone.

    • Carefully remove the screen from the device.

  9. Nokia 6 Home Button Assembly Replacement, Home Button Assembly: passo 9, imagem 1 %32
    • Disconnect the battery connector with a spudger.

  10. Nokia 6 Home Button Assembly Replacement: passo 10, imagem 1 %32 Nokia 6 Home Button Assembly Replacement: passo 10, imagem 2 %32
    Ferramenta utilizada neste passo:
    Tweezers
    $4.99
    • Use a Phillips #00 screwdriver to remove the 1.2 mm x 2.2 mm screw in the upper hand corner of the phone.

    • Use tweezers to remove the bracket.

  11. Nokia 6 Home Button Assembly Replacement: passo 11, imagem 1 %32 Nokia 6 Home Button Assembly Replacement: passo 11, imagem 2 %32
    • Detach the cable with the black nylon spudger.

    • Detach the home button and remove it from the device.

Conclusão

To reassemble your device, follow these instructions in reverse order.

Uma outra pessoa concluiu este guia.

Chrissy Robins

Membro desde: 04/15/19

1.567 Reputação

Autoria de 10 guias

Equipe

Cal Poly, Team S9-G15, Maness Spring 2019 Membro de Cal Poly, Team S9-G15, Maness Spring 2019

CPSU-MANESS-S19S9G15

4 Membros

Autoria de 14 guias

1Comentário do guia

I am very grateful for your help,now I got it all figured out..I can do it own my own without necessary taking it to the Nokia center right here in Kenya. friday night funkin mods online

Britt Isaacs - Responder

Comentar

Visualizações:

Últimas 24 horas: 2

Últimos 7 dias: 8

Últimos 30 dias: 38

Ao todo: 3,017