
Motorola Moto Z2 Play Screen Replacement

Introdução
Ir para o passo 1Use this guide to remove or replace the screen on your Motorola Moto Z3 Play.
Before you begin, download the Rescue and Smart Assistant app to backup your device and diagnose whether your problem is software or hardware related.
Warning: Because of the strong adhesive securing the display, minimal clearance for inserting your tools, and high heat required, there's a good chance of accidentally damaging the display when removing it. If you're replacing the display anyway, then you don't have to worry—but if you intend to re-use the display, take serious care when heating and inserting tools to separate the display from the rest of the device.
O que você precisa
Fix Kit
Este kit contém todas as peças e ferramentas necessárias para executar este guia.

Peças


Ferramentas


Exibir mais…
-
-
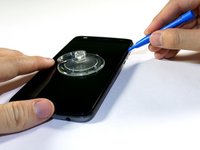
Heat the edges of your Motorola Moto Z2 Play screen for two to three minutes with a heat gun. You adjust the heat gun to 85 degrees centigrade, and be careful not to hold the heat gun on one position for too long; to avoid damaging, or "hotspotting" the LCD. The screen should be very warm, but not painful, to the touch. Reheat as necessary.
-
-
Ferramenta utilizada neste passo:Tweezers$4.99
-
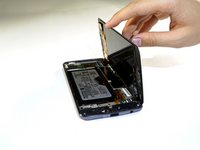
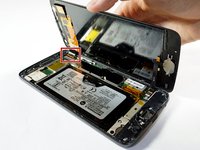
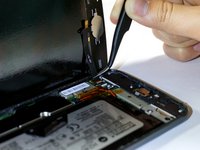
Identify the ribbon cable, located at the bottom right of the phone.
-
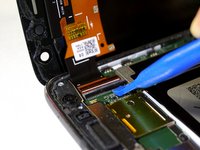
If present, remove kapton (orange) tape covering the cable connector.
-
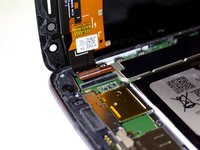
Flip up the small locking flap on the ZIF connector and use tweezers to slide the cable straight out of its socket.
-
-
-
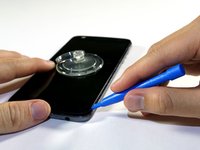
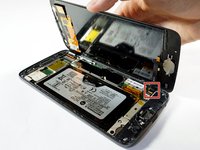
Apply an iOpener to the bottom edge of the display assembly for about a minute to loosen the adhesive beneath the fingerprint sensor.
-


Compare your new replacement part to the original part—you may need to transfer any remaining components or remove adhesive backings from the new part before installing.
To reassemble your device, follow the above steps in reverse order.
Take your e-waste to an R2 or e-Stewards certified recycler.
Repair didn’t go as planned? Check out our Answers community for troubleshooting help.
Cancelar: não concluí este guia.
27 outras pessoas executaram este guia.

Equipe

Cal Poly, Team S19-G5, Livingston Winter 2018 Membro de Cal Poly, Team S19-G5, Livingston Winter 2018
CPSU-LIVINGSTON-W18S19G5
4 Membros
Autoria de 30 guias
9 comentários
This is a guide for disassembly only. There are a few further steps required to replace front,,,