Ir para o conteúdo principal
Participe da comunidade de reparos - Criar conta
How to Upgrade the Expandable Storage in a PlayStation 5

How to Upgrade the Expandable Storage in a PlayStation 5

Robert Boyd

Robert Boyd e 10 outros colaboradores

Última atualização em 31 de jan de 2025

5 - 15 minutos
Fácil
Guia em destaque

Introdução

Ir para o passo 1

Follow this guide to add expandable SSD storage to your PlayStation 5.

Before starting this guide, make sure that your M. 2 blade SSD is compatible with Sony’s specifications. The SSD blade seen in the photos is not suitable for the expandable storage slot in the PlayStation 5.

Also, make sure that you have updated your PlayStation has been updated with the latest system software.

Before you begin, completely power down and unplug all cables from your console. Remember to follow general electrostatic discharge (ESD) safety procedures while repairing the console.

O que você precisa

Fix Kit

Este kit contém todas as peças e ferramentas necessárias para executar este guia.

Ferramentas

Exibir mais…

Vídeo de Apresentação

  1. How to Upgrade the Expandable Storage in a PlayStation 5, Remove the stand screw: passo 1, imagem 1 %32
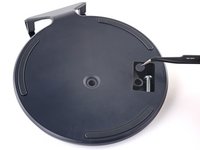
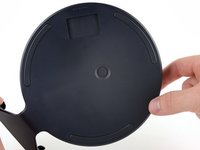
    • If your PlayStation 5 is in its vertical orientation, flip it upside down so the stand is facing up.

    • If your PlayStation 5 is in its horizontal orientation, skip to Step 6.

    • Work on a flat surface to prevent your PlayStation from falling over.

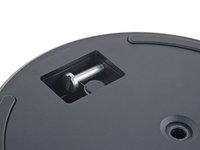
    • Use a coin or a flathead screwdriver to remove the 26.5 mm-long stand screw.

  2. How to Upgrade the Expandable Storage in a PlayStation 5, Remove the vertical stand: passo 2, imagem 1 %32 How to Upgrade the Expandable Storage in a PlayStation 5, Remove the vertical stand: passo 2, imagem 2 %32
    • Lift straight up to remove the stand.

  3. How to Upgrade the Expandable Storage in a PlayStation 5, Store the stand screw: passo 3, imagem 1 %32 How to Upgrade the Expandable Storage in a PlayStation 5, Store the stand screw: passo 3, imagem 2 %32
    • Insert the screw into the cubby on the bottom of the stand.

  4. How to Upgrade the Expandable Storage in a PlayStation 5, Cap the screw hole: passo 4, imagem 1 %32 How to Upgrade the Expandable Storage in a PlayStation 5, Cap the screw hole: passo 4, imagem 2 %32 How to Upgrade the Expandable Storage in a PlayStation 5, Cap the screw hole: passo 4, imagem 3 %32
    Ferramenta utilizada neste passo:
    Tweezers
    $4.99
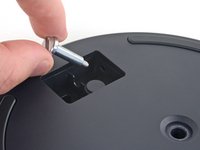
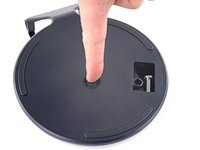
    • Use a pair of tweezers or your fingernail to remove the cap from the cubby.

    • Use your finger to press the cap into the screw hole.

  5. How to Upgrade the Expandable Storage in a PlayStation 5, Close the cubby: passo 5, imagem 1 %32 How to Upgrade the Expandable Storage in a PlayStation 5, Close the cubby: passo 5, imagem 2 %32 How to Upgrade the Expandable Storage in a PlayStation 5, Close the cubby: passo 5, imagem 3 %32
    • Twist the stand counterclockwise to close the cubby.

  6. How to Upgrade the Expandable Storage in a PlayStation 5, Remove the horizontal stand: passo 6, imagem 1 %32 How to Upgrade the Expandable Storage in a PlayStation 5, Remove the horizontal stand: passo 6, imagem 2 %32
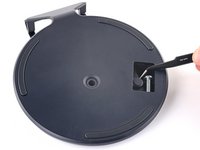
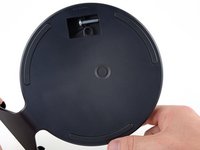
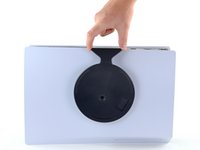
    • If your PlayStation 5 is in its horizontal orientation, rest it on its face with the charging port facing up.

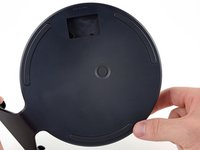
    • Lift the stand straight up to remove it.

  7. How to Upgrade the Expandable Storage in a PlayStation 5, Remove the right faceplate: passo 7, imagem 1 %32 How to Upgrade the Expandable Storage in a PlayStation 5, Remove the right faceplate: passo 7, imagem 2 %32 How to Upgrade the Expandable Storage in a PlayStation 5, Remove the right faceplate: passo 7, imagem 3 %32
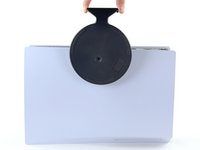
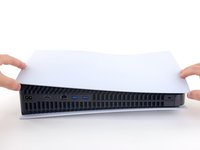
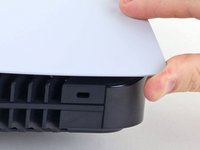
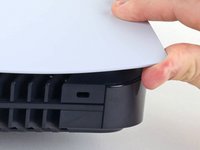
    • Flip the device over so that the USB and ethernet ports are on the left side from your perspective.

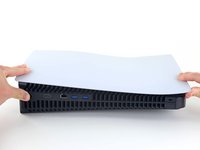
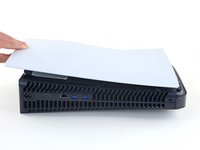
    • Lift up the corner of the faceplate to unclip it from the case.

  8. How to Upgrade the Expandable Storage in a PlayStation 5: passo 8, imagem 1 %32 How to Upgrade the Expandable Storage in a PlayStation 5: passo 8, imagem 2 %32
    • While lifting up the corner, slide the faceplate towards the bottom of the device.

    • Remove the right faceplate.

  9. How to Upgrade the Expandable Storage in a PlayStation 5, Remove the SSD cover screw: passo 9, imagem 1 %32
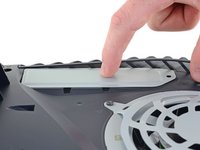
    • Use a Phillips screwdriver to remove the 17 mm-long SSD cover screw.

  10. How to Upgrade the Expandable Storage in a PlayStation 5, Remove the SSD cover: passo 10, imagem 1 %32 How to Upgrade the Expandable Storage in a PlayStation 5, Remove the SSD cover: passo 10, imagem 2 %32 How to Upgrade the Expandable Storage in a PlayStation 5, Remove the SSD cover: passo 10, imagem 3 %32
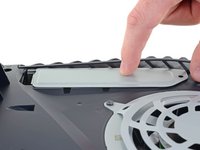
    • Use your finger to slide the SSD cover towards the top of the device to unclip it from the case.

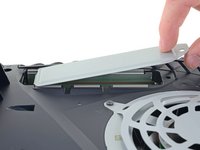
    • Remove the SSD cover.

  11. How to Upgrade the Expandable Storage in a PlayStation 5, Remove the SSD screw: passo 11, imagem 1 %32
    • Use a Phillips screwdriver to remove the 11 mm-long SSD screw.

  12. How to Upgrade the Expandable Storage in a PlayStation 5, Move the spacer: passo 12, imagem 1 %32 How to Upgrade the Expandable Storage in a PlayStation 5, Move the spacer: passo 12, imagem 2 %32 How to Upgrade the Expandable Storage in a PlayStation 5, Move the spacer: passo 12, imagem 3 %32
    Ferramenta utilizada neste passo:
    Tweezers
    $4.99
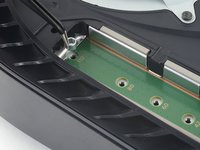
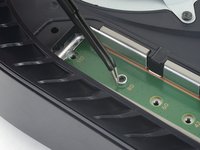
    • Use a pair of tweezers to lift and move the spacer to the appropriate slot for your chosen M.2 SSD.

    • Do not attempt to install the SSD without the spacer in the proper location.

  13. How to Upgrade the Expandable Storage in a PlayStation 5, Insert the SSD: passo 13, imagem 1 %32 How to Upgrade the Expandable Storage in a PlayStation 5, Insert the SSD: passo 13, imagem 2 %32
    • If your SSD will benefit from a heat sink, follow this guide to install one.

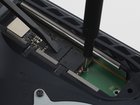
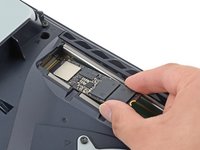
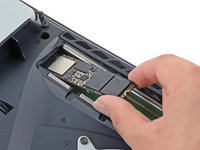
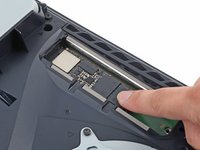
    • Insert your SSD at a shallow angle into the M.2 socket.

    • Both the SSD and M.2 socket are keyed, which means the SSD only fits one way into the socket.

    • It is normal for the SSD to rest at an angle once it has been inserted into the M.2 socket.

  14. How to Upgrade the Expandable Storage in a PlayStation 5, Secure the SSD to the motherboard: passo 14, imagem 1 %32 How to Upgrade the Expandable Storage in a PlayStation 5, Secure the SSD to the motherboard: passo 14, imagem 2 %32 How to Upgrade the Expandable Storage in a PlayStation 5, Secure the SSD to the motherboard: passo 14, imagem 3 %32
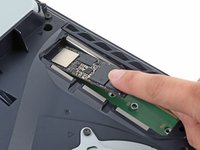
    • Use your finger to press the SSD down until the end sits atop the spacer.

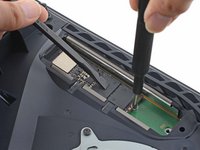
    • With the SSD on the spacer, insert the SSD screw through the spacer and screw it into place, securing the end of the SSD.

  15. How to Upgrade the Expandable Storage in a PlayStation 5: passo 15, imagem 1 %32
    • Use a Phillips screwdriver to tighten the 11 mm-long screw to the end of the SSD.

    • Do not overtighten this screw. Doing so may damage the SSD.

Conclusão

To reassemble your device, follow these instructions in reverse order.

Take your e-waste to an R2 or e-Stewards certified recycler.

Repair didn’t go as planned? Try some basic troubleshooting, or ask our PlayStation 5 Answers community for help.

32 outras pessoas executaram este guia.

Gear Up For Future Repairs

Shop all

Robert Boyd

Membro desde: 02/01/21

30.588 Reputação

Autoria de 94 guias

4Comentários do guia

Hello!

The 11m screw that keeps the SSD in place is totally stripped -- any tips for how to remove it? I've tried the rubber band and duct tape over the screw methods, with no luck.

Michael Deneen - Responder

Se puede cortar para extraerlo con un 🪛 plano

silentdark96 -

Very well detailed, thank you!

wakey18 - Responder

Follow the English language repair guide.

The Dutch translation needs an update.

aoosten - Responder

Comentar

Visualizações:

Últimas 24 horas: 14

Últimos 7 dias: 138

Últimos 30 dias: 616

Ao todo: 32,987