Ir para o conteúdo principal
Dell Latitude E7270 Solid State Drive Replacement

Dell Latitude E7270 Solid State Drive Replacement

Jacob Clement

Jacob Clement e 2 outros colaboradores

Última atualização em January 9, 2025

15 minutos
Moderado

Introdução

Ir para o passo 1

Use this guide to replace a full or broken Solid State Drive on your Dell Latitude E7270.

The Solid State Drive is where your computer stores all of its downloaded software/drivers/operating system. Solid State Drives are more robust than typical Hard Disk Drives, but are not immune to physical damage or onboard shorts. A damaged/full Solid State Drive can do anything from slow your computer down to make it inoperable.

Before using this guide, check out the troubleshooting page to see if your symptoms match any that represent a bad battery.

Before you begin this repair, make sure that your device is powered off and it is unplugged from the charger.

NOTE: In the absence of an SSD, a RAM stick was used as a substitute for visual and educational purposes only. The SSD in your device will resemble a RAM stick but may differ in color.

O que você precisa

Kits de conserto

Estes kits contêm todas as peças e ferramentas necessárias para executar este guia.

Peças

Ferramentas

Exibir mais…

  1. Dell Latitude E7270 Solid State Drive Replacement, Back Panel: passo 1, imagem 1 %32
    • Place the device top down in front of you so that the vents are visible and are furthest from the user.

    • Please be sure that the device is powered off and unplugged before removing parts or deconstructing anything.

  2. Dell Latitude E7270 Solid State Drive Replacement: passo 2, imagem 1 %32
    • Remove all eight M2.5 X 8MM screws with a Phillips #00 screwdriver.

    are you sure they are M2.5x8mm? they look more like M2x8mm

    Charles Beauchemin - Responder

    The screws should be captive, so no need to remove them completely.

    engiNURD - Responder

  3. Dell Latitude E7270 Solid State Drive Replacement: passo 3, imagem 1 %32
    • Lift and remove the panel.

  4. Dell Latitude E7270 Solid State Drive Replacement, Battery: passo 4, imagem 1 %32
    • Remove the three M2.5 X 5MM screws, located above the battery, with a Phillips #00 screwdriver.

    FYI - You only remove the 2 outer screws as the hole in the middle is used by a screw on the base cover.

    CJ NI - Responder

    If you have a 3-cell, 42Whr battery (Type 7CJRC; DPN: 021X15), you only remove one screw, near the plug of the battery.

    engiNURD - Responder

  5. Dell Latitude E7270 Solid State Drive Replacement: passo 5, imagem 1 %32 Dell Latitude E7270 Solid State Drive Replacement: passo 5, imagem 2 %32
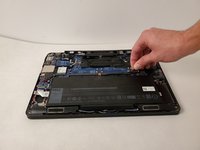
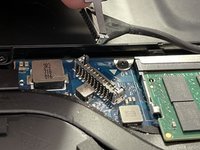
    • Disconnect the battery wire by using your fingers to pull diagonally left on the tab.

  6. Dell Latitude E7270 Solid State Drive Replacement: passo 6, imagem 1 %32
    • Remove the battery completely by grabbing an edge and pulling up on the battery.

  7. Dell Latitude E7270 Solid State Drive Replacement, Solid State Drive: passo 7, imagem 1 %32
    • Locate the SSD stick on the bottom right of the device.

    • In the absence of an SSD, a RAM stick was used as a substitute for visual and educational purposes only. The SSD in your device will resemble a RAM stick but may differ in color.

  8. Dell Latitude E7270 Solid State Drive Replacement: passo 8, imagem 1 %32
    • Slide the SSD of its socket.

Conclusão

To reassemble your device, follow these instructions in reverse order.

2 outras pessoas executaram este guia.

Um comentário

Thumbs down for showing a memory module and not a SSD.

Christopher Gehringer - Responder

Comentar

Exibir estatísticas:

Últimas 24 horas: 3

Últimos 7 dias: 18

Últimos 30 dias: 73

Ao todo: 4,477