Hi @johnnybegood7
Have you checked that the charger is OK and that its DC output is 19V DC?
Usually there's an indication of power being supplied by the laptop even if it doesn't start i.e. AC power indicator LED is on when charger connected and a power refresh i.e. disconnect main battery and cmos battery may fix a corrupted BIOS that is preventing it from starting.
If there's no indication of power at all and it won't start then it may be something else e.g. a faulty DC-In jack (example to show part) or something else so there's no power and the battery may be completely discharged due to this problem i.e. can't be charged.
Use a voltmeter to check if there's 19V DC between the red and black wires on the DC-In jack cable plug where it connects to the motherboard. Unplug the DC-In jack cable plug from the motherboard to make it easier to do. Disconnect the main battery cable from the motherboard before you connect the charger and unplug the jack cable.
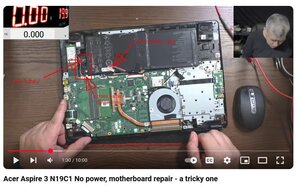
If there is an indication that power is available when the charger is connected here's an image taken from this video showing the location of the cmos battery, cmos battery connection and the main battery cable, which in the video is already disconnected.
Once you have opened the laptop, disconnect the main battery cable from the motherboard first and then disconnect the cmos battery from the board. Wait 5-10 minutes for the board to self discharge (you can't hurry this by pressing the Power button as it has been disconnected when the keyboard was removed during disassembly) and then reconnect the cmos battery, reconnect the main battery, reassemble the laptop, connect the charger and check what happens.
Be very careful not to touch anything else on the motherboard to prevent ESD damage to the components.
(click on image)


2 comentários
Hi @johnnybegood7
What is the model number as shown on the product label on the bottom of the laptop?
por jayeff
Hi Jay
I made a mistake , it is NOT an Aspire 5.
It is an Aspire -3.
Model number : N19C1.
por JohnnyBeGood7