Andrew Taylor, here are a couple things that may help to further trouble shoot:"
Power-On Self Test: RAM and Processor Verification
A power-on self test in the computer’s ROM automatically runs whenever the computer is started up after being fully shut down (the test does not run if the computer is only restarted). If the test detects a problem, the status LED located above the power button on the front of the computer will flash in the following ways*:
1 Flash: No RAM is installed or detected. Or, the quick memory test failed. An LED will light up on the memory riser card next to the affected DIMM or empty DIMM slot.
3 Flashes: A RAM bank failed extended memory testing. An LED will light up on the memory riser card corresponding to the affected DIMM.
Troubleshooting: Try reseating the memory DIMMs. Check memory installation instructions for proper installation order. Swap affected DIMM with known good DIMM.
*Note: The status LED lights up when the power button is depressed at startup. Do not count this light as one of the diagnostic flashes. The memory riser card diagnostic LEDs will also flash briefly when the computer is started up or shut down and when it goes in and out of sleep mode. This is normal behavior.
Logic Board Diagnostic LEDs
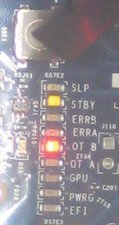
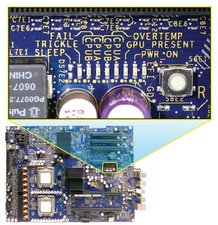
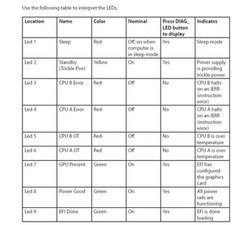
The Mac Pro (Early 2008) logic board includes a set of LEDs to help service providers troubleshoot the computer. The LEDs are located on the logic board between the two DIMM riser card connectors. LEDs 3, 4, 5, and 6 are normally off and will automatically illuminate if an error occurs. To read LEDs 1, 2, 7, 8, and 9, you must press the DIAG_LED button, which is adjacent to the LEDs. To press the DIAG_LED button, use the nylon probe tool (Apple part number 922-5065).
Mac Pro 8X
LED 1 Sleep
LED 2 Standby or Trickle Power
Normally on when DIAG_LED button is pressed.
If LED 2 is not on, the symptom would be that the computer won’t power on.
Troubleshooting:
Check AC cord is connected to a working AC wall outlet.
Reseat AC Plug.
Check connections of power supply cables to the logic board.
Check power supply cable connections at power supply.
Replace power supply.
LED 3 CPU B (Lower Processor) Error
LED 4 CPU A (Upper Processor) Error
Normally off. These LEDs come on if an error occurs or if the BootROM is corrupted. They do not depend on the DIAG_LED button being pressed.
Related symptoms include no video or the computer is hung up. If the BootROM is corrupted, the optical drive tray should eject, prompting for the insertion of a recovery disc to restore the BootROM.
Troubleshooting:
With the computer booted, up press the SYS_RST switch. If this clears the CPU Error LED, check for incompatible device driver software that may have been installed for added hardware.
If the Error LED is still on, power down the computer and try resetting the SMC. Restart the computer.
Reset the power supply by unplugging the AC cord for 10 seconds.
Unplug AC cord and remove any added DIMMs and PCI Express cards. If this causes the LED to go off, repopulate the DIMMs and/or PCI Express cards to find the combination that caused the LED to come on. Overheated memory could be a possible cause for this CPU error LED to come on. Check fan operation.
Unplug the AC cord and remove the battery for 10 seconds. You may need to remove a PCI Express card to get to the battery. Reinstall the battery and restart the computer.
Try swapping CPU A and CPU B locations. If the CPU Error LED follows the CPU, replace that CPU.
Try replacing the logic board.
LED 5 CPU B (Lower Processor) Overtemp
LED 6 CPU A (Upper Processor) Overtemp
Normally off. These LEDs come on if an error occurs. They do not depend on the DIAG_LED button being pressed.
These two LEDs can operate in two different modes; they will either flash or stay on. If either LED is flashing, it may indicate an initial processor over-temperature condition. If either LED is solidly on, it may indicate a chronic processor over-temperature condition. Initial processor over-temperature can cause symptoms such as sluggish computer performance. Chronic processor over-temperature can cause the computer to hang completely.
Troubleshooting:
Verify proper heatsink installation.
Verify all thermal sensors are properly connected.
Verify all fans are operating properly, especially the front intake fan.
Verify power supply cables are properly seated.
If both overtemp LEDs come on immediately when the computer is turned on, a faulty power supply could be one cause of this behavior. Replace power supply.
Try swapping CPU A and CPU B heatsink locations. If the CPU Error LED follows the CPU
heatsink, replace that CPU heatsink.
Try swapping CPU A and CPU B locations. If the CPU Error LED follows the CPU, replace that CPU.
LED 7 GPU Present
Normally on when DIAG_LED button is pressed.
If this LED is on, it indicates there is a graphics card installed and recognized by the computer. It does not indicate that the graphics card is fully functional. Some graphics cards require additional power to function, which is available from connectors on the logic board. For these cards, if the auxiliary booster power cable is not connected between the logic board and the graphics card, an error message reminding about this additional power connection will be displayed as Mac OS X starts up.
Troubleshooting:
Check that the graphics card is seated correctly in its PCI slot.
Check that the card’s auxiliary booster power cable is connected properly on both ends (if the card requires one). If the cable is connected properly, try connecting it to the other, empty logic board booster power connector (if available) to see if the cause is related to this connector. If the card and LED operate properly when connected to the other power connector, check EFI and SMC firmware versions and update them if necessary. See “Mac Pro Firmware Updates” in this section for more information. Only then should you consider replacing the logic board.
Verify power supply cables are properly seated .
Try the graphics card in a different PCI slot.
Try a different graphics card.
If an error message about graphic card booster power connection is displayed, check that the appropriate booster power cable is firmly connected between the logic board and the graphics card.
Replace the logic board.
Replace the PS3 power supply cable. (• Note: This cable supplies power to the PCI slots.)
LED 8 Power Good
Normally on when DIAG_LED button is pressed.
If this LED is on, it indicates the power supply is functioning.
Troubleshooting:
Check that the power cables to the logic board are properly attached.
Check the cable connections at the power supply.
Check for any signs of an obvious electrical short, e.g. metal screws or PCI card slot cover loose inside computer touching the logic board.
LED 9 EFI Good
Normally on when DIAG_LED button is pressed. Takes approximately 5 seconds after power up.
If this LED is on, it indicates that the computer has completed the on board Extensible Firmware Interface (EFI) operations and the operating system is now in control.
Troubleshooting:
Check that LED 8 Power Good LED is on.
Check that LEDs 3, 4, 5, and 6 are off.
Try removing any added hardware.
Try removing any added DIMMs.
Memory Riser Card Diagnostic LEDs
Both of the memory riser cards include diagnostic LEDs for each DIMM. Each of the LEDs will light if it detects an issue with the corresponding installed DIMM. These LEDs will also flash briefly when the computer is started up or shut down and when it goes in and out of sleep mode. This is normal behavior.
Troubleshooting:
Shutdown and restart the computer.
Verify EFI and SMC firmware versions and update them if necessary. See “ Mac Pro Firmware Updates” in this section for more information.
Reseat the memory riser card associated with the failure LED. If the failure LED persists, continue with the next step.
Swap upper and lower memory riser cards A and B. If the symptoms follow the riser card, continue with the next step. If the failure LED remains associated with the same memory riser card slot, consider a possible connection issue with the logic board. Replace the logic board in this case.
Reseat the appropriate DIMM corresponding to the failure LED. If the issue persists, continue with the next step.
Check memory installation instructions for proper installation order.
Swap affected DIMM with known good DIMM.
Try moving DIMM to another slot (within the same bank of two) to see if the failure LED follows the DIMM. If so, replace DIMM with known good DIMM. If the failure LED persists, replace the memory riser card associated with the failure LED.
Video Card Diagnostic LEDs
T_Fault LED
Normally off, this LED lights up if the graphics chip gets too hot.
Troubleshooting:
Verify that the video card heatsink and fan are not clogged with dust. Carefully blow out any dust as necessary.
Check that the front fan is working.
Try re-seating the card in the PCI Slot.
Make sure the card’s auxiliary booster power cable is connected (if there is one).
Re-boot the computer.
Mac Pro (Early 2008) Troubleshooting — General Information 159
Try a different video card.
Replace the video card.
Ext_Power LED
Normally off, this LED lights up if the auxiliary power isn’t being supplied.
Troubleshooting:
Make sure the card’s auxiliary booster power cable is connected (if there is one).
Check connections from the power supply to the logic board.
Try a different auxiliary power cable.
Try a different video card.
Replace the video card.•
Power Supply Verification
To power on, the computer’s logic board requires “trickle” power. If the system fails to power on, first reset the SMC as described in this chapter. If the computer still doesn’t power on, follow the procedure outlined below to determine whether the issue is related to the power supply.
Verify trickle power
Diagnostic LED 2 indicates the presence of trickle power required by the logic board to begin the startup process.
LED 2 should be yellow when the DIAG_ LED button is pressed, indicating that trickle voltage is present.
Verify Power Supply Is Providing Power
Diagnostic LED 8 indicates that the main power is OK and within regulation.
Plug in AC power cord, and press the power-on button on the front panel.
LED 8 should be green when the DIAG_ LED button is pressed, indicating that the main power is OK and within regulation.
If diagnostic LED 5 and LED 6 are both solidly illuminated at power up, improperly seated power supply cables could be one cause of this behavior. Check all power supply cable connections to ensure they are properly seated.


6 comentários
Any chance you can give us the last four digits of the computers serial number? That would help us to determine exactly what hardware they are supposed to have. what memory modules are you using? Which slot did you install the video card in?
por oldturkey03
Last four digits of SN of the machine I have here at home are "AUQ2". (Other machine is still at my office.) There are four 2GB RAM modules in this particular machine, two installed in the top two slots of each daughtercard (per the manual). Video card is installed in Slot 1 (farthest away from hard drives).
por Andrew Taylor
3.0 GHz Q. Core Xeon X5365 x2
Intro. April 4, 2007* Disc. January 8, 2008
Order BTO/CTO Model A1186 (EMC 2138)
Family Mac Pro ID MacPro2,1
RAM 1 GB VRAM 256 MB
Storage 250 GB (7200 RPM) Optical 6X DL "SuperDrive"
por oldturkey03
Andrew Taylor, can you please verify the EMC number being 2138 since that with a dual Xeon would make it a Mac Pro 8X and slightly different layout for the diagnostic LED's
por oldturkey03
EMC is 2113.
por Andrew Taylor
Exibir mais 1 comentário