Ir para o conteúdo principal

Esta versão pode conter edições incorretas. Mude para o último instantâneo verificado.

O que você precisa

Vídeo de Apresentação

  1. Este passo não foi traduzido. Ajude a traduzi-lo

    : passo 1, imagem 1 %32
    • Before you begin, discharge your iPhone battery below 25%. A charged lithium-ion battery can catch fire and/or explode if accidentally punctured.

    • Power off your iPhone before beginning disassembly.

    • Remove the two 6.9 mm-long pentalobe screws at the bottom edge of the iPhone.

    • Opening the iPhone's display will compromise its waterproof seals. Have replacement seals ready before you proceed past this step, or take care to avoid liquid exposure if you reassemble your iPhone without replacing the seals.

  2. , Fazer uma marca em suas palhetas: passo 2, imagem 1 %32 , Fazer uma marca em suas palhetas: passo 2, imagem 2 %32 , Fazer uma marca em suas palhetas: passo 2, imagem 3 %32
    • Se você inserir uma palheta de abertura muito fundo, você pode danificar o seu dispositivo. Execute esta etapa para marcar a palheta e evitar danos.

    • Meça 3 mm a partir da ponta e marque a palheta com um marcador permanente.

    • Você também pode marcar as outras pontas da palheta com medidas diferentes.

    • Como alternativa, prenda uma moeda com fita adesiva em uma palheta, deixando 3 mm de ponta.

  3. , Colocar fita adesiva sobre todas as rachaduras: passo 3, imagem 1 %32 , Colocar fita adesiva sobre todas as rachaduras: passo 3, imagem 2 %32 , Colocar fita adesiva sobre todas as rachaduras: passo 3, imagem 3 %32
    • Se o seu iPhone tiver uma tela rachada, mantenha as rachaduras sob controle e evite danos corporais durante o reparo colocando fita adesiva sobre o vidro.

    • Coloque tiras sobrepostas de fita adesiva transparente sobre a tela do iPhone até que toda a superfície fique coberta.

    • Use óculos de segurança para proteger seus olhos de qualquer vidro que possa ser liberado durante o reparo.

    • Se não conseguir fazer com que a ventosa grude nas próximas etapas, dobre um pedaço de fita adesiva resistente (como fita adesiva vedante) na forma de uma pega e levante a tela com ela.

    • Se tudo mais falhar, você pode colar a ventosa na tela com supercola.

  4. , Instruções com o Anti-Clamp: passo 4, imagem 1 %32 , Instruções com o Anti-Clamp: passo 4, imagem 2 %32 , Instruções com o Anti-Clamp: passo 4, imagem 3 %32
    • As próximas três etapas demonstram o Anti-Clamp, uma ferramenta que projetamos para facilitar o procedimento de abertura. Se não estiver usando o Anti-Clamp, pule três etapas para um método alternativo.

    • Para obter instruções completas sobre como usar o Anti-Clamp consulte este guia.

    • Puxe a pega azul para trás para destravar os braços do Anti-Clamp.

    • Deslize os braços pela borda esquerda ou direita do seu iPhone.

    • Posicione as ventosas próximo à borda inferior do iPhone, uma na dianteira e a outra na traseira.

    • Aperte as ventosas uma contra a outra para aplicar sucção na área desejada.

    • Se você achar que a superfície do seu iPhone é muito escorregadia para o Anti-Clamp se prender, você pode usar fita para deixar a superfície mais aderente.

  5. : passo 5, imagem 1 %32 : passo 5, imagem 2 %32 : passo 5, imagem 3 %32
    • Puxe a pega azul para a frente para travar os braços.

    • Gire a pega 360 graus no sentido horário até que as ventosas comecem a se esticar.

    • Certifique-se de que as ventosas permaneçam alinhadas uma com a outra. Se elas começarem a ficar desalinhadas, solte um pouco as ventosas e realinhe os braços.

  6. : passo 6, imagem 1 %32 : passo 6, imagem 2 %32 : passo 6, imagem 3 %32
    • Aqueça uma bolsa térmica iOpener e passe-a pelos braços do Anti-Clamp.

    • Você também pode usar um secador de cabelo, uma pistola de ar quente ou uma superfície aquecida, mas calor extremo pode danificar o visor e/ou a bateria interna, portanto, proceda com cuidado.

    • Dobre a bolsa térmica iOpener de modo que ela fique sobre a borda inferior do iPhone.

    • Aguarde um minuto para que o adesivo tenha a chance de se soltar e apresentar um vão para a abertura.

    • Insira uma palheta de abertura no vão, abaixo da tela e da moldura de plástico, e não da tela em si.

    • Se o Anti-Clamp não formar espaço suficiente, aplique mais calor na área e gire a pega um quarto de volta.

    • Não gire a pega mais do que um quarto de volta de cada vez e espere um minuto entre cada volta. Deixe que o Anti-Clamp e o tempo façam o trabalho por você.

    • Pule as próximas três etapas.

  7. : passo 7, imagem 1 %32
    • O aquecimento da borda inferior do iPhone ajuda a amolecer o adesivo que prende o visor, facilitando a abertura.

    • Use um secador de cabelo ou prepare uma bolsa térmica iOpener e aplique-o(a) na borda inferior do iPhone por cerca de um minuto para amolecer o adesivo que se encontra por baixo.

  8. : passo 8, imagem 1 %32 : passo 8, imagem 2 %32
    • Se estiver usando uma ventosa de sucção simples, aplique-a na borda inferior do telefone, evitando a parte curva do vidro.

  9. : passo 9, imagem 1 %32 : passo 9, imagem 2 %32 : passo 9, imagem 3 %32
    • Puxe a ventosa para cima com pressão firme e constante para criar um pequeno vão entre o painel dianteiro e a estrutura traseira.

    • Insira uma palheta de abertura no vão, abaixo da [link|https://guide-images.cdn.ifixit.com/igi/...|new_window=true|tela e da moldura de plástico, e não da tela em si.

    • O adesivo impermeabilizante que fixa o visor é muito forte; a formação dessa abertura inicial requer uma quantidade significativa de força.Se estiver com dificuldade para abrir um vão, aplique mais calor e mova suavemente a tela para cima e para baixo para amolecer o adesivo, até se formar um vão de tamanho suficiente para inserir a ferramenta.

  10. : passo 10, imagem 1 %32 : passo 10, imagem 2 %32 : passo 10, imagem 3 %32
    • Deslize a palheta de abertura pelo canto inferior esquerdo e pela borda esquerda do iPhone, cortando o adesivo que mantém o visor no lugar.

    • Não insira a palheta mais do que 3 mm, pois pode ser que você danifique componentes internos.

  11. , Informações sobre a tela: passo 11, imagem 1 %32
    • Há cabos sensíveis passando ao longo da borda direito de seu iPhone. Não insira a sua palheta aqui, do contrário você pode danificar os cabos.

  12. : passo 12, imagem 1 %32 : passo 12, imagem 2 %32 : passo 12, imagem 3 %32
    • Insira novamente a sua ferramenta no canto inferior do iPhone e suba com ela pela lateral direita para continuar separando o adesivo.

    • Não insira a palheta mais do que 3 mm, pois isso pode danificar os cabos da tela.

  13. : passo 13, imagem 1 %32 : passo 13, imagem 2 %32 : passo 13, imagem 3 %32
    • A borda superior do visor está fixada por cola e por clipes.

    • Passe a palheta de abertura pelo canto superior do visor, enquanto puxa ou balanceia com cuidado o visor para baixo, na direção da porta Lightning.

    • Os clipes podem se quebrar se você aplicar força demais. Trabalhe com cuidado e seja paciente.

    • Não insira a palheta mais do que 3 mm, pois isso pode danificar o conjunto de sensores do painel dianteiro.

    • Passe a palheta pelo canto oposto e corte qualquer adesivo restante que esteja prendendo o visor.

  14. : passo 14, imagem 1 %32
    • Puxe a ventosa de sucção pela pequena lingueta para removê-la do painel dianteiro.

  15. : passo 15, imagem 1 %32 : passo 15, imagem 2 %32 : passo 15, imagem 3 %32
    • Abra o iPhone virando a tela para cima pelo lado esquerdo, como se estivesse virando a contra-capa de um livro.

    • Não tente ainda separar completamente a tela, pois vários cabos planos frágeis a conectam à placa lógica do iPhone.

    • Apoie a tela em algo para deixá-la de pé enquanto você executa os trabalhos no fone.

    • Durante a remontagem, retorne o visor para a posição deitada, alinhe os clipes ao longo da borda superior e pressione cuidadosamente na borda superior antes de engatar o resto do visor. Se ele não se encaixar facilmente com um clique audível, verifique a condição dos clipes em torno do visor e certifique-se de que eles não estejam tortos.

  16. Este passo não foi traduzido. Ajude a traduzi-lo

    : passo 16, imagem 1 %32 : passo 16, imagem 2 %32
    Ferramenta utilizada nesse passo:
    Magnetic Project Mat
    $19.95
    Comprar
    • Remove five screws securing the logic board connector bracket, of the following lengths:

    • Three 1.0 mm Y000 screws

    • One 1.3 mm Y000 screw

    • One 3.7 mm Phillips screw

    • Throughout this repair, keep track of each screw and make sure it goes back exactly where it came from to avoid damaging your iPhone.

  17. Este passo não foi traduzido. Ajude a traduzi-lo

    : passo 17, imagem 1 %32
    • Remove the bracket.

    • The bracket may be lightly adhered in place. Lift gently but firmly to separate it.

    • During reassembly, this is a good point to power on your iPhone and test all functions before you seal the display in place. Be sure to power your iPhone back down completely before you continue working.

  18. Este passo não foi traduzido. Ajude a traduzi-lo

    : passo 18, imagem 1 %32 : passo 18, imagem 2 %32
    • Use a spudger or a clean fingernail to pry the battery connector up from its socket on the logic board.

    • Try not to damage the black silicone seal surrounding this and other board connections. These seals provide extra protection against water and dust intrusion.

    • Bend the connector slightly away from the logic board to prevent it from accidentally making contact with the socket and providing power to the phone during your repair.

  19. Este passo não foi traduzido. Ajude a traduzi-lo

    : passo 19, imagem 1 %32 : passo 19, imagem 2 %32
    • Use a spudger or a fingernail to pry up and disconnect the front panel sensor assembly connector.

  20. Este passo não foi traduzido. Ajude a traduzi-lo

    : passo 20, imagem 1 %32 : passo 20, imagem 2 %32
    • Use a spudger or a fingernail to disconnect the OLED panel cable connector.

    • To re-attach press connectors like this one, carefully align and press down on one side until it clicks into place, then repeat on the other side. Do not press down on the middle. If the connector is misaligned, the pins can bend, causing permanent damage.

  21. Este passo não foi traduzido. Ajude a traduzi-lo

    : passo 21, imagem 1 %32 : passo 21, imagem 2 %32
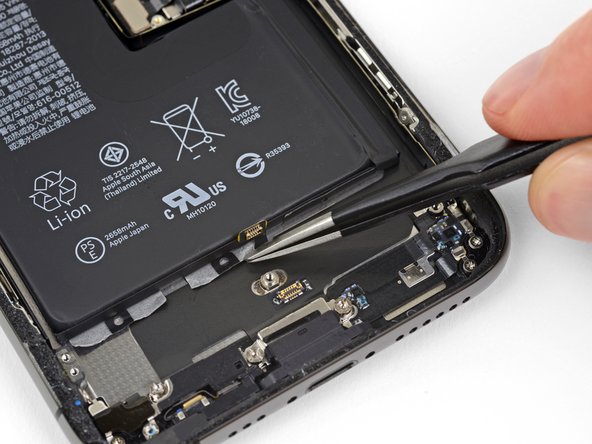
    • Use a spudger or fingernail to pry the digitizer cable connector up from its socket.

    • This connector's recessed location makes it tricky to reconnect. Take your time and align it carefully, then gently press it into place with your fingertip—first one side, then the other. You should feel it click into place.

    • If any part of your screen doesn't respond to touch after your repair, disconnect the battery and then re-seat this connector, making sure it clicks fully into place and that there's no dust or other obstruction in the socket.

  22. Este passo não foi traduzido. Ajude a traduzi-lo

    : passo 22, imagem 1 %32 : passo 22, imagem 2 %32 : passo 22, imagem 3 %32
    • The front panel sensor assembly flex cable is lightly adhered in place.

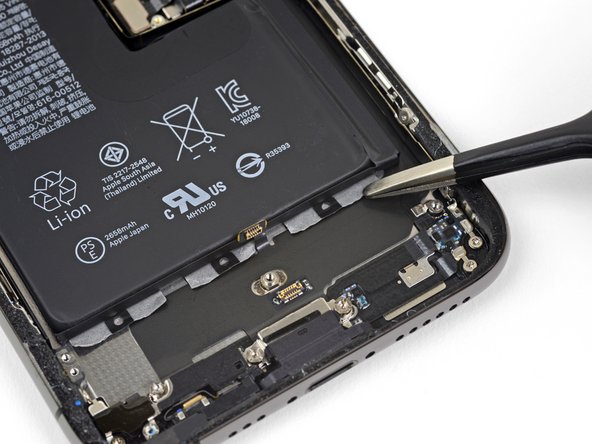
    • Carefully lift the cable until the adhesive separates.

  23. Este passo não foi traduzido. Ajude a traduzi-lo

    : passo 23, imagem 1 %32
  24. Este passo não foi traduzido. Ajude a traduzi-lo

    : passo 24, imagem 1 %32 : passo 24, imagem 2 %32
    • Remove the five screws securing the two brackets below the Taptic Engine and main speaker:

    • One 1.0 mm tri-point Y000 screw

    • Two 1.3 mm Phillips screws

    • One 1.7 mm Phillips screw

    • One 1.8 mm Phillips screw

  25. Este passo não foi traduzido. Ajude a traduzi-lo

    : passo 25, imagem 1 %32 : passo 25, imagem 2 %32 : passo 25, imagem 3 %32
    • The brackets are lightly adhered in place.

    • Gently lift to unstick and remove each bracket, being careful not to bend it.

    • If necessary, apply a little heat with a hair dryer or heat gun to soften the adhesive. (Putting an iOpener on the brackets is not recommended, as this may bend the spring contacts along the top.)

  26. Este passo não foi traduzido. Ajude a traduzi-lo

    : passo 26, imagem 1 %32 : passo 26, imagem 2 %32
    • Remove the 1.9 mm Phillips screw securing the speaker connector cover.

  27. Este passo não foi traduzido. Ajude a traduzi-lo

    : passo 27, imagem 1 %32
    • Remove the speaker connector cover.

  28. Este passo não foi traduzido. Ajude a traduzi-lo

    : passo 28, imagem 1 %32 : passo 28, imagem 2 %32
    • Use the tip of a spudger to pry up and disconnect the speaker connector.

  29. Este passo não foi traduzido. Ajude a traduzi-lo

    : passo 29, imagem 1 %32 : passo 29, imagem 2 %32
    • When prying up the speaker, take care not to damage the speaker flex cable you just disconnected. If necessary, bend the cable toward the battery so the speaker has room to come out.

    • Insert a spudger under the top edge of the speaker, near the edge of the iPhone's case.

    • Gently pry up and lift the top edge of the speaker slightly.

    • When reinstalling the speaker, check the position of the flex cable and make sure it doesn't get trapped underneath the speaker.

  30. Este passo não foi traduzido. Ajude a traduzi-lo

    : passo 30, imagem 1 %32 : passo 30, imagem 2 %32
    • While prying up the speaker, use tweezers to peel away the plastic bumper strip from the top edge of the speaker.

    • If necessary, apply a little heat to soften the adhesive and make the bumper strip easier to separate.

  31. Este passo não foi traduzido. Ajude a traduzi-lo

    : passo 31, imagem 1 %32 : passo 31, imagem 2 %32 : passo 31, imagem 3 %32
    • Hold the speaker by its side edges and rock it side-to-side, separating the adhesive securing it to the bottom edge of the iPhone.

    • Pull the speaker away from the bottom edge of the iPhone until the adhesive gasket separates.

  32. Este passo não foi traduzido. Ajude a traduzi-lo

    : passo 32, imagem 1 %32 : passo 32, imagem 2 %32
    • Remove the speaker.

    • The speaker's adhesive gasket is not reusable. Peel away any remaining adhesive residue with tweezers.

    • To help protect against water and dust intrusion, replace the adhesive gasket during reassembly. Prep the area by cleaning it with a bit of isopropyl alcohol and a lint-free cloth or coffee filter so that the gasket adheres properly. Install a new gasket onto the speaker, and then install the speaker.

  33. Este passo não foi traduzido. Ajude a traduzi-lo

    : passo 33, imagem 1 %32 : passo 33, imagem 2 %32
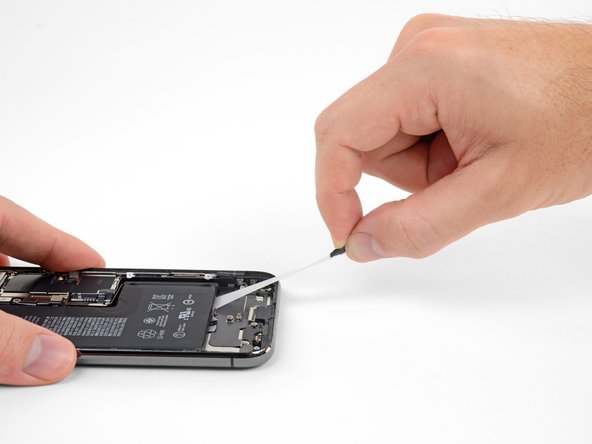
    • Use a spudger to disconnect the Taptic Engine flex cable by prying it straight up from its socket.

  34. Este passo não foi traduzido. Ajude a traduzi-lo

    : passo 34, imagem 1 %32 : passo 34, imagem 2 %32
    • Remove the two 1.9 mm Phillips screws securing the Taptic Engine.

  35. Este passo não foi traduzido. Ajude a traduzi-lo

    : passo 35, imagem 1 %32 : passo 35, imagem 2 %32
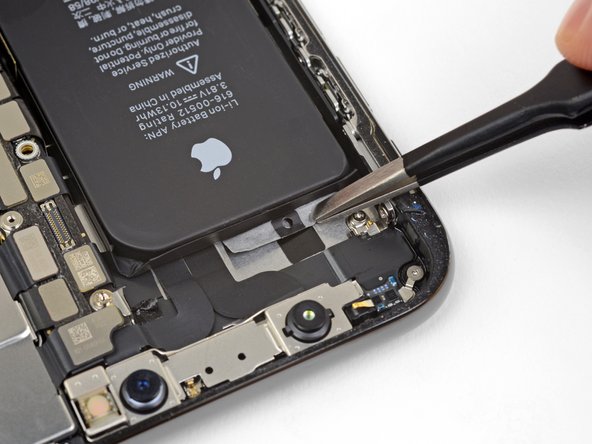
    • Grasp the plastic bumper strip and carefully lift it over the speaker connector.

  36. Este passo não foi traduzido. Ajude a traduzi-lo

    : passo 36, imagem 1 %32
    • Remove the Taptic Engine assembly.

  37. Este passo não foi traduzido. Ajude a traduzi-lo

    : passo 37, imagem 1 %32
    • The battery is secured to the rear case by four pieces of stretch-release adhesive—one under the upper area of the battery, and three under the lower area.

    • Each piece of adhesive has a black pull-tab at the end, which is lightly adhered to the side edge of the battery.

  38. Este passo não foi traduzido. Ajude a traduzi-lo

    : passo 38, imagem 1 %32 : passo 38, imagem 2 %32
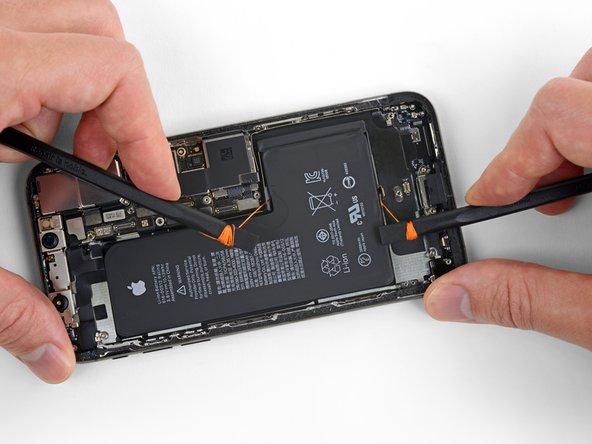
    • Separate the first battery adhesive tab from the bottom edge of the battery.

    • Each tab has a small loop in the center; insert a tool through the loop if you're having trouble grabbing hold of the tab.

    • Don't jab the battery with any sharp tools. A punctured battery may leak dangerous chemicals or catch fire.

  39. Este passo não foi traduzido. Ajude a traduzi-lo

    : passo 39, imagem 1 %32 : passo 39, imagem 2 %32 : passo 39, imagem 3 %32
    • Repeat the above step to separate the remaining two adhesive tabs from the bottom edge of the battery.

    • Take care not to damage the speaker cable connector, near the center adhesive tab.

  40. Este passo não foi traduzido. Ajude a traduzi-lo

    : passo 40, imagem 1 %32 : passo 40, imagem 2 %32 : passo 40, imagem 3 %32
    • In the following steps, you'll pull each tab to slowly stretch out the adhesive underneath the battery. This special stretch-release adhesive loses its tack when stretched and then comes out in your hand, allowing you to lift out the battery with ease.

    • If the strips break, don't panic! They don't always work as intended. Keep reading for some additional steps for removing broken strips.

    • To increase your odds of success:

    • Don't press down on the battery. Hold the iPhone firmly by its sides.

    • Keep the strips flat and unwrinkled as you pull.

    • Pull very slowly, giving the strip time to stretch and separate. It takes around 15-30 seconds of stretching to remove each strip.

    • Pull at a low angle so the strip doesn't snag along the bottom edge of the battery.

    • If a strip does break off underneath the battery and cannot be retrieved, move on to the other strips and then continue with the additional steps below.

  41. Este passo não foi traduzido. Ajude a traduzi-lo

    : passo 41, imagem 1 %32 : passo 41, imagem 2 %32 : passo 41, imagem 3 %32
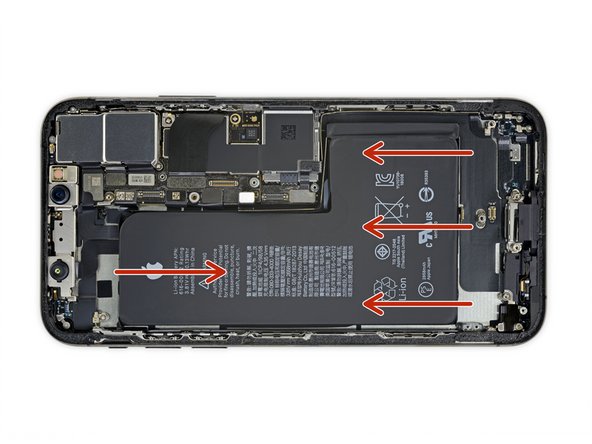
    • Grab one of the outer battery adhesive tabs and slowly pull it away from the battery, toward the bottom of the iPhone.

    • Pull steadily, maintaining constant tension on the strip until it slips out from between the battery and the rear case.

    • The strip will stretch to many times its original length. Continue pulling and re-grab the strip near the battery if necessary.

    • If the battery adhesive tabs break during the removal process, use your fingers or blunt tweezers to retrieve the remaining length of adhesive, and continue pulling.

    • If any of the adhesive strips break underneath the battery and cannot be retrieved, try to remove the remaining strips, and then proceed as instructed below.

  42. Este passo não foi traduzido. Ajude a traduzi-lo

    : passo 42, imagem 1 %32 : passo 42, imagem 2 %32 : passo 42, imagem 3 %32
    • Repeat the previous step to remove the strip on the opposite side, leaving the center strip for last.

  43. Este passo não foi traduzido. Ajude a traduzi-lo

    : passo 43, imagem 1 %32 : passo 43, imagem 2 %32 : passo 43, imagem 3 %32
    • Remove the center strip, being careful not to snag it on the speaker flex cable.

  44. Este passo não foi traduzido. Ajude a traduzi-lo

    : passo 44, imagem 1 %32 : passo 44, imagem 2 %32
    • The final pull tab lies very close to the Face ID hardware. If damaged, Face ID can only be repaired by Apple, so work with care.

    • Peel and separate the pull tab on the final adhesive strip, on the top edge of the upper battery cell.

  45. Este passo não foi traduzido. Ajude a traduzi-lo

    : passo 45, imagem 1 %32 : passo 45, imagem 2 %32 : passo 45, imagem 3 %32
    • Pull and remove the final adhesive strip.

    • The strip may fling the battery when it separates from the iPhone, so hold your hand over the battery to secure it—but don't press down on the battery itself, or the added pressure may cause the adhesive strip to break off underneath the battery.

    • If you removed all four adhesive strips successfully, skip the two next steps.

    • Otherwise, if any of the adhesive strips broke off underneath the battery and could not be retrieved, continue with the next step below.

  46. Este passo não foi traduzido. Ajude a traduzi-lo

    : passo 46, imagem 1 %32 : passo 46, imagem 2 %32
    • If any of the adhesive strips broke off and the battery remains stuck to the rear case, remove it by adding a few drops of isopropyl alcohol (90% or greater) underneath the battery near the stuck strip(s).

    • After about a minute, gently lift the battery.

    • The battery should come free with minimal force. If not, add a little more isopropyl alcohol and try again. Do not bend or puncture the battery.

    • Be careful not to damage the ribbon cables or the wireless charging coil directly underneath the battery.

    • For an alternative method to unstick the battery, continue to the next step.

  47. Este passo não foi traduzido. Ajude a traduzi-lo

    : passo 47, imagem 1 %32 : passo 47, imagem 2 %32 : passo 47, imagem 3 %32
    • If any of the adhesive strips broke off and the battery remains stuck to the rear case, prepare an iOpener or use a hair dryer to heat the rear case directly behind the battery.

    • Heat the iPhone until the rear case is slightly too hot to comfortably touch. Don't overheat the iPhone, or you may accidentally ignite the battery.

    • Flip the iPhone back over and thread a strong piece of string (such as dental floss or a length of thin guitar string) underneath the battery.

    • Wear gloves to protect your fingers, or wrap each end of the string around a tool.

    • Pull the string from side to side in a sawing motion to separate the adhesive. This can take some time since the adhesive is slow to deform, but with patience it will come free. Do not deform or damage the battery.

    • Start from the top or bottom edge of the battery, and pull toward the middle. Don't pull the string through the middle third of the battery, or you may damage the ribbon cables or the wireless charging coil directly underneath.

    • If you choose to use pry tools to lift the battery out of the iPhone, use extreme caution or you may damage the ribbon cables or the wireless charging coil directly underneath the battery.

  48. Este passo não foi traduzido. Ajude a traduzi-lo

    : passo 48, imagem 1 %32
    • Grasp the battery from the bottom edge and remove it from the iPhone.

    • If there's any alcohol solution remaining in the phone, carefully wipe it off or allow it to air dry before installing your new battery.

    • Reinstall the Taptic Engine and speaker before installing a new battery. This helps keep the battery aligned correctly during installation.

    • Before you adhere the replacement battery, temporarily reconnect the battery connector to the logic board socket. This ensures that the battery is properly aligned in its recess.

    • Adhere the battery, disconnect it, and continue reassembling your device.

    • If your new battery does not come with adhesive preinstalled, refer to this guide for help replacing the adhesive strips.

    • Perform a force restart after reassembly. This can prevent several issues and simplify troubleshooting.

Linha de Chegada

110 outras pessoas executaram este guia.

Jeff Suovanen

Membro desde: 08/06/13

428.338 Reputação

Autoria de 259 guias

Equipe

iFixit Membro de iFixit

Staff

Membros da 135

Autoria de 17.169 guias

17 comentários

i don’t know what happened but now my iphone xs will only boot into recovery mode and there is nothing showing up on the display. i have double triple quadruple checked and dont know what my issue is. any feedback on the matter would be greatly appreciated.

Daniel Bolton - Responder

My iPhone has been turned off completely for the past few weeks, I have tried to hard restart it but nothing seems to work. It has a black screen and isn’t responding to anything. Nothing has ever been wrong with the phone it just shut down one day and hasn’t restarted since. Do you have a suggestion to get my phone working again?

Olivia - Responder

Anyone have an issue where the phone won’t charge after replacing the battery/

Christopher Rich - Responder

Yes, I cant figure out why. I wonder if because its not the original battery, it wont let the new one charge? Idk.

Nick Lo -

It is possible the you went to deep with the plectrum, knocking of a capacitor from the logic board. I think it’s best you take it to a really good repair shop where the owner has expert solder skills to replace it.

Good luck

TheKillerbee24 - Responder

Adicione um comentário

Exibir estatísticas:

Últimas 24 horas: 170

Últimos 7 dias: 979

Últimos 30 dias: 4,564

Duração total: 335,591