Esta versão pode conter edições incorretas. Mude para o último instantâneo verificado.
O que você precisa
-
-
Desligue o iPhone antes de iniciar a desmontagem.
-
Remova os dois parafusos pentalobe de 6,7 mm na borda inferior do iPhone.
-
-
-
Meça 3 mm a partir da ponta e marque a palheta com um marcador permanente.
Got to step 2 and realized the fix kit doesn't include an opening pick! Looks like a guitar pick, and I have those lying around. Is that expected? Looks like the pick is used in many steps below. There's a little blue crowbar that isn't mentioned in the instructions. Perhaps that replaces the opening pick?
Hi! I can't see which guide you were using when writing this comment. Can you reply here with which guide and fix kit you used?
I see you posted this in Meta. I hope it's resolved soon! In the meantime, a guitar pick may work well enough for your repair.
what fix kit?
My fix kit didn't include an opening pick either
My AliExpress refurbished screen came with a pick that has a coin-like circle that pops out, so no modification was necessary
-
-
-
Coloque tiras sobrepostas de fita adesiva transparente sobre a tela do iPhone até que toda a superfície fique coberta.
-
Se não conseguir fazer com que a ventosa grude nas próximas etapas, dobre um pedaço de fita adesiva resistente (como fita adesiva vedante) na forma de uma pega e levante a tela com ela.
-
-
-
Puxe a pega azul para trás para destravar os braços do Anti-Clamp.
-
Deslize os braços pela borda esquerda ou direita do iPhone.
-
Posicione as ventosas próximo à borda inferior do iPhone - uma pela frente e a outra pela traseira.
-
Aperte as ventosas uma contra a outra para aplicar sucção na área desejada.
-
-
-
Puxe a pega azul para a frente para travar os braços.
-
Gire a pega 360 graus no sentido horário ou até que as ventosas comecem a se esticar.
-
Certifique-se de que as ventosas permaneçam alinhadas uma com a outra. Se elas começarem a ficar desalinhadas, solte um pouco as ventosas e realinhe os braços.
-
-
-
Aqueça uma bolsa térmica iOpener e passe-a pelos braços do Anti-Clamp.
-
Dobre a bolsa térmica iOpener de modo que ela fique sobre a borda inferior do iPhone.
-
Aguarde um minuto para que o adesivo tenha a chance de se soltar e apresentar um vão para a abertura.
-
Insira uma palheta de abertura sob a tela e o painel de plástico, mas não abaixo da própria tela.
-
Pule as próximas três etapas.
Please UPDATE THIS STEP to say 'insert the opening pick underneath the PLASTIC FRAME OF THE SCREEN' and not the screen. Way too many people are taking this as the way to do it then posting their screen looks different when it's open when they've actually removed the screen leaving the frame in place. It's not rocket science.
Thanks for the suggestion! We updated this step to clarify that.
-
-
-
Use um secador de cabelo, uma pistola de ar quente ou prepare uma bolsa térmica iOpener e aplique-o(a) na borda inferior do iPhone por cerca de um minuto para amolecer o adesivo que se encontra por baixo.
An alternative to the Iopener or heat gun is to heat water to EXACTLY 80 degrees F (cooking thermometer is great for this) and pour into a reinforced ziplock type bag. Leave the bag on the screen, but be sure that none of the hot water rests on the zipper portion, as the water is hot enough to soften that seal and leak out on to your device! This meat had is my personal favorite as the heat is distributed very equally and precisely as compared to a heat gun, but is more accessible than the Iopener.
-
-
-
Puxe a ventosa para cima com pressão firme e constante para criar um pequeno vão entre o painel frontal e a estrutura traseira.
-
Insira uma palheta de abertura no espaço abaixo da, tela e da moldura de plástico, mas não debaixo da própria tela.
-
-
-
Deslize a palheta de abertura pelo canto inferior esquerdo e pela borda esquerda do iPhone, cortando o adesivo que mantém a tela no lugar.
I think it's important to note that depending on how a screen was damaged, make sure to insert the pic under the black bezel directly under the actual screen. This bezel is a frame around the digitizer. I unknowingly inserted the pic between the bezel and the screen, and separated them both. I did this all the way around the phone. So I basically had to struggle to keep together two different sections of the display assembly because of this mishap, until I removed all the ribbon connectors. It made things much more difficult.
-
-
-
Insira novamente a palheta na borda inferior do iPhone e deslize-a para cima no lado direito para continuar separando o adesivo.
My replacement screen for the XR has a black rim but it looks pink. Is that normal?
Step 11 says not to insert your pick around the right side to avoid damaging cables, then Step 12 says to insert it on the right side. Help, I'm confused!
Hi there!
Thank you for the feedback! The wording in step 11 was definitely ambiguous, so we have changed it! You only need to avoid the marked spots rather than the right edge.
-
-
-
-
Abra o iPhone virando a tela para cima pelo lado esquerdo, como se estivesse virando a contra-capa de um livro.
-
Apoie a tela em algo para deixá-la de pé enquanto você executa os trabalhos no fone.
sure looks like the "hinge" is on the right hand side to me.. not left...!
If you leave the suction cup attached to the screen during the “hinging” process, it makes for a very handy holder for the screen until it’s completely detached.
-
-
-
Remova os três parafusos Y000 de 1,2 mm que prendem o suporte que cobre o conector da bateria.
-
Remova o suporte.
Definitely make sure all three lobes of your tool are aligned before use (it’s a little harder to tell with this style of bit) and apply even and adequate pressure to ensure it grabs as you spin the driver to prevent disfiguring the lobes/slot of the screw head.
Unfortunately my Y000 tool was perhaps not the best fit (tolerance a bit off) in these screws and I ended up stripping out the heads of all three of these. I started to panic but after I sanded the tip of my Y000 bit down a little with super fine grit (1000CW-C) sand paper to flatten the domed tip (visible with macro lens) and give it a bit more bite I was able to remove and reinstall without issue—in fact I had to remove and install them twice since I forgot my adhesive tape during reassembly, so the screws survived and the sanded bit worked.
+1 to above comment. I bought a cheap kit from Amazon and the Y000 screw driver is not good for this job. I’m concerned that I may have disfigured the heads and i type this comment in the midst of my fix :D Be gentle and assess if you can remove at least one screw with your driver before rummaging through all three and other similar screws holding display connector as well.
Update to above comment. I got hold of a Y0.8 screw driver bit (lucky to find an ORIA screw driver kit in my office) and it works like wonders :) Now back to work…
-
-
-
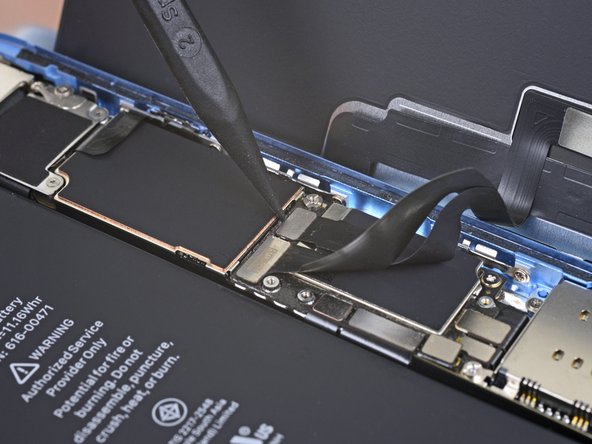
Com a ponta pontiaguda de uma espátula, erga o conector da bateria em linha reta, para fora do soquete.
-
Vire o conector ligeiramente para fora da placa lógica para evitar que ele entre acidentalmente em contato com o soquete e forneça energia elétrica ao telefone durante o reparo.
-
-
-
Remova os dois parafusos Y000 de 1,2 mm que prendem o suporte do conector da tela.
-
Remova o suporte.
-
-
-
Com a ponta pontiaguda de uma espátula, erga e desconecte o cabo do digitalizador.
-
-
-
Com a ponta pontiaguda de uma espátula, desconecte o conector do cabo da tela.
The new display cable isn’t snapping in but I was just able to snap in the old one. Did I break the new one somehow?
Same it is really frustrating, just keeps slipping up and its bound to get damaged
-
-
-
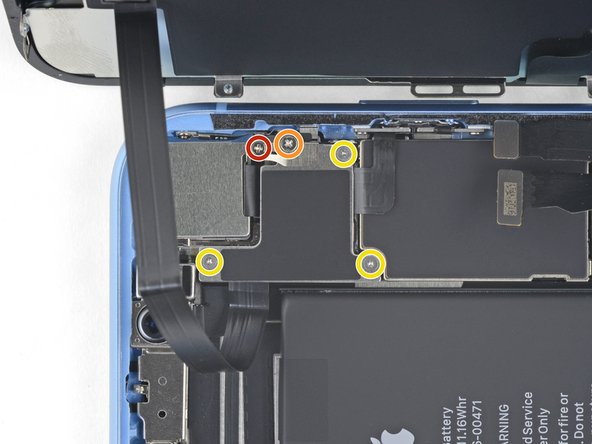
Remova os cinco parafusos que prendem o suporte do conector da placa lógica à estrutura traseira:
-
Um parafuso Phillips nº 000 de 1,3 mm
-
Um parafuso Phillips nº 000 de 1,5 mm
-
Três parafusos Y000 de 1,2 mm
-
Remova o suporte.
I’m not sure it makes much if any difference, but we went ahead and swapped the order for you guys. Thanks for your comments!
I just repaired another XR, and you are right! It doesn’t make any differnerce in the order these screws come out. I still damaged this fragile piece. As I work on more of these, I’ll figure out a way to remove this screw without damaging the clip. For now everyone, just use extra caution when removing the 1.3mm phillips screw! Thanks Jeff
I’ve now done at least 6 of these so far and I have fairly consistent good results by taking the 2 Philips head screws out first, then doing the Y screws.
Stow -
Is this piece important for the repair if broken? I have broken it on a home repair. What is it used for? Is it a grounding connection or is it completely unimportant. More information needed please
I’m wondering that too. Is this piece important?
I can confirm that taking out the 1.3 mm screw first then the 1.5 mm screw works the best. If done correctly, you should be able to to remove the rest of the screws and pull the panel off with the clip still attached to the panel. For reassembly, start with the 1.5 mm screw then the 1.3 mm screw.
I don’t remove the small screw at all. I just slide out the metal cover plate and slide back in to reassemble.
this is what i have done as well. Care is still needed to avoid damaging this part. However, it is seemingly far less prone to damage or loss and thus less risky for this repair process.
I too broke this shield. In looking over this problem I believe it’s best to loosen, but not remove, either screw first then the other. To be clear, loosen the red or yellow screw but only just to break it free, then the second screw. Then remove both and the others and the shield should remain in one piece. I put it back with the broken part (on the red screw) and made sure the two are in contact so there’s conductivity as these shields serve a purpose other than just holding in connectors. My phone works fine with this fix.
Is this small bracket important if broken??
Mine is broken
Mine is broken and my apple pay doesn’t work. Something to do with NFC antenna this little clip??
I'm guessing so. I replaced a screen on a phone I bought from a friend. I noticed this bracket was broken when I disassembled the phone but didn't think much of it. When I reassembled it my NFC also does not work. Bummer. A lot of people in these comments have asked if it is crucial that this bracket be connected. Can someone from iFixit or other please reply to those comments?
Kyaw-Zin is right because the shield contains of two tin parts. But there is another option:
1. Unscrew the yellow and orange screws first.
2. Lift the shield gently that it can turn about 20° anticlockwise.
3. Open the red screw and let the shield turn with it the first degrees.
The first time I did this repair, I didn’t see the comments ahead of time and broke the bracket, even removing the 1.3mm screws first. The second time I did the repair, I was prepared and being extra careful, but the simple act of turning the 1.3mm screw head was enough to break it. If I ever have to do this repair again, I’ll just leave the screw in and try to slide the plate out with the screw (and bracket, hopefully) still in tact, as per Kyaw-Zin Win.
None of the screw driver bits I got fits the 1.3mm and 1.5mm screws. How do I remove them?
Same issue as above. The bits provided in the kit do not work with the 1.3mm and 1.5mm screws
Further to above comment about bit not working. Had to go and purchase another PH000 from Home Depot and that worked
I’ve broken that little bracket attached to the red screw. Is it important and can I get a replacement????? Thanks all
Broken the clip. Is this important??
Don't remove the 1.3 Phillips screw! Twisting this screw will break the smaller bracket that is clipped to the larger. Remove all the other screws. Block the smaller bracket from moving as you gently slide the larger bracket horizontally toward the battery until free. The smaller bracket can stay in place while the screen is replaced. When reassembling, support the small bracket by backing with a spudger or similar tool.
I just broke the smaller bracket also :( I didn´t notice these comments until now :(
It looks like part of the antenna for NFC, as all except NFC works on my iPhone now.
It should be repairable using some wire wrap wire, either twisted around the two screws that connected that part of the bracket (or soldered in place). I will try and report back if it works.
Success!! I managed to re-construct the small arm of the bracket by screwing the 1.3mm screw back in with some 0.3mm enamel wire soldered into what was left of the small bracket arm on the screw, then the other end of the enamel wire I wrapped under the 1.5 wire screw's head (enamel exposed to bare metal), then screwed both screws down. also I lifted up the small metal arm with a screw driver (to make sure it reconnects with the display grounding square) ..and NFC worked again (slightly different antenna pattern mind (need to place cards slightly higher up the rear of the phone). Anyway works again :)
-
-
-
Com a ponta pontiaguda de uma espátula, erga o conector do conjunto de sensores dianteiros de seu soquete.
During testing, make sure your proximity sensor is not on upside down, as it’s easy to connect upside down. Your phone will boot loop if it’s on incorrectly.
-
-
-
Remova o conjunto da tela.
unclear if this is where screen removal ends
I had the same question, but the answer is yes. Steps 21-30 are removing parts from the original screen that need to be reattached onto the new screen. You are no longer working inside the frame, but on the back of the screen itself.
I apologize for missing these comments initially, but yes that’s correct, the screen is removed now and the rest of the guide goes on to other parts, either in the phone or on the back of the screen. Good luck with the repair!
The alternate method of removing the battery should be highlighted as a standard option. There is so much more work and potential to damage the parts than if you left them in place and carefully with plenty of heat remove the battery. I so wish I had seen this before!
-
-
Este passo não foi traduzido. Ajude a traduzi-lo
-
Remove the seven screws securing the bracket below the Taptic engine and speaker:
-
Three Phillips 1.4 mm screws
-
Two Phillips 1.7 mm screws
-
One Phillips 1.9 mm screw
-
One Phillips 1.6 mm screw
Why remove all this stuff for the battery? Is it necessary to do any of steps from here to 32 for the battery at all?
Removing these parts facilitates removing the bottom adhesive tabs but is not necessary. If you remove the upper adhesive tabs, then heat the backside of the lower ones (which you do if you couldn't get the tabs out), the battery comes out easily. Removes 14 steps from this procedure.
-
-
Este passo não foi traduzido. Ajude a traduzi-lo
-
Lift the bracket from the edge nearest the battery. Don't try to fully remove it, as it's still connected via a small flex cable.
-
-
Este passo não foi traduzido. Ajude a traduzi-lo
-
While holding the bracket out of the way, use the point of a spudger to pry up and disconnect the flex cable underneath.
-
-
Este passo não foi traduzido. Ajude a traduzi-lo
-
Remove the piece of black tape and the small rubber rectangle covering the Taptic Engine connector cover.
-
-
Este passo não foi traduzido. Ajude a traduzi-lo
-
Remove the five screws securing the lower speaker:
-
One 2.8 mm standoff screw
-
One 2.3 mm standoff screw
-
One 2.3 mm Phillips screw
-
One 1.8 mm Phillips screw
-
One 1.6 mm Phillips screw
I was able to get the 2.8mm standoff screw out with a 1.5 mm flat head from my iFixit kit but was not able to find anything to get the 2.3mm screw out. Buying the standoff screwdriver begrudgingly. I wish I'd known about this before I started.
Recommend PH00 for the 1.8 and PH000 for the rest.
-
-
Este passo não foi traduzido. Ajude a traduzi-lo
-
Remove the small bracket on the top right corner of the speaker.
-
Remove the Taptic Engine connector cover.
-
-
Este passo não foi traduzido. Ajude a traduzi-lo
-
Insert a spudger under the top edge of the speaker near the edge of the iPhone's case.
-
Gently pry up and lift the top edge of the speaker.
-
-
Este passo não foi traduzido. Ajude a traduzi-lo
-
Hold the speaker by its side edges and rock it side-to-side, separating the adhesive securing it to the bottom edge of the iPhone.
-
Pull the speaker away from the bottom edge of the iPhone until the adhesive gasket separates.
-
-
Este passo não foi traduzido. Ajude a traduzi-lo
-
Remove the speaker.
you may be able to reuse the gasket if you heat the glue. You may want to consider this because I can’t find the gasket through ifixit.
do we have to remove all the extra stuff such as this if we're just replacing screen display? what is the importance?
If you want to get the surface prepped nicely, tightly roll up the corner of a KimTech wipe, add some IP, then gently use your spudger tip to wipe excess gasket material from the area. Take your time!
-
-
Este passo não foi traduzido. Ajude a traduzi-lo
-
Remove the two 1.8 mm Phillips screws securing the Taptic Engine.
-
-
Este passo não foi traduzido. Ajude a traduzi-lo
-
Use a spudger to disconnect the Taptic Engine flex cable by prying it straight up from its socket.
-
-
Este passo não foi traduzido. Ajude a traduzi-lo
-
Each piece of adhesive has a black pull-tab at the end, which is lightly adhered to the side edge of the battery.
-
-
Este passo não foi traduzido. Ajude a traduzi-lo
-
Peel back the first battery adhesive tab from the bottom right edge of the battery.
Yes I think this is very discouraged to use tweezers to do this task (like it is shown on the picture), applying a force to pull the adhesives can easily result in an unintended action on the battery. These adhesive do generally break anyway. Better use the dental floss solution as mentioned in step 41.
Welp fellas extra careful on this part, I wasn't enough and punctured the battery which led to a small fire reaction, luckily with only 15% of charge it barely did anything. EXTRA CAREFUL I REPEAT TAKE IT SLOW
-
-
Este passo não foi traduzido. Ajude a traduzi-lo
-
Slowly pull one battery adhesive tab away from the battery, towards the bottom of the iPhone.
-
Pull steadily, maintaining constant tension on the strip until it slips out from between the battery and the rear case. For best results, pull the strip at as low an angle as possible, without snagging it on any of the iPhone's other components.
-
If the battery adhesive tabs break during the removal process, use your fingers or blunt tweezers to retrieve the remaining length of adhesive, and continue pulling.
-
-
Este passo não foi traduzido. Ajude a traduzi-lo
-
Repeat the above steps to remove the remaining three adhesive strips.
-
If you removed all of the adhesive strips successfully, skip the next step.
-
Wait about one minute for the alcohol solution to weaken the adhesive. Use the flat end of a spudger to gently lift the battery.
-
-
Este passo não foi traduzido. Ajude a traduzi-lo
-
If any of the adhesive strips broke off and the battery remains stuck to the rear case, prepare an iOpener or use a hair dryer to heat the rear case directly behind the battery. This will help soften the adhesive.
-
Flip the iPhone back over and thread a strong piece of string (such as dental floss or a length of thin guitar string) underneath the battery.
-
Pull the string from side to side in a sawing motion all along the length of the battery to separate the adhesive. This can take some time since the adhesive is slow to deform, but with patience it will come free. Do not deform or damage the battery.
Personally, I would recommend using drops of isopropyl alcohol. This softens most kind of sticky things. Then pry the battery out. Since you're replacing the battery, damaging it shouldn't be a worry.
As long as you don't puncture it as i did lol
I used a 3d printed heated bed at 70 Celsius to preheat for 10 minutes the phone body. After that I fixed the anti-clamp tool on the lower part of the battery. With a good vacuum in the cups the battery comes out surprisingly easy
-
-
Este passo não foi traduzido. Ajude a traduzi-lo
-
Remove the battery from the iPhone.
-
Adhere the battery, disconnect it, and continue reassembling your device.
Changed the Battery but the new battery shows Service symbol..what to do?
Just replaced the battery, but the new one is draining like crazy. Even faster then the old one? Did I get a faulty battery?
I might have the same issue ill try calibrating it and force restarting.
-


Cancelar: não concluí este guia.
111 outras pessoas executaram este guia.

12 comentários
Hello and Good morning please I wanted to know if iPhone 8 battery can be fixed in iPhone XR?
Not sure what you’re asking; if your asking if the iPhone 8 battery will fit in an Xr, or vise-versa, the answer is no.
After battery replacement, battery health is disabled. Will a factory reset reenable the battery health?
Hi Jon,
Unfortunately, Apple disables battery health for non-Apple battery repairs. I’ll make sure to add this into the guide intro.
What about the constant repeating message that “could not check if battery is genuine”. Does it stop showing up on the screen?
After you clear the message it will only come up again when the iPhone is restarted.
The step by step guide shows and tells you in detail how to take it out and how to replace it.
Instructions were clear enough, though lengthy and often redundant. I disassembled my phone, replaced the battery, and closed it up in about two hours (first-timer).
For the love of God, iFixit, you need to do a much better job linking videos for procedures like replacing screen adhesive in your instructions. I eventually found one for applying the adhesive, but it was still little confusing so I looked at your YouTube video. That video, is no longer even relevant because the procedure shown in the video does not match with the current adhesive kit you see. Or, at least, sure doesn't look the same.
Anyway, I encourage anybody trying this to purchase and extra screen adhesive or two. you'll probably need them.
this is before i buy the battery replacement kit, i was wondering if i need to buy the adhesive battery strips or if it comes with the kit
Hey, Danke für die ausführliche Anleitung. Es ist nicht der erste Akku, den ich in einem iPhone tausche und ich komme immer gut mit den Anleitungen klar.
Ich hätte eine Bitte / Empfehlung falls ihr diese oder andere Anleitungen zu neueren iPhones nochmal aktualisiert:
Ich vermute es geht nicht nur mir so, dass es relativ komplex ist, die neue Klebedichtung richtig zu befestigen. Hierfür wären Tipps und ggf. Bilder hilfreich..
One of my gaskets was as shown in your second photo, the other had been worked into the threads (as if smeared) probably from the factory and was completely unusable.
In place of replacements (unsure of where to purchase) I just used a clear silicone caulking on both screws upon reassembly to offer at least some water seal. I wish these gaskets were included with the gasket waterproofing sealant kit!
Erica - Responder
Is there any place to buy these screw gaskets? I haven’t seen it mentioned anywhere but one of mine was pretty much chewed up. Silicone should work but I’d prefer the oem solution.
Chilinh Nguyen - Responder
I found a place on Amazon that sells them. It's cheapest to get a full set of screws than to get just these. $5-$6 USD.
J Olin -
Can it be dead?
Lulu navarro - Responder
If I transfer the data from the old to the new battery with an icopy, don't I get an error message?
David Julian Krause - Responder
how am i supposed to know if the battery is below 25% if the screen won't turn on?
Beth Jackson - Responder
Spoiler alert! I just followed all the steps and if you bought the anti-clamp you might save a lot of time and some unreversible steps.
I recommend that you read all the steps before beginning and follow the steps up to the point where the guide removes the screen (step 23). After that read again the precautions of step 41 and try the next thing:
- Using something like the iOpener hot bag, heat up the back side of the phone where the battery is glued to for some minutes
- Alternatively use a 3d printer heat bed at 60 degrees Celsius
- Once the back of the phone is hot to the touch, enough to make it uncomfortable to the touch, find a portion of the battery with a smooth surface and attach the anti-clamp to it and the back of the phone
- Follow the steps 4 and 5 to detach the battery from the frame
If this procedure works you will not have to remove some elements such as:
- lower speaker black tape (step 28)
- lower speaker water proof gasket (step 33)
I hope that someone find this helpful. Happy fixing!!
Julio Beltran - Responder