Introdução
Aprenda a substituir a tela do seu iPhone 7 Plus. Esta peça vem com o conjunto frontal, o alto-falante auricular e a blindagem EMI já instalados, facilitando o reparo.
Tudo o que você precisa fazer é remover a tela antiga e transferir o botão home para a tela nova para que ele funcione.
O que você precisa
Vídeo de Apresentação
-
-
Desligue o seu iPhone antes de iniciar a desmontagem.
-
Remova os dois parafusos Pentalobe de 3,4 mm na borda inferior do iPhone (usando uma ponta de chave P2, caso você tenha um kit de pontas).
 Pergunte ao FixBot
-
-
-
Meça 3 mm a partir da ponta e marque a palheta com um marcador permanente.
-
-
Ferramenta utilizada neste passo:Clampy - Anti-Clamp$24.95
-
Puxe a pega azul para trás para destravar os braços do Anti-Clamp.
-
Deslize os braços pela borda esquerda ou direita do seu iPhone.
-
Posicione as ventosas próximo à borda inferior do iPhone, diretamente acima do botão home - uma pela dianteira e a outra pela traseira.
-
Aperte as ventosas uma contra a outra para aplicar sucção na área desejada.
-
-
-
Puxe a pega azul para a frente para travar os braços.
-
Gire a pega 360 graus no sentido horário até que as ventosas comecem a se esticar.
-
Certifique-se de que as ventosas permaneçam alinhadas uma com a outra. Se elas começarem a ficar desalinhadas, solte um pouco as ventosas e realinhe os braços.
-
-
-
Aqueça uma bolsa térmica iOpener e passe-a pelos braços do Anti-Clamp.
-
Dobre a bolsa térmica iOpener de modo que ela fique sobre a borda inferior do iPhone.
-
Aguarde um minuto para que o adesivo tenha a chance de se soltar e apresentar um vão para a abertura.
-
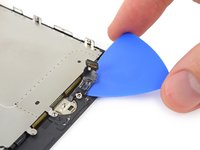
Insira uma palheta de abertura no vão.
-
Pule as próximas três etapas.
-
-
-
O aquecimento da borda inferior do iPhone ajudará a amolecer o adesivo que prende a tela, facilitando a abertura.
-
Use um secador de cabelo ou prepare uma bolsa térmica iOpener e aplique-o(a) na borda inferior do iPhone por cerca de 90 segundos para amolecer o adesivo que se encontra por baixo.
-
-
-
Aplique uma ventosa de sucção na metade inferior do painel dianteiro, imediatamente acima do botão home.
-
-
-
Puxe a ventosa para cima com pressão firme e constante para criar um pequeno vão entre a tela e a moldura.
-
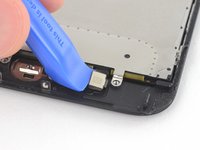
Insira uma palheta de abertura no vão.
-
-
-
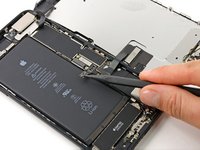
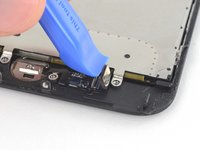
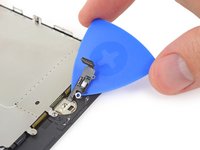
Passe a palheta de abertura a borda esquerda do fone para cima, começando pela borda inferior e indo em direção aos botões de controle de volume e ao seletor de mudo, cortando o adesivo que mantém a tela no lugar.
-
Pare próximo ao canto superior esquerdo do visor.
-
-
-
-
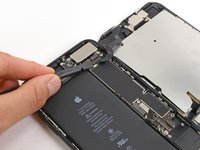
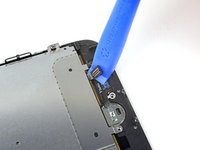
Insira novamente a sua ferramenta no canto direito inferior do iPhone e deslize-a ao redor do canto e subindo pela lateral direita do fone para separar o adesivo.
-
-
-
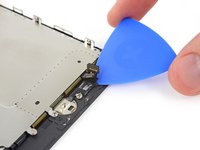
Puxe com cuidado a ventosa de sucção para erguer a borda inferior da tela.
-
Puxe a ventosa de sucção pela pequena lingueta para removê-la do painel dianteiro.
-
-
-
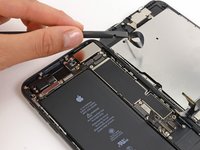
Passe uma palheta de abertura por debaixo da tela, circundando o canto esquerdo superior e ao longo da borda superior do fone para amolecer o último adesivo.
-
-
-
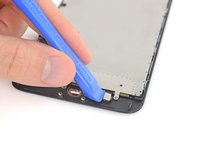
Deslize o conjunto da tela ligeiramente para baixo (afastando-o da borda superior do fone) para desengatar os clipes que o mantêm preso à estrutura traseira.
-
-
-
Abra o iPhone virando a tela para cima pelo lado esquerdo, como se estivesse virando a contra-capa de um livro.
-
Apoie a tela em algo para deixá-la de pé enquanto você executa os trabalhos no fone.
-
-
-
Remova os quatro parafusos tri-point Y000 a seguir que prendem o suporte do cabo da tela inferior à placa lógica:
-
Três parafusos de 1,2 mm
-
Um parafuso de 2,6 mm
-
-
-
Remova o suporte do cabo da tela inferior.
-
-
-
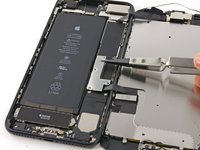
Use a ponta de uma espátula para levantar o conector da bateria para fora do seu soquete na placa lógica.
-
-
-
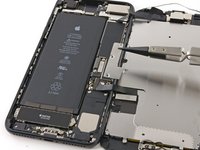
Use a ponta chata de uma espátula ou uma unha para desconectar os dois conectores para cabo de display inferiores, alavancando-os para cima a partir de seus soquetes na placa lógica.
-
-
-
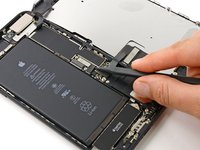
Remova os três parafusos tri-point Y000 que prendem o suporte sobre o conector do conjunto do painel dianteiro:
-
Um parafuso de 1,3 mm
-
Dois parafusos de 1,0 mm
-
Remova o suporte.
-
-
-
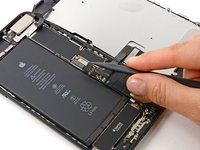
Desconecte o conector do conjunto do painel dianteiro do seu soquete na placa lógica.
-
-
-
Remova os quatro parafusos Y000 que prendem o suporte sobre o botão home/sensor Touch ID:
-
Um parafuso de 1,1 mm
-
Três parafusos de 1,3 mm
-
-
-
Remova o suporte que prende o sensor home/Touch ID.
-
-
-
Faça alavanca sob a borda esquerda do conector do cabo do botão home para desconectá-lo do seu soquete.
-
-
-
Com cuidado, faça alavanca no conector por baixo e afaste-o para não atrapalhar o cabo do botão de Início/Touch ID.
-
Se o conector não se soltar facilmente ao fazer alavanca, use um secador de cabelo ou uma iOpener para aquecer e amolecer o adesivo que prende o conector, e depois tente novamente.
-
-
-
Vire o conjunto do display. Use um secador de cabelo ou prepare um iOpener e aplique na borda inferior do display por cerca de 90 segundos para amolecer o adesivo por baixo.
-
-
-
Use uma palheta de abertura para separar delicadamente o adesivo que prende o cabo do sensor home/Touch ID à parte traseira do painel do display.
-
-
-
Remova o conjunto botão home levantando-o pela parte frontal do display.
-


Compare a sua nova peça de reposição com a peça original — talvez seja necessário transferir componentes restantes ou remover as películas adesivas da peça nova antes de instalar.
Para remontar o seu dispositivo, siga os passos acima na ordem inversa.
Leve o seu e-waste, lixo eletrônico para um reciclador certificado R2 ou e-Stewards.
O reparo não saiu como planejado? Tente alguma resolução de problemas, ou procure ajuda no nosso fórum de Respostas.
Cancelar: não concluí este guia.
628 outras pessoas executaram este guia.
Um agradecimento especial a esses tradutores:
100%

Translation Bot está nos ajudando a consertar o mundo! Quer contribuir?
Comece a traduzir ›

60Comentários do guia
Only the glass is broken on my screen. I don't need a new digitizer. Is there a way to just replace the glass? Seems like that would be much cheaper. Thanks!
Unfortunately, by the nature of the technology, cracked glass likely means your digitizer is out of commission (does touch still register on the cracked screen?). Below that is the LCD, and that might not be broken (if the image is fine, then the LCD is likely fine). The problem is that these components are VERY VERY difficult to separate. This makes the individual replacements a nightmare. I hate to say anything is impossible, but separating these components will feel impossible without expensive tools and extensive knowledge. It will also likely end in a mess of broken components. When there is a will, there is a way. But the separation project will demand a lot of will.
Our store is having trouble with the earpiece speaker working after screen repair on just the 7 Plus, not with the 7. We have tried different techniques and still get figure what we are doing wrong. Has anyone else had this problem and know the solution?
My earpiece speaker also won't work with new screen... this is frustrating. Any solution
There are some connections for the earpiece speaker that can be a little tricky to get properly connected during reassembly. If you look at the third photo in step 22 of the iPhone 7 Plus teardown you can see four copper pads on the cable, and four protruding copper connections on the speaker. For starters, make sure that these are all clean. When reassembling, make sure that the metal pads on the cable firmly touch the metal pins on the speaker. These are actually electrical connections, and are a little tougher to seat properly because they don't snap in like press or ZIF connectors. If the metal is all lined up and pressed against each other, then electricity should be flowing and sound should result! If the earpiece speaker was not removed and this guide was followed as is, it is most likely an issue with the connectors in step 19 of this guide.