Ir para o conteúdo principal
Toshiba Satellite C55D-A5108 Back Cover Replacement

Toshiba Satellite C55D-A5108 Back Cover Replacement

Kristen Gismondi

Kristen Gismondi e 2 outros colaboradores

Última atualização em June 7, 2024

20 minutos
Moderado

Introdução

Ir para o passo 1

Use this guide to remove and replace the back cover of your Toshiba Satellite C55D-A5108. The back cover provides security to the inner components of your laptop, while also providing grip and helping prevent overheating.

This guide will remove the back cover of your laptop, the battery, and hard drive. You will also be putting the components back together. If you do not feel confident with doing this yourself, please find someone that can help you with the process.

O que você precisa

Ferramentas

  1. Toshiba Satellite C55D-A5108 Back Cover Replacement, Battery: passo 1, imagem 1 %32
    • Flip over the device so that the model stickers are facing up.

  2. Toshiba Satellite C55D-A5108 Back Cover Replacement: passo 2, imagem 1 %32
    • Move the right notch to the unlock position by sliding it to the right.

  3. Toshiba Satellite C55D-A5108 Back Cover Replacement: passo 3, imagem 1 %32
    • Hold the left notch in an unlocked position with one hand and use the other hand to slide the battery out.

  4. Toshiba Satellite C55D-A5108 Back Cover Replacement, Hard Drive: passo 4, imagem 1 %32
    • Remove the Phillips #0 screw from the memory cover.

  5. Toshiba Satellite C55D-A5108 Back Cover Replacement: passo 5, imagem 1 %32
    • Grasp the side of the hard drive opposite the circular battery, and carefully pull out the drive by moving it away from the circular battery.

  6. Toshiba Satellite C55D-A5108 Back Cover Replacement, Back Cover: passo 6, imagem 1 %32 Toshiba Satellite C55D-A5108 Back Cover Replacement, Back Cover: passo 6, imagem 2 %32 Toshiba Satellite C55D-A5108 Back Cover Replacement, Back Cover: passo 6, imagem 3 %32
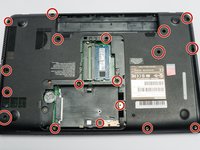
    • Remove the 16 screws holding the back cover with a Phillips #0 screwdriver.

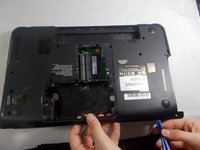
    • Pry the cover off with an opening tool.

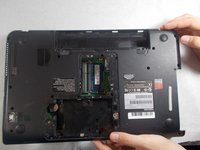
    • Gently remove the cover with your hands and place to the side.

Conclusão

To reassemble your device, follow these instructions in reverse order.

Uma outra pessoa concluiu este guia.

Kristen Gismondi

Membro desde: 11/12/14

92.429 Reputação

Autoria de 241 guias

Equipe

iFixit Membro de iFixit

Staff

118 Membros

Autoria de 19.540 guias

0 comentários

Comentar

Exibir estatísticas:

Últimas 24 horas: 0

Últimos 7 dias: 4

Últimos 30 dias: 4

Ao todo: 271