Ir para o conteúdo principal

Toshiba Portege M300 Motherboard Replacement

O que você precisa

  1. Toshiba Portege M300 Motherboard Replacement, Motherboard: passo 1, imagem 1 %32
    • Place laptop upside down.

    • Rotate so the battery side is facing away from you.

    • Locate the twelve screws on the bottom of the laptop.

    • Using the correct Phillips head screwdriver remove the twelve screws from the bottom of the laptop.

  2. Toshiba Portege M300 Motherboard Replacement: passo 2, imagem 1 %32
    • Locate the two screw covers and screws that can be found underneath the screen of the laptop.

    • Once located remove the screw covers and screws from underneath the screen by using the correct sized Phillips head screwdriver.

    • The screen should readily detach from the laptops body.

  3. Toshiba Portege M300 Motherboard Replacement: passo 3, imagem 1 %32
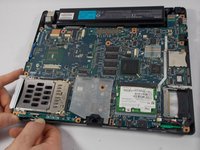
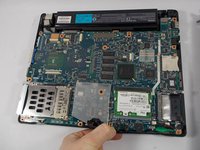
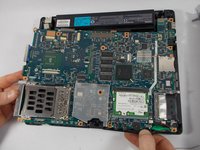
    • Locate the wires that connect the screen to the laptops body. (They are located at the bottom left side of the screen.)

    • Lift up the black protective cover that the wires lie under.

    • With one hand holding the black cover up, with free hand carefully pull away the wires, removing them from the laptop’s body.

  4. Toshiba Portege M300 Motherboard Replacement: passo 4, imagem 1 %32
    • Underneath the black protective cover locate the wires that are for the speakers.

    • With one hand holding the black cover up, with free hand carefully pull away the speaker wires, removing them from the laptop’s body.

  5. Toshiba Portege M300 Motherboard Replacement: passo 5, imagem 1 %32
    • Close laptop.

    • Grip the left and right sides of the top side of the laptop. (Silver portion).

    • Lift gently with both hands upward.

    • Top portion should disengage from the bottom half of the laptop. (Black portion).

  6. Toshiba Portege M300 Motherboard Replacement: passo 6, imagem 1 %32 Toshiba Portege M300 Motherboard Replacement: passo 6, imagem 2 %32 Toshiba Portege M300 Motherboard Replacement: passo 6, imagem 3 %32
    • With fingers scale the sides of the motherboard and pull back tabs that are holding the motherboard in place to the laptop.

    • Once all tabs are pulled back the motherboard should easily be able to be removed from the bottom half of the laptop.

Conclusão

To reassemble your device, follow these instructions in reverse order.

2 outras pessoas executaram este guia.

Nicholas Phillips

Membro desde: 03/24/14

158 Reputação

Autoria de 1 guia

0 comentários

Adicione um comentário

Exibir estatísticas:

Últimas 24 horas: 0

Últimos 7 dias: 0

Últimos 30 dias: 6

Duração total: 785