Ir para o conteúdo principal
Participe da comunidade de reparos - Criar conta
Samsung HMX-F90 LCD Screen Replacement

Samsung HMX-F90 LCD Screen Replacement

Amir Harb

Amir Harb e 2 outros colaboradores

Última atualização em 7 de mai de 2024

30 - 45 minutos
Difícil

Introdução

Ir para o passo 1

Cracked or faulty LCD screens can make the HMX-F90 difficult to use. This guide can be used to replace the flip-out LCD screen.

O que você precisa

Ferramentas

Exibir mais…

  1. Samsung HMX-F90 LCD Screen Replacement, LCD Screen: passo 1, imagem 1 %32 Samsung HMX-F90 LCD Screen Replacement, LCD Screen: passo 1, imagem 2 %32
    • Rotate the camcorder so that back is facing you. Then flip open the LCD screen.

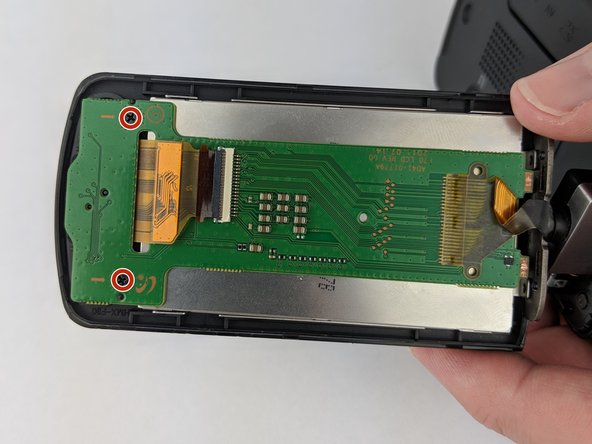
    • Locate and remove the 4.5mm Phillips #00 screws in the LCD screen base.

  2. Samsung HMX-F90 LCD Screen Replacement: passo 2, imagem 1 %32 Samsung HMX-F90 LCD Screen Replacement: passo 2, imagem 2 %32
    • Close the LCD screen. Then lift the silver base away from the camcorder.

  3. Samsung HMX-F90 LCD Screen Replacement: passo 3, imagem 1 %32 Samsung HMX-F90 LCD Screen Replacement: passo 3, imagem 2 %32
    • Rotate the camcorder so that it is facing you.

    • Locate and remove the two 4.5mm Phillips #00 screws.

  4. Samsung HMX-F90 LCD Screen Replacement: passo 4, imagem 1 %32 Samsung HMX-F90 LCD Screen Replacement: passo 4, imagem 2 %32 Samsung HMX-F90 LCD Screen Replacement: passo 4, imagem 3 %32
    • Open the LCD screen and rotate it around 90 degrees.

    • Locate the small prying notch and use a prying tool to slowly remove the LCD cover.

  5. Samsung HMX-F90 LCD Screen Replacement: passo 5, imagem 1 %32 Samsung HMX-F90 LCD Screen Replacement: passo 5, imagem 2 %32 Samsung HMX-F90 LCD Screen Replacement: passo 5, imagem 3 %32
    • Locate and remove the two 3.5mm Phillips #00 screws holding the back cover.

  6. Samsung HMX-F90 LCD Screen Replacement: passo 6, imagem 1 %32 Samsung HMX-F90 LCD Screen Replacement: passo 6, imagem 2 %32 Samsung HMX-F90 LCD Screen Replacement: passo 6, imagem 3 %32
    Ferramenta utilizada neste passo:
    Tweezers
    $4.99
    • With tweezers gently unclip the silver tab holding the ribbon wire.

    • Gradually feed the ribbon wire through the hole to remove the screen.

Conclusão

To reassemble your device, follow these instructions in reverse order.

Gear Up For Future Repairs

Shop all

Amir Harb

Membro desde: 09/26/17

705 Reputação

Autoria de 6 guias

Equipe

USF Tampa, Team S13-G1, Boczar Fall 2017 Membro de USF Tampa, Team S13-G1, Boczar Fall 2017

USFT-BOCZAR-F17S13G1

4 Membros

Autoria de 12 guias

1Comentário do guia

How can I buy the LCD??

Mike - Responder

Comentar

Visualizações:

Últimas 24 horas: 4

Últimos 7 dias: 10

Últimos 30 dias: 22

Ao todo: 1,354