Introdução
Modern electronics contain a dizzying array of internal data and power cable connectors—and nothing brings a project crashing to a halt like accidentally breaking a connector.
Use this guide to familiarize yourself with the most common types of connectors, and learn the tools and techniques you’ll need to disconnect (and reconnect) them safely.
- ZIF Connectors
- No-Fuss Ribbon Cable Connectors
- Locking Tab Connectors
- Other Ribbon Cable Connectors
- Flat-Topped (Low Profile) Connectors
- Press Connectors
- Coaxial Cable Connectors
- Display Cable Connectors
- Sliding Connectors
- Large Sliding Connectors
- JST Connectors
- Power Cable Connectors
- Bundled Cable Connectors
- Glued-Down Cables
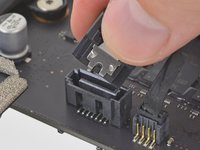
- SATA Cables
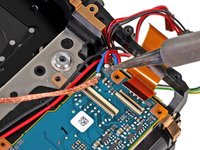
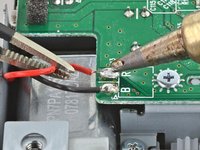
- Soldered Connections
- Rare & Exotic Connectors (Part 1)
- Rare & Exotic Connectors (Part 2)
O que você precisa
-
-
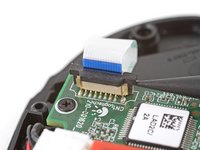
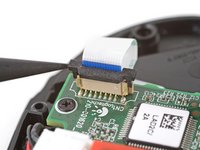
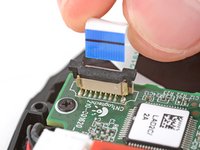
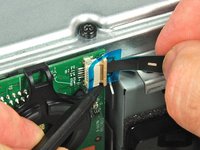
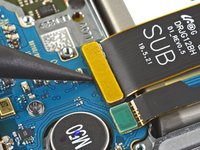
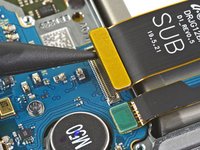
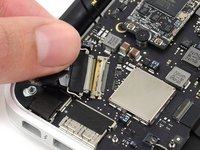
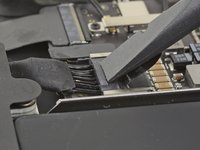
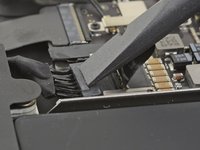
To disconnect the cable, use a spudger, opening tool, or a clean fingernail to flip up the locking flap—this is the unlocked position.
-
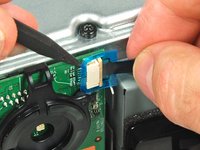
Once the flap is in the unlocked position, use tweezers or your fingers to gently pull the cable out of its socket.
-
-
-
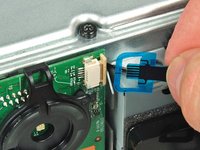
Simply pull these "no-fuss" ribbon cables straight out of their socket to disconnect them.
-
-
-
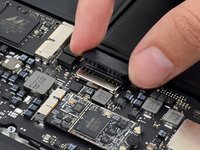
Use a spudger to gently push up on alternating sides of the plastic tab until it clicks up into its unlocked position.
-
Once the tab is unlocked, you can gently pull the cable straight out of its socket.
-
-
-
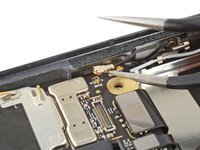
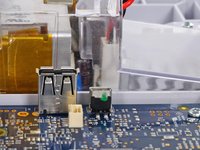
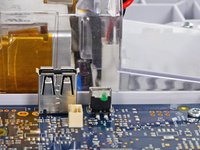
To disconnect this connector, use a spudger or clean fingernail to lift the looped tab away from the connector.
-
Then, use the tip of the spudger to push the plastic locking tab away from the socket—it should only move about 1–2 mm.
-
You can now pull the cable straight out of its socket.
-
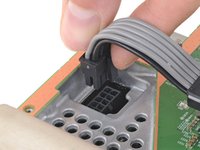
Fully insert the cable into its socket under the locking tab.
-
Loop the tab around the front of the connector.
-
Use a spudger or clean fingernail to push in the locking tab, securing the cable.
-
-
-
To disconnect the cable, use the flat end of a spudger to lift and unclip the outer edges of the connector. You may need to use your fingers to pull the connector completely out of its socket.
-
-
-
Place a spudger or an opening tool under the connector's edge and pry straight up to disconnect it.
-
Although more rare, some larger pop-style connectors might have a built-in pull-tab for easy disconnection. Lift straight up to disconnect these.
-
-
-
Ferramenta utilizada neste passo:Tweezers$3.99
-
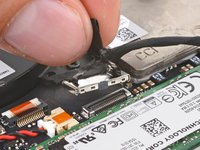
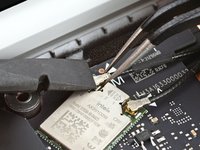
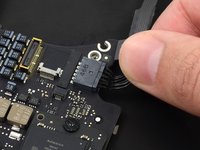
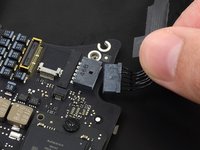
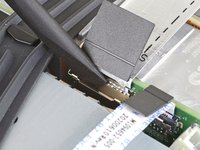
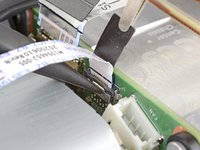
To disconnect the cable, slide a thin, ESD-safe pry tool or angled tweezers under the metal neck of the connector (as close to the head as possible) and lift straight up from the board.
-
-
-
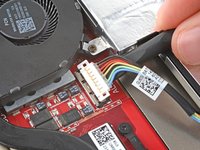
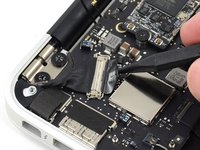
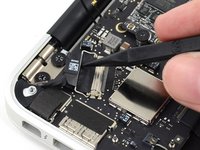
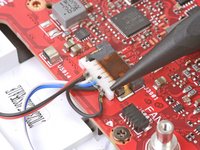
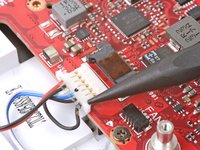
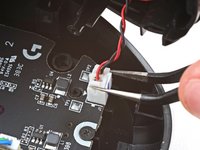
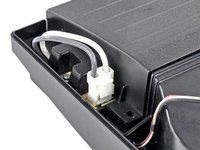
Disconnecting these cables is a two-step process. First, gently push the tip of a spudger under the metal buckle to unclip it, then swing it over the socket.
-
Next, hold the buckle and cable together and gently pull the connector straight out of its socket.
-
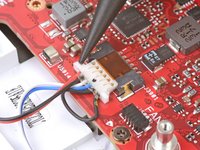
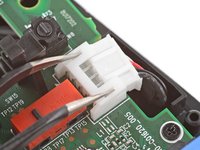
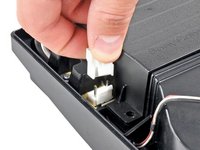
Grip the cable and buckle together and insert the connector fully into its socket.
-
Flip the buckle over the socket and use a spudger to press the buckle down until it clicks into place.
-
-
-
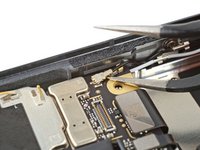
To disconnect, use the point of a spudger to push on alternating sides of the connector to "walk" it out of its socket.
-
-
-
Most of the time, these connectors will have a lip or a tab along the top that can be used to push the connector out of its socket.
-
If there's no clear spot to use a tool, check out bundled cable connectors.
-
To disconnect, use the wide end of a spudger to push on the connector tab to slide it out of its socket.
-
-
-
To disconnect the cable, first try pushing on alternating sides of the connector, like small sliding connectors.
-
If that doesn't work, use a pair of tweezers to firmly grip the sides of the connector and pull straight away from the socket. Hold the tweezers closer to the connector to get a better grip.
-
If the connector's socket has cutouts, you can insert the arms of a pair of sharp tweezers into the cutouts and gently push the connector out of its socket.
-
-
-
Squeeze the tab against the connector and pull straight up to disconnect it.
-
-
-
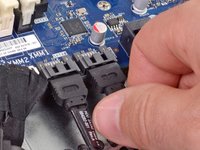
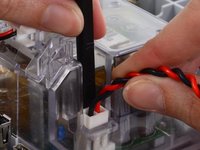
Grip all the cables at once as close to the connector as possible and pull the connector slowly and steadily out of its socket.
-
-
-
To remove it, carefully slide a spudger or opening pick under the cable to separate its adhesive.
-
-
Ferramenta utilizada neste passo:FixHub | Power Series Soldering Toolkit$299.95
-
Not to worry! A soldering iron makes quick work of these little guys.
-
-
-
Inspect the connector carefully, and try to determine how it disconnects.
-
If you're still having trouble, look for guides of similar devices to see if they provide any clues, or ask for help in our Answers forum.
-
-
-
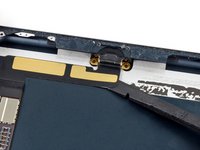
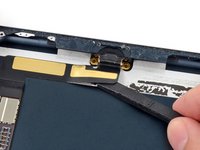
Photo 1: A large metal cover latches over the full connector, locking it in place.
-
Photo 2: A metal tab needs to be pushed in—instead of pulled out, to unlock the flat cable.
-


Still having trouble? Ask our Answers forum for help.
For more electronics skills, click here.
Cancelar: não concluí este guia.
405 outras pessoas executaram este guia.


28Comentários do guia
Beautiful work. However, my modern LCD flat screen TV set uses the "No-Fuss Ribbon Cable Connectors" and I think they are fairly common in this application.
"Step 2 — No-Fuss Ribbon Cable Connectors
Occasionally, you'll find a ribbon cable that simply pulls out of its socket, with no retaining flap.
<snip>
These kinds of connectors are fairly rare, so check carefully for a way to release the connector before you resort to pulling on the ribbon cable."
This was great! thanks for the detailed pictures. I have a question though on a very specific port used on apple tv 1.
here's the link to my post
It's important to note that ZIF connectors often do require force to insert, for example the digitizer ribbon cable on the Nexus 6, which has a bit of negative tension from being curved. It has to be pushed in using the little raised portion with a fingernail, and held so the line on the cable matches the line on the PCB before closing the retention bracket or else it will not connect properly.
I have a visio T-con board that has two flat ribbon connectors the one to the screen as a flip open latch you can do with your finger nail the other has a thin metal strip that over hangs the end on both sides. And ideas on how this one opens up? Rowland
Great post!
Would be great if Jeff or someone could help me with my question, doesn't look as though that connector type is covered in the the post above. Its listed here - Need help with these Connector latches
TIA,
Norm