Ir para o conteúdo principal
PowerA Fusion Controller For Xbox One Buttons Replacement

PowerA Fusion Controller For Xbox One Buttons Replacement

Andrea

Andrea e 4 outros colaboradores

Última atualização em December 15, 2023

20 minutos
Moderada

Buttons are a crucial part of any controller. However, after extended use, whether regular or light, the buttons will wear down. This guide will show you how to replace the buttons on your controller. Please note that this guide is for replacing the buttons, not the circuitry attached to them. If the buttons are acting strange, for instance reading a tap as a double tap, this guide may not help.

O que você precisa

Peças

Ferramentas

Exibir mais…

  1. PowerA Fusion Controller For Xbox One Buttons Replacement, Buttons: passo 1, imagem 1 %32 PowerA Fusion Controller For Xbox One Buttons Replacement, Buttons: passo 1, imagem 2 %32 PowerA Fusion Controller For Xbox One Buttons Replacement, Buttons: passo 1, imagem 3 %32
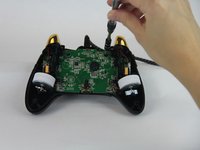
    • Remove the (9) nine 9.2mm screws with a JIS #1 screwdriver.

    • Remove the two bottom plastic grip covers.

  2. PowerA Fusion Controller For Xbox One Buttons Replacement: passo 2, imagem 1 %32 PowerA Fusion Controller For Xbox One Buttons Replacement: passo 2, imagem 2 %32
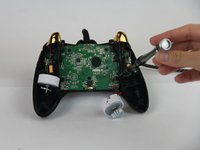
    • Remove the (2) two 9.2mm screws with a JIS #1 screwdriver.

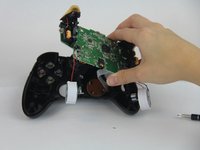
    • Remove the back cover of the controller.

    Would have been a better guide if you actually used a power a fusion controller.

    This is just a normal power a controller.

    Fusion has detachable cable and 4 detachable paddles on the back.

    Lol

    Qyuubix - Responder

  3. PowerA Fusion Controller For Xbox One Buttons Replacement: passo 3, imagem 1 %32 PowerA Fusion Controller For Xbox One Buttons Replacement: passo 3, imagem 2 %32 PowerA Fusion Controller For Xbox One Buttons Replacement: passo 3, imagem 3 %32
    • Remove the (5) five 9.2mm screws with a JIS #1 screwdriver.

    • Lift the motherboard and let it hang.

  4. PowerA Fusion Controller For Xbox One Buttons Replacement: passo 4, imagem 1 %32 PowerA Fusion Controller For Xbox One Buttons Replacement: passo 4, imagem 2 %32
    • Remove the (4) four 9.2mm screws that are holding the motherboard to the controller.

    • Put the motherboard aside.

  5. PowerA Fusion Controller For Xbox One Buttons Replacement: passo 5, imagem 1 %32 PowerA Fusion Controller For Xbox One Buttons Replacement: passo 5, imagem 2 %32
    • Remove the buttons.

  6. PowerA Fusion Controller For Xbox One Buttons Replacement: passo 6, imagem 1 %32 PowerA Fusion Controller For Xbox One Buttons Replacement: passo 6, imagem 2 %32
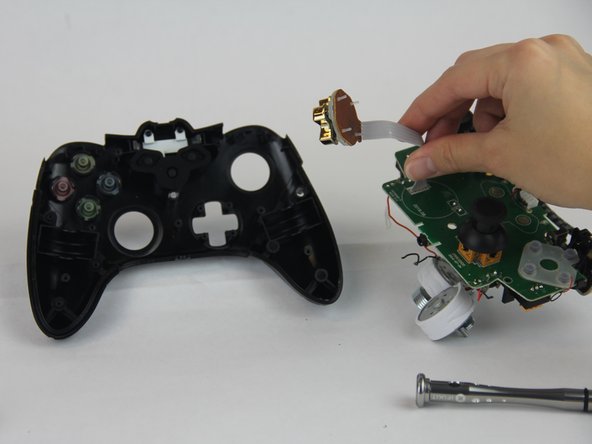
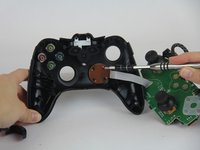
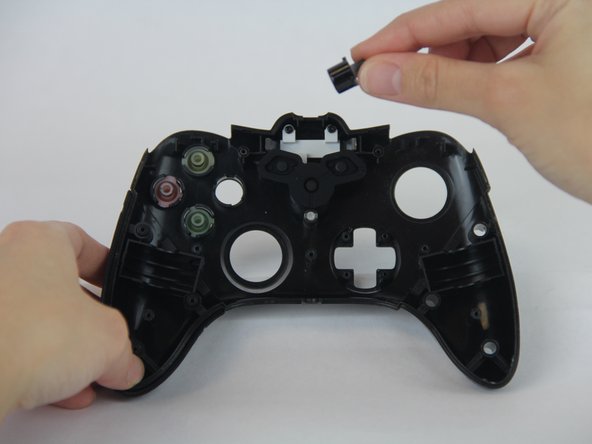
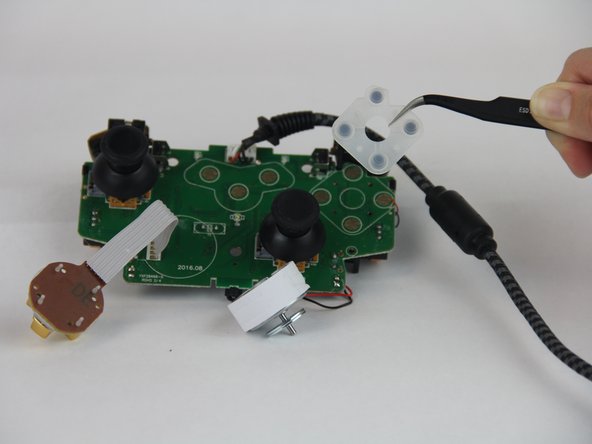
    • Go back to the motherboard, and remove the buttons' gasket with a tweezler.

    What do you do after you remove the button gasket

    AcridAssassin - Responder

    Do the buttons come with the gasket? Also the buttons are for an Xbox One controller. Does that mean they are compatible?

    Alexi Macias - Responder

Conclusão

To reassemble your device, follow these instructions in reverse order.

9 outras pessoas executaram este guia.

Andrea

Membro desde: 09/26/17

644 Reputação

Autoria de 4 guias

Equipe

USF Tampa, Team S14-G4, Boczar Fall 2017 Membro de USF Tampa, Team S14-G4, Boczar Fall 2017

USFT-BOCZAR-F17S14G4

Membros da 4

Autoria de 5 guias

2 comentários

Okay so what do you do if by any chance one of the links that are sawdered to the mother board for the D Pad Connection cable breaks… Then what? How would I go about fixing that????

Heather Jesse - Responder

is there a guide to clean the bumpers out? my RB became less consistent and i'm hoping it's just because they're gunked up

urmum - Responder

Adicione um comentário

Exibir estatísticas:

Últimas 24 horas: 5

Últimos 7 dias: 22

Últimos 30 dias: 72

Duração total: 19,228