
Optical Bay Enclosure Dual Hard Drive Replacement

Introdução
Ir para o passo 1Universal Prerequisite for Optical Bay Enclosures #78,79,81
-
-
Remove the plastic positioner from the optical bay hard drive enclosure by pressing in on one of the clips on either side and lifting it up and out of the enclosure.
-
-
-
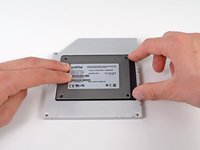
Make sure that the hard drive connectors are facing down before placing it into the enclosure.
-
Gently place the hard drive into the enclosure's hard drive slot.
-
While firmly holding the enclosure in place with one hand, use your other hand to press the hard drive into the enclosure connectors.
-
-
-
Once the hard drive is snug, reinsert the plastic positioner while holding the hard drive against the bottom of the enclosure.
-
Reconnect any cables you have removed from the original optical drive onto the optical bay enclosure.
Why no mention of attaching the new hard drive to the Optical Drive Enclosure using the enclosed phillips screws?
Once you have securely inserted the new hard drive into the Optical Drive Enclosure and replaced the plastic positioner you should attach the drive to the enclosure using two of the provided phillips screws. Two holes on the underside of the enclosure should align with two attachment holes on the underside of the drive.
I suspect that the plastic positioner will secure the drive well enough (for this style of adapter). As I mentioned in earlier comment, this should mean you can replace / upgrade the SATA drive later without needing to remove the adapter, skipping many steps.
Do you need a sata cable to connect the new drive to the board or does it connect via the optical drive cable that we disconnected earlier?
It does connect to the optical drive cable but if you don't use the optical bay enclosure you'll need a 13 pins to 22 pins sata adaptor (and some tape!)
The sata cable for the optical drive has 6 + 7 pins while ssd and hhd have 15 + 7 pins
Can someone please explain why you need to remove the black plastic faceplate from the optical bay enclosure. It is designed to receive the standard SSD. What is gained from removing a part of it?
Thank you! This guy has made upgrading the mid 2010 iMac I inherited from my mom MUCH easier and saved me a lot of time, trial, and error.
I'm a little confused. Do I need the enclosure from ifixit or am I removing the optical drive and installing an ssd in the preexisting op drive enclosure? If using the already existing enclosure what type of ssd do I need as for Sata connectors?
-


To reassemble your device, follow these instructions in reverse order.
To reassemble your device, follow these instructions in reverse order.
Cancelar: não concluí este guia.
Uma outra pessoa concluiu este guia.


1Comentário do guia
Great guide, however I think you overestimated the difficulty of it. The biggest challenge is not stripping any screws and being sure to have all sizes that you may possibly need including some that might not be standard because stripping screws is very possible. Otherwise, nice job
What’s the switch for on the inside of the caddy? What position should it be in? Mine came switched to the right (towards SATA connector that disk inserts into).
Robert Lord - Responder