Ir para o conteúdo principal
Participe da comunidade de reparos - Criar conta
Minolta Dimage Xt LCD Screen Disassembly

Minolta Dimage Xt LCD Screen Disassembly

Keith Sechrist

Keith Sechrist e 8 outros colaboradores

Última atualização em 23 de mai de 2022

20 - 40 minutos
Moderado
Imagens inconsistentes

Introdução

Ir para o passo 1

If you need to replace the LCD screen of your Minolta Dimage Xt, follow this guide. The LCD screen is held into the camera by the outer casing and an internal bracket. It is one component, so there isn't a way to just replace the LCD screen, without first removing other parts. Once screen is out of the bracket, wires must be removed to completely remove the LCD screen.

Before beginning this guide, be sure to remove the batteries from the camera.

O que você precisa

Ferramentas

Exibir mais…

  1. Minolta Dimage Xt LCD Screen Disassembly, Casing: passo 1, imagem 1 %32 Minolta Dimage Xt LCD Screen Disassembly, Casing: passo 1, imagem 2 %32 Minolta Dimage Xt LCD Screen Disassembly, Casing: passo 1, imagem 3 %32
    • Locate and remove the silver screws on each side of the camera.

    • Use the Phillips #00 Screwdriver to unscrew all 2.0mm (4 instances) and 4.0mm (2 instances) screws.

    #000 bit seems to work better. There are seven screws in total (2 on either end and 3 on bottom).

    Doug Ewing - Responder

  2. Minolta Dimage Xt LCD Screen Disassembly: passo 2, imagem 1 %32 Minolta Dimage Xt LCD Screen Disassembly: passo 2, imagem 2 %32 Minolta Dimage Xt LCD Screen Disassembly: passo 2, imagem 3 %32
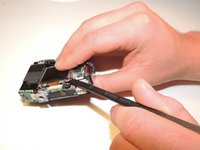
    • Then, carefully pry apart the front and back outer casing away from the internal components.

    • Be aware of the ribbon wire that will disconnect when the casing is detached.

    Lens cover can be accessed without removing rear housing. I was able to lift off the front to access the lens cover mechanism while leaving the rear in place.

    Doug Ewing - Responder

  3. Minolta Dimage Xt LCD Screen Disassembly, LCD Screen: passo 3, imagem 1 %32
    • The LCD screen has wires connecting it to the rest of the camera. A bracket holds the LCD in place, so there are no screws beyond this point.

    • The screen also has a ribbon wire connected at the bottom of the screen.

  4. Minolta Dimage Xt LCD Screen Disassembly: passo 4, imagem 1 %32 Minolta Dimage Xt LCD Screen Disassembly: passo 4, imagem 2 %32
    • Detach the connector at the bottom from the LCD screen.

    • Starting from the side or a corner gently slide the spudger underneath the screen.

    • Press the tip of the spudger down as far is you can and slowly pry the LCD screen away from the bracket.

  5. Minolta Dimage Xt LCD Screen Disassembly: passo 5, imagem 1 %32
    • The screen is not detached. Wires are still connecting the screen to the camera at the bottom corners, but it is removed from the bracket.

    • Check to make sure the wires are connected, so it will receive proper power supply.

    • To remove the bracket from the LCD screen, remove two 1.5 mm screws using the Phillips #00 screwdriver.

Conclusão

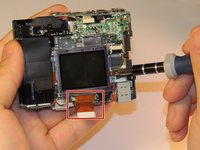
To install a new LCD screen you will have to reconnect the wires and properly place them in the bracket. Make sure to reattach the ribbon wire before finishing repairs.

Uma outra pessoa concluiu este guia.

Gear Up For Future Repairs

Shop all

Keith Sechrist

Membro desde: 03/11/13

22 Reputação

Autoria de 2 guias

Equipe

Clemson, Team 12-4, Benson Spring 2013 Membro de Clemson, Team 12-4, Benson Spring 2013

CLEM-BENSON-S13S12G4

3 Membros

Autoria de 14 guias

1Comentário do guia

Great procedure, thank you.

Do you know where I can buy the LCD replacement part?

I have a Konica Minolta Dimage X1 8.0 MP

mscir - Responder

Comentar

Visualizações:

Últimas 24 horas: 0

Últimos 7 dias: 7

Últimos 30 dias: 29

Ao todo: 1,225