
Microsoft Surface Pro 3 Battery Replacement
Introdução
Ir para o passo 1This guide will teach you how to safely remove your battery from your Surface Pro 3. The guide starts by removing the screen and digitizer and then goes right into removing the battery.
O que você precisa
Peças


Ferramentas


Exibir mais…
-
-
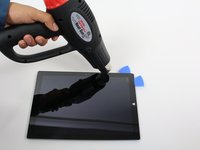
To remove the display, first soften the adhesive by applying heat. You can use a heat pad, heat gun, or iOpener. In a pinch, a hair dryer can also work.
-
Steadily and evenly heat the perimeter of the display until it's too hot to touch, and try to maintain that temperature for several minutes.
-
-
-
Use a suction cup or an iSclack to pull up on the glass and create a slight gap between the glass and the metal frame.
-
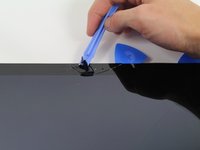
Carefully insert an opening pick into the gap between the screen and the device to cut the adhesive.
-
Slide the pick around the sides and bottom of the display to cut the adhesive. Apply more heat as needed.
Be very very careful!! Don’t cut yourself. Wear gloves.
-
-
-
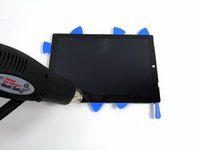
Continue to heat sections of the screen with the heat gun.
-
As you make your way around the screen with the heat gun, use the plastic opening tool and the opening picks to pry the screen loose.
I used an inexpensive variable heat gun with a dial. It was perfect. My fixed temperature gun would have ruined it. There are two small vents on either side of the screen near the top. Start there and work down on each side. I didn’t have opening picks to keep the glass separated from the body. So, I used blank Cards Against Humanity I found lying around.
I watched two popular videos. Neither helped and were no better than these instructions. In one video, the guy heats and smashes his way around the display with metal tool. Mistake! Don’t do this even if the screen is broken. This causes glass shards to go everywhere and will force you to replace the adhesive before installing a new screen. You can’t reuse adhesive if it is full of glass. Another video uses a heat gun one side at a time and simply sliding a pick along the edge working around the Surface. This didn’t work. The person had already removed the screen once before and started the second removal before the video.
CAUTION: if you insert the picks too far, you risk damaging the display (separating the glass from the display circuitry).
The display circuitry is 14 mm from the side edges, 10 mm from the top edge, and 6 mm from the bottom edge.
thanks a lot for your comment
-
-
-
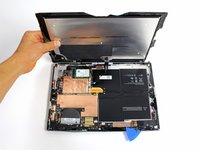
Lift the screen up carefully so that no wires are torn.
This guide misses a CRUCIAL NOTE on this step.
On this step, from Picture 1 to Picture 2 the device is rotated so the Windows logo on the glass is actually on the left hand side.
You *must* rotate the device otherwise you will risk damaging the cables, as it folds open like a book.
Pain in the ass! One has to wonder why they couldn’t use magnetic connections instead of this goo, black thing that even to replace is so %#*@ annoying to say the least! After trying to remove a broken screen I didn’t even use the adhesive strips. I used the ones I had there and to be frank it’s better since:
a) I couldn’t get the new screen properly aligned and to fit to perfection even though the touch works flawlessly (w/ some adhesive tape on the top to hide the gaps) and
b) who knows? you may as well need to reopen it again. Hopefully not.Hopefully it will be easier. Hopefully never again!!!
P.S.:
-
-
-
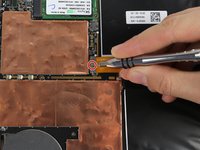
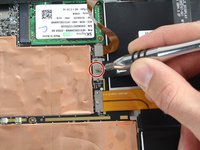
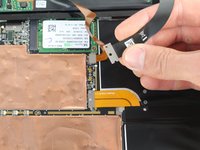
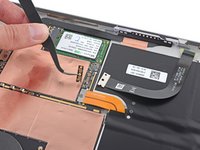
Remove the single 4 mm T3 Torx screw securing the display cable.
-
Lift the connector to disconnect the cable.
It's always best to disconnect the battery before disconnecting the display cable. Ensuring there is no power to the device will also ensure you don't damage the backlight components when disconnecting the display. You should also make sure to reattach the display cable before reattaching the battery cable when putting it back together.
There is also a tiny little board between the ribbon cable and motherboard. Be sure not to lose it!!! If you do the part is 1631 LCD Contact Shield Plate.
You’ll notice a spring on the back of your old screen. The new screens don’t have that spring so it will need to be transferred over by the heat gun trick.
The instructions do not mention the bridge connectors under the connectors - tiny little rectangle boards with gold connector dots. There is one under the battery connector and under the display connector. It is sandwiched in between the board and the connector. You may not even notice the bridge connectors. In fact the pictures here with the cable connectors off are showing the bridge connectors under the cable connectors still lying on the motherboard. Go ahead and remove the bridge connectors with tweezers. These connectors are just lying on the motherboard and WILL FALL OFF getting lost without noticing it. The cable connectors do not work without the bridge connectors installed. Good news is the connectors are keyed and fit only one way.
BTW: Both screws on the battery and display connector were T3’s and the same size.
Hi!. What’s the name of the band connector and what’s the name of the connector in both sides?
-
-
Ferramenta utilizada neste passo:Plastic Cards$2.99
-
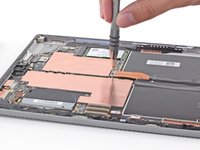
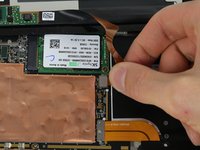
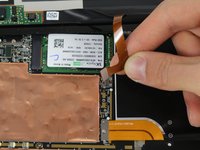
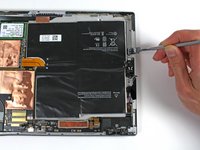
Use the metal spudger to scrape the battery off of the device.
A plastic card and non-metal spudger were too flexible to work. I used the metal spudger working the outer edge (right and top) getting about half way through these three cells. I then used my hand to pry up at about 60 degrees with a firm slow steady force. The adhesive slowly separated. The batteries were double sided taped to the back of the surface pro. The tape is very thin. It came off with the battery cells and could not be reused. Therefore, I used several lines of Tesa tape for the new battery cells. Make sure the connector on the new battery reaches and fully squares off to the bridge connector on the motherboard. First time I was off by a tiny fraction of an mm. The battery cable has zero give. I had to remove and reset the new battery.
The batteries were so strongly adhered by the double face tape, that I ended up using a wooden paint stirrer with the end chamfered into the shape of a chisel (used a razor blade to cut the bevel on the end of the paint stirrer).
I was able to apply a lot of force using this tool to separate the batteries from the frame.
-
-
-
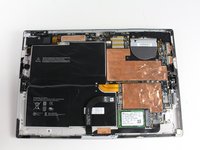
Lift the battery out of the device.
Hello. If I manage to somehow replace the battery, what adhesive should I use to glue the battery and screen back into place?
I just used a dot of B-7000 on each of the corners of all four squares of the battery.
No way to take the screen off without cracking it PERIOD!!!
-


To reassemble your device, follow these instructions in reverse order.
To reassemble your device, follow these instructions in reverse order.
Cancelar: não concluí este guia.
58 outras pessoas executaram este guia.
Equipe

Cal Poly, Team 12-18, Maness Fall 2015 Membro de Cal Poly, Team 12-18, Maness Fall 2015
CPSU-MANESS-F15S12G18
5 Membros
Autoria de 31 guias
33Comentários do guia
Do you have to glue everything back together? Do you heat the parts back up to get the glue to stick again?
I slowly removed the old adhesive watching out for glass shards. A spundger and razer blade didn’t really help. In the end, I just used my fingernail and finger to roll the adhesive like I was removing rubber cement. It too about 30 minutes but I was able to get it cleaned off. I replaced the adhesive with 2 mm Tesa tape. This worked great.
Has anyone ever successfully opened a surface pro 3 without breaking the screen?
Yes I have successfully open the surface pro with out breaking the screen by using a heat gun, the islack and the using the picks around the screen as anchors, then use the islack as you will use it to replace the screen in the iphone. It takes time and patience and a lot of heat. It took me 25 minutes to remove the screen with out breaking it.
Only wizards can accomplish this task without breaking the screen. Yes the screen must be reheated for the glue to stick again. A simple fix to avoid all of these problems is to switch to Apple products.
Apple products are worse. I've worked with Ipads and Iphones and seen my fair share of ballooned batteries that lift the screen off for you.
I successfully removed many screens without cracking by heating to 100 deg with a heat gun, using a small suction cup to lightly tug on the cutting area, using a small syringe to insert alcohol into the adhesive, and using a thin single edge box cutter to slice through the adhesive. The best place to start is at the top near the camera as it's not as sticky there. Make sure your suction cup has a good grip, or you risk cracking the screen if the suction cup lets go with the knife under it.
Oh yeh… because Apple products are so easy to change batteries…
This makes no sense at all. Apple products are where almost impossible to fix devices originated.
Switching to an apple product is not an option.
...but then you have an Apple product. A much worse problem.
Indeed! Even simpler fix? Live in a cave without technology. However, if the professional tools you need only exist in a Windows environment and you require a stylus and touchscreen, how would Apple's products suffice? As an electrical engineer who uses Altium, DxDesigner, OrCAD, and many other such tools, I'm serious when I ask. Meanwhile, my SP3 is serving me tremendously well.
With the number of SP3 an SP4s out there, when the time comes that batteries are failing, there will be a market for the service to replace them for under the US$320 that Microsoft charges. A reliable method to do so would be straightforward (a vacuum gripper for the faceplate and body in an 85°C temperature controlled environment) and could be used to reclose and reseal when done. Not hobby grade but would pay for itself with a few days' use to repair Surface Pros. Somebody will step forward to do that...
Hi, where do I find the details of the battery I need for the replacement?
You can use the command prompt on Windows 10 for you surface pro 3
1. Press Win+X
2. enter command prompt
3. input the command "powercfg /batteryreport"
4. find the batteryreport on you C:
there is the report of you battery. if you have some question. send Email: CoikVollin@139.com
Does anyone know what purpose the little battery board connector serves? Can it be damaged to make the SP3 not power on again?
Dunno if you’re around Lee, but I’ve got a Surface Pro 3 not powering and i’d very much like to know the answer! Do you even need that sleeve?
This is the bridge connector which sits between the motherboard and the cable connector. It is not held on by anything other than being sandwiched between the motherboard, the cable connector and the screw running through the connectors. It is a must have. The display or battery will not work without their bridge connectors.
This article was a massive help, thanks!
see/read how i ended up doing it here:
As the pictures reveal, this method massively broke the screen. Do NOT use the prying tool to separate the screen. Use something very thin, maybe even an exacto knife, to slip under the screen and work around and separate it. More like slicing than prying. It is still really easy to break it. Make sure it is heated enough and work very SLOWLY.
As the pictures show this guy massively busted the screen. Do NOT use the blue plastic prying tool to separate the screen. Use something super thin, maybe even like an exacto knife, to work around the screen more like a slicing action than prying. Even then make sure the glue is sufficiently heated and work very slowly.
I know this post is old but I was just wondering, has anyone ever used a heated plate to remove the screen? My Creator Pro 3D printer has a 6” x 9” heated bed that can heated to any desired temperature (up to over 100 degrees Celsius) without running the printer. Putting a fairly thick aluminum plate, with an aluminum “picture frame” on top so the heat only goes to the edges of the screen seems like it might be an easy way to evenly heat the glue to the desired temperature. The question is: what’s the desired temperature to heat the screen?
Hallo, habe den Akku getauscht. Seitdem funktioniert der Akku nicht mehr. Mein Surface sagt:“Akku nicht gefunden“. Ich kann mein Surface nur mit dem Steomkabel starten. Nach dem Start kann ich das Steomkabel entfernen und er läuft weiter. Was kann das Problem sein?
Mit freundlichen Grüßen,
Almost impossible to replace the battery without cracking the LCD screen. In my case, managed to get a hairline crack at the bottom, due to which the touch screen feature has conked off. As it was behaving erratically, simply turned off the HID touch screen in DEVICE MANAGER. And I have my very nippy i7/512GB SSD Surface Pro 3 back again as a very efficient work horse, sans the touch functionality of-course.
The earlier battery had swollen, threatening to crack the screen and more important the risk of a explosion/ fire. Got this great replacement battery on one of my Hong Kong visits and located a smart technician to replace the battery, who charged me just USD 25 for his efforts.
All in all, very happy that got my SP3 functioning back again.
Now next trip, I shall pick up the replacement LCD screen as well.
Glad to know that the Surface range can undergo successful surgery and be functional once again.
:-)
Wow, they were right about being careful not to lose those little bridges between the display/battery cables and the main board. The connections will not work without them! If you finished the replacement and your screen is not working, check if the little bridge is present (step 6, picture 3). At least i managed to find them in the end…
Replaced the battery since I already needed to replace the screen. Broke screen into many, many pieces. If you're a novice like me, I'd advise against replacing battery if you need an intact screen after you're done until you have some practice.
Very well assembled guide!
Yes it can run only on external power.
I just replaced both my screen and battery. It took four hours and a couple of wrong turns but I was successful learning what to do next time. However, I am not sure I would do it again.
It takes more heat than one imagines - all most too much and made me queasy fearing I was going to damage something. I would say it actually too hot and likely to damage something so be careful and do not prolong the removal. To get started I used a glass top warming/buffet heating tray set to about 200 degrees. I turned the surface pro glass side down before turning it one so it would heat gradually with the tray. I let it heat for 15 minutes. In end, I am not sure it helped or not by starting this way. This was not an easy removal so I shudder to think how worse it would have been if this didn’t help. I used a variable heat gun for the remaining steps. My screen was broken so breaking it further while nerve racking was not going to be catastrophic.
michael jones - Responder
I attempted battery replacement, but during disassembly, i damaged the display by inserting the picks to far, and separating the display circuitry from the glass.
I used a Milwaukee precision hot tool model 1400, which has only a fixed heat setting, but it worked perfectly to soften the adhesive.
(I was very careful to heat the entire glass panel by playing the heat gun over the entire surface so that it would expand uniformly.
Robert Gerlach - Responder
I just broke mine during the heating process as well…. The glue at the corner was so strong that I cant even slip a blade into the edge… Then when keep applying heat using a hair dryer at low tempreture the glass expanded too much and broke……
C Y Wong - Responder
If you have never done this repair, YOU WILL SHATTER THE SCREEN! I've repaired dozens of these over the last several years for my client's and I still shatter them. It's a 98% probability that you will break the glass; it's very thin and shatters easily. Be prepared.
Gregg Stanley - Responder