Ir para o conteúdo principal
Lenovo Yoga 910-13IKB SSD Replacement

Lenovo Yoga 910-13IKB SSD Replacement

Nikhil Nagarajan

Nikhil Nagarajan e 9 outros colaboradores

Última atualização em August 1, 2023

5 - 10 minutos
Fácil
Estudante em progresso

Introdução

Ir para o passo 1

Boot time and the amount of time it takes for the device to read and write information are directly related to the storage in your device. Over time, this storage can become slow; in extreme cases, it can become corrupted. In addition, it is also possible that the amount of storage your device has isn’t enough for your needs, so you might wish to replace it with a larger capacity drive. For those looking to replace or upgrade the storage on their Lenovo Yoga 910-13IKB, Lenovo has made it simple; this replacement requires only a JIS #00 screwdriver.

O que você precisa

Kits de conserto

Estes kits contêm todas as peças e ferramentas necessárias para executar este guia.

Peças

Ferramentas

Exibir mais…

  1. Lenovo Yoga 910-13IKB SSD Replacement, Bottom Panel: passo 1, imagem 1 %32 Lenovo Yoga 910-13IKB SSD Replacement, Bottom Panel: passo 1, imagem 2 %32
    • Before you begin, be sure to turn off your laptop and unplug it from the outlet.

    • Turn the laptop over and remove the ten Torx T5 screws along the perimeter of the bottom panel.
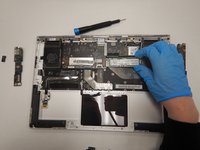
    • Remove the panel.

  2. Lenovo Yoga 910-13IKB SSD Replacement: passo 2, imagem 1 %32
    • Remove all 4 screws attached to the battery with a small Phillips head screwdriver.

    • Each screw on the back is M2 x 1.7mm

    • After the screws are taken out, remove the battery. The battery is the large black rectangle at the bottom of the area.

  3. Lenovo Yoga 910-13IKB SSD Replacement: passo 3, imagem 1 %32
    • Remove all 6 screws attached to the trackpad with a small Phillips head screwdriver.

    • Each screw on the back is M2 x 1.7mm

    • Detach the ribbon cable connected to the trackpad using the wedge device.

    • Remove the trackpad using the wedge device.

  4. Lenovo Yoga 910-13IKB SSD Replacement: passo 4, imagem 1 %32
    • Remove all 6 screws attached to the USB ports on both sides of the device with a small Philips head screwdriver.

    • Detach both ribbon cables attached to each USB port with a wedge device, then detach the USB ports.

  5. Lenovo Yoga 910-13IKB SSD Replacement: passo 5, imagem 1 %32 Lenovo Yoga 910-13IKB SSD Replacement: passo 5, imagem 2 %32 Lenovo Yoga 910-13IKB SSD Replacement: passo 5, imagem 3 %32
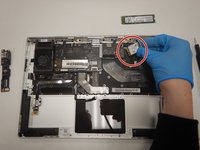
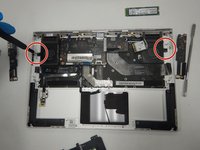
    • Remove all 4 screws attached to SSD stick with a small Phillips head screwdriver.

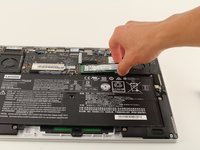
    • Pull the SSD stick directly to the right until it shifts out of place to remove it.

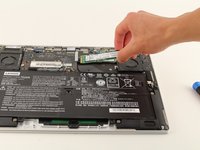
    • The storage chip above it (further away from you) may also simply be detached by pulling it directly to the right until it clicks out.

  6. Lenovo Yoga 910-13IKB SSD Replacement: passo 6, imagem 1 %32 Lenovo Yoga 910-13IKB SSD Replacement: passo 6, imagem 2 %32 Lenovo Yoga 910-13IKB SSD Replacement: passo 6, imagem 3 %32
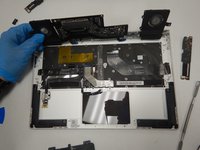
    • Remove all 4 screws attached to both fans, and the back connector strip (long metal piece furthest from you with screws in it) with a small Phillips head screwdriver

    • Remove the back connector strip using a wedge device to pry it off of the device

    • With the back connector strip removed, pry the fans (which are attached) using a wedge device and the fans will now be maintainable.

  7. Lenovo Yoga 910-13IKB SSD Replacement, SSD: passo 7, imagem 1 %32
    • Remove the 3mm JIS #00 screw holding the storage in place.

  8. Lenovo Yoga 910-13IKB SSD Replacement: passo 8, imagem 1 %32 Lenovo Yoga 910-13IKB SSD Replacement: passo 8, imagem 2 %32
    • Pull up lightly on the drive and gently pull it out of the connector.

Conclusão

To reassemble your device, follow these instructions in reverse order.

Nikhil Nagarajan

Membro desde: 01/23/20

97 Reputação

Autoria de 1 guia

Equipe

Cal Poly, Team S1-G5, White Winter 2020 Membro de Cal Poly, Team S1-G5, White Winter 2020

CPSU-WHITE-W20S1G5

4 Membros

Autoria de 14 guias

1Comentário do guia

Just one question: if I want to replace just the SSD, surely one goes straight from step one to step seven?

Bessi Aðalsteinsson - Responder

Comentar

Visualizações:

Últimas 24 horas: 3

Últimos 7 dias: 27

Últimos 30 dias: 97

Ao todo: 6,661