
HP Pavilion dv7-6c90us Cooling Fan Replacement
Introdução
Ir para o passo 1Replacing any component in a laptop requires patience, strong organization skills, and a good work space. With enough patience and perseverance anyone can do it!
In order to successfully replace the dv7 cooling fan you need to work on a flat surface with good lighting and plenty of room to keep small parts organized so that the computer can be put back together without issue.
Make sure enough time is set aside to complete the process in one sitting. This project's estimated time frame is 4 to 6 hours.
WARNING: Before touching electronic computer components, such as the motherboard, CPU, or RAM, discharge all static electricity by touching a grounded metal object.
WARNING: Disassembling a laptop and replacing components by yourself often voids the warranty. Handle all computer parts with care, and be patient.
O que você precisa
Peças
Ferramentas


Exibir mais…
-
-
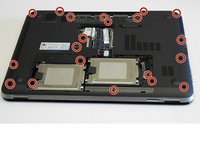
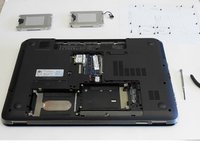
Carefully remove all twenty screws from the external laptop case.
-
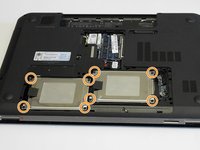
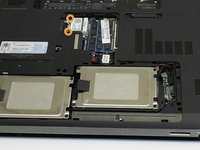
Remove the eight Phillips PM2.5x5.0 screws from both hard drive compartments, and place them on the diagram.
-
Carefully place all screws in the correct spot on the diagram. Many screws are different sizes and lengths. It is extremely important that all screws go back into the same screw hole they came out of during re-assembly.
-
-
-
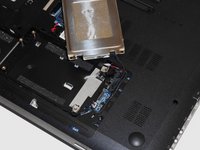
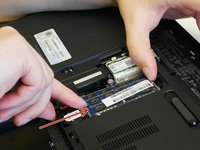
Disconnect the hard drive by gently pulling the plastic tab connector from the motherboard port.
-
Remove the empty hard drive bracket and hard drive. Set them aside until re-assembly.
-
-
-
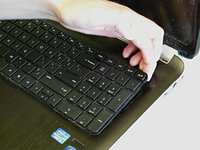
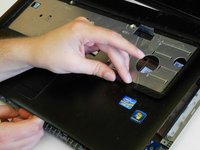
Turn the laptop right-side-up, and open the screen. Loosen the keyboard by carefully prying it up using your fingernails, carefully working along the edges.
-
Slowly lift the keyboard away from the case.
-
Lift the plastic tab that connects the keyboard ribbon cable to the motherboard.
-
Set the keyboard aside.
-
-
-
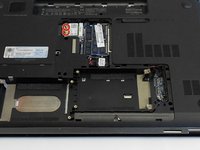
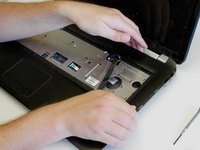
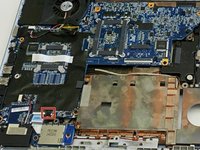
The laptop should now look like this.
There is a horizontal grey wire in the middle of the picture. There is no additional showing where is goes on the left.
I was careless when I completed step 15 documentation. Now when I am in the process of reversing the process, I don’t know where to connector.
Need a 19.5 step showing what is happening in this area of the laptop.
-
-
-
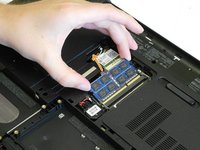
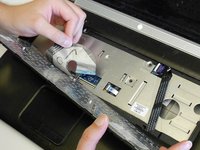
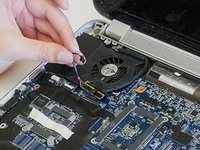
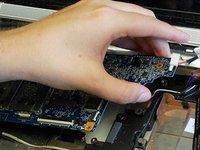
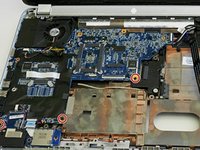
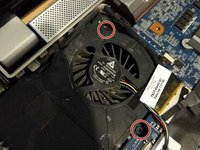
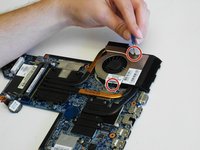
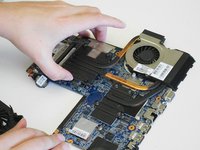
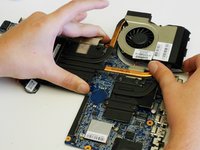
Remove the five screws that hold the motherboard and fan in place.
-
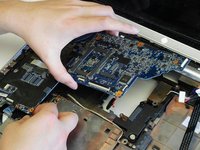
Carefully remove the motherboard and fan.
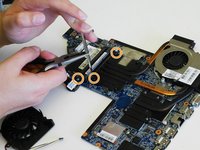
Thanks for this helpful guide! But 2 edits were necessary, one in this step to avoid breaking something.
Other than that everything went well. So thanks again!
My raw edit:
"WARNING: motherboard can't be removed without removing the 2 screws holding the fan to the laptop body! That edit for their position (not clear in this shot) was declined. I would have broken something if I kept on pulling with those screws too in place."
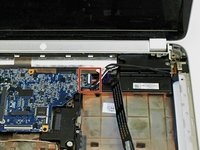
I added a new picture showing clearly at least one of the two screws, but positioned the marker also on the other less visible one.
At this point I still had two wire harness connections to the underside of the motherboard that were preventing it from lifting out.
The two screws by the fan are indicated on the second photo, but perhaps would be better to also indicate them on the first photo. In addition, similar to the other comment, I also had two wire connections that were still connected that prevented the motherboard from lifting out, but they were easy to see and easy to disconnect, but this should be added to the instructions.
En este punto no es posible sacar la placa. Faltan retirar dos tornillos del fan, el conector del CDROM y descalzar/levantar el parlante superior.
-
-
-
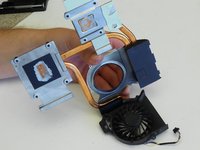
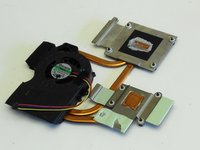
The old fan can be removed by sliding it out of the fan/heat sink assembly.
-
Insert the new fan into the fan slot in the fan/heat sink assembly. Put the assembly back together with the micro screws.
The raw edit for "Before reassembly, make sure your new fan freely rotates within its housing." is necessary to avoid going through all of the steps again. I had to use a screwdriver as a wedge to widen the fan's housing distance from the fan, and blow into it to verify free fan rotation.
-
-
-
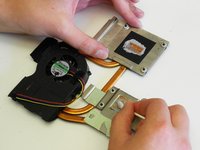
Use cotton swabs, paper towels, and alcohol to gently remove old thermal compound from the fan/heat sink assembly and motherboard.
-
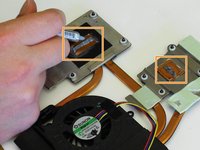
Apply a small amount of new thermal compound to the center of the brass section of the heat sink. Both areas that need new thermal compound are marked with red boxes.
-
-
-
Re-attach the heat sink assembly to the motherboard.
-
Using light pressure, shift the fan/heat sink gently back and forth to spread the thermal compound. This makes a solid connection between the heat sink and motherboard.
Nice manual. I always use this one when I am laying hand my notebook. I would just say that it takes less time: I need around 3 h to disassemble, clean and reassemble.
-


Follow the steps in reverse order to reassemble.
Once you have reassembled the laptop, your repair is complete. If you need additional help, see the HP Pavilion dv7 Maintenance and Service Guide on HP's support website (link to guide: http://h10032.www1.hp.com/ctg/Manual/c03...).
Follow the steps in reverse order to reassemble.
Once you have reassembled the laptop, your repair is complete. If you need additional help, see the HP Pavilion dv7 Maintenance and Service Guide on HP's support website (link to guide: http://h10032.www1.hp.com/ctg/Manual/c03...).
Cancelar: não concluí este guia.
43 outras pessoas executaram este guia.
Equipe

Colorado Springs, Team 1-1, Mcmichael SU 2015 Membro de Colorado Springs, Team 1-1, Mcmichael SU 2015
UCCS-MCMICHAEL-SU15S1G1
3 Membros
1 Guia de autoria
15 comentários
My HP Pavilion dv7 Cooling Fan failed and this procedure was exactly what I needed to install a new fan. The steps are right on. I would have done a lot of experimentation and possible damage had I not had this reference to follow. Thank you very much.
You used way too much thermal compound.
A pea sized drop will be just fine, my dude.
the link works just fine!by the way author i thank you for your work,its really help me!!
Extremely helpful,thank you
Today is August 31,2017
Thank you so much! I just did this today following your directions, with my husbands help. It took us a little less than 3 hrs. All is well, actually great! My HP dv7 is up and running great! Thanks again. I'm sure without this guide I would have goofed up somewhere.
Extremely helpful, thank you so much.
I did have a bit of a hiccup. When pulling the heat sync assembly off the motherboard the thermal compound let go suddenly. The assembly ended up hitting a capacitor and popping it off the motherboard. I managed to do some very tiny soldering and put the capacitor back on the board (seems to have worked).
For my edification and others’, is there a better way to pry the heat sync assembly off the board? Some sort of tool to put beneath it somehow and gently pry it loose (without somehow damaging the CPU or GPU?
Thank you for the time and effort putting this step-by-step guide together. It was extremely valuable in helping me restore my laptop to original performance. Job well done!
Thanks! done in 1 hour!
This guide was invaluable, my fan was jamming and I had tried an external exhaust fan with little luck. I needed to keep my computer running to support legacy software. I managed to complete the task following the steps.
To the author, one thing.
Your a God! , without you, I would’ve had a pile of junk leftover and a bunch of screws.
Thank you very much!
Really useful guide - it made the job very doable. The DV7 I was fixing also had a biometric fingerprint reader to disconnect and re connect that was hard to get to.
I did a time lapse video of re assembly for some fun…
This instruction was a gift!
It was very accurate in most places and enabled me to successfully replace my dv7 fan in about 6 hours. I never would have even attempted it without this detailed procedure. I imagine a computer shop would have charged hundreds of dollars for this repair. I gained enough confidence that I would attempt other repairs on my own now.
There were a couple of issues: There were several connectors still holding the motherboard in place that were not addressed. One was the backup battery, two other connectors on the bottom, one near the card reader and a second small display connector near the fan - easily handled though.
The only real problem I encountered was removing the top cover. It made popping sounds as I pried it up all right. Turned out some of the pops were locking catches and the right-rear threaded insert breaking off. Still it went back together ok and worked perfectly when I turned it back on.
Thank you!
Your steps and instructions were perfect and provided the guide I needed to replace the CPU fan. I agree with the other commenter that there were a few additional plug connections that had to be disconnected but they were very obvious and easy to do. I actually drew the picture of the bottom of the notebook with the screw locations on a folded-over large piece of cardboard. Each screw I would sink (punch) into its location in the picture. It worked great. Thank you so much for your time and effort to help us all! We owe you.