Ir para o conteúdo principal
HP Elitebook 8460p Cooling Fan Replacement

HP Elitebook 8460p Cooling Fan Replacement

Garrett Anderson

Garrett Anderson e 2 outros colaboradores

Última atualização em March 22, 2021

20 minutos
Moderada

Use this guide to clean and replace the internal CPU fan and/or heat sink on the HP Elitebook 8460p if it is failing, broken, or if your device is excessively overheating. Signs that the fan has failed, or is failing, can be spotted if the computer frequently shuts down and restarts and displays a warning about overheating and if you do not hear the fan run when the computer initially starts up.

Heat can damage the internal components of the laptop easily if it is not properly controlled. If you are having problems with the operation of the fan, attempt to fix the problem as soon as possible and avoid using the computer as much as possible before fixing the problem.

When opening the laptop up to repair, replace, or clean the fan, make sure to ground yourself with an ESD strap to prevent electrostatic discharges from damaging sensitive components in the laptop such as the motherboard or the processor.

To complete this guide, you will need an ESD strap and a Phillips #0 screw driver.

O que você precisa

A iFixit ganha comissão quando você compra por estes links.
  1. HP Elitebook 8460p Cooling Fan Replacement, Battery: passo 1, imagem 1 %32
    • On the back of the computer, slide the left switch towards the outside of the laptop until you hear a click.

  2. HP Elitebook 8460p Cooling Fan Replacement: passo 2, imagem 1 %32
    • Slide the battery away from the switches until it can be lifted away from the laptop.

    • Lift the battery away from the laptop.

  3. HP Elitebook 8460p Cooling Fan Replacement, Back Panel: passo 3, imagem 1 %32
    • On the back of the laptop, slide the right switch toward the outside of the laptop until you hear a click.

  4. HP Elitebook 8460p Cooling Fan Replacement: passo 4, imagem 1 %32
    • Slide the back shell of the laptop away from the switches until it can be lifted up.

    • Lift the shell straight up.

  5. HP Elitebook 8460p Cooling Fan Replacement, CPU Cooling Fan: passo 5, imagem 1 %32 HP Elitebook 8460p Cooling Fan Replacement, CPU Cooling Fan: passo 5, imagem 2 %32
    • Attach an ESD strap to your wrist and to a ground.

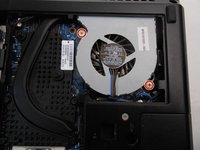
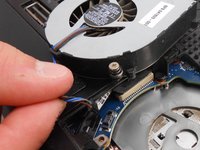
    • Using a Phillips #0 bit, unscrew the two screws on opposite corners of the fan.

  6. HP Elitebook 8460p Cooling Fan Replacement: passo 6, imagem 1 %32 HP Elitebook 8460p Cooling Fan Replacement: passo 6, imagem 2 %32
    • Pull the fan straight up and to the side slightly.

  7. HP Elitebook 8460p Cooling Fan Replacement: passo 7, imagem 1 %32 HP Elitebook 8460p Cooling Fan Replacement: passo 7, imagem 2 %32
    • Disconnect the small electrical connector. Pry the edge up with your finger nails or using a small plastic pry tool.

  8. HP Elitebook 8460p Cooling Fan Replacement: passo 8, imagem 1 %32
    • Using a Phillips #0 bit, unscrew the six screws on the heat sink.

  9. HP Elitebook 8460p Cooling Fan Replacement: passo 9, imagem 1 %32 HP Elitebook 8460p Cooling Fan Replacement: passo 9, imagem 2 %32
    • Pry the inside edge up, pulling the entire assembly to the inside of the laptop, exposing the processor and graphics processor

    • Clean and replace the thermal paste on the processor if you have any thermal paste.

  10. HP Elitebook 8460p Cooling Fan Replacement: passo 10, imagem 1 %32
    • Blow compressed air through the vent from the outside and through the heat sink.

Conclusão

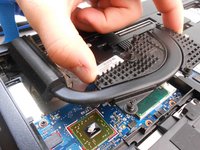
To reassemble your device, follow these instructions in reverse order.

2 outras pessoas executaram este guia.

0 comentários

Adicione um comentário

Exibir estatísticas:

Últimas 24 horas: 13

Últimos 7 dias: 33

Últimos 30 dias: 47

Duração total: 4,821