Ir para o conteúdo principal

DualShock 4 CHU-ZCT2U Charging Port Replacement

Guia arquivado
Este guia é mantido exclusivamente para fins históricos. Use a versão atualizada do guia para executar o reparo.

O que você precisa

  1. DualShock 4 CHU-ZCT2U Charging Port Replacement, Outer Shell: passo 1, imagem 1 %32 DualShock 4 CHU-ZCT2U Charging Port Replacement, Outer Shell: passo 1, imagem 2 %32 DualShock 4 CHU-ZCT2U Charging Port Replacement, Outer Shell: passo 1, imagem 3 %32
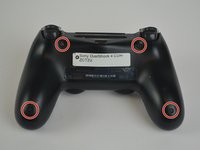
    • Unscrew the four 6.5mm screws, using a Phillips-Head screwdriver.

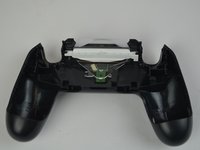
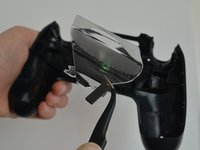
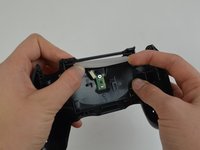
    • Pry the two halves of the shell apart using a plastic opening tool.
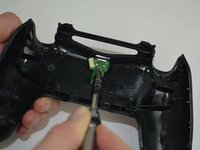
    • Be careful, as there will be a ribbon connecting the inner workings of the controller. It will not separate into two parts just by pulling apart the shell.

  2. DualShock 4 CHU-ZCT2U Charging Port Replacement: passo 2, imagem 1 %32 DualShock 4 CHU-ZCT2U Charging Port Replacement: passo 2, imagem 2 %32 DualShock 4 CHU-ZCT2U Charging Port Replacement: passo 2, imagem 3 %32
    • Pull the ribbon cable out of the motherboard port to fully separate the two halves, using a pair of tweezers.

  3. DualShock 4 CHU-ZCT2U Charging Port Replacement, Charging Port: passo 3, imagem 1 %32 DualShock 4 CHU-ZCT2U Charging Port Replacement, Charging Port: passo 3, imagem 2 %32
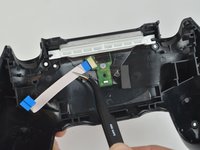
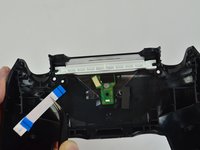
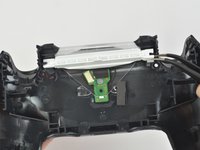
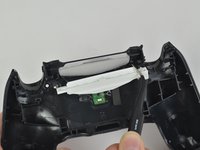
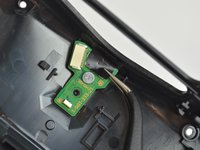
    • Pull the ribbon cable from the charge port, using a set of tweezers.

  4. DualShock 4 CHU-ZCT2U Charging Port Replacement: passo 4, imagem 1 %32 DualShock 4 CHU-ZCT2U Charging Port Replacement: passo 4, imagem 2 %32 DualShock 4 CHU-ZCT2U Charging Port Replacement: passo 4, imagem 3 %32
    • Grip the right hand corner of the opaque white piece with a pair of tweezers, and pull it upwards to remove it.

  5. DualShock 4 CHU-ZCT2U Charging Port Replacement: passo 5, imagem 1 %32 DualShock 4 CHU-ZCT2U Charging Port Replacement: passo 5, imagem 2 %32 DualShock 4 CHU-ZCT2U Charging Port Replacement: passo 5, imagem 3 %32
    • Lift the clear plastic piece up by its right hand corner.

    • Pull it to the right to remove the bottom left hand corner from the groove.

    • Remove the clear plastic piece. It pushes in easily.

  6. DualShock 4 CHU-ZCT2U Charging Port Replacement: passo 6, imagem 1 %32 DualShock 4 CHU-ZCT2U Charging Port Replacement: passo 6, imagem 2 %32 DualShock 4 CHU-ZCT2U Charging Port Replacement: passo 6, imagem 3 %32
    • Peel off the black sticker on the charge port, using a pair of tweezers.

    • Unscrew the 4.50mm screw in the center of the port chip, using a Phillips-Head screwdriver.

    • Pull the charging port out with a pair of tweezers.

Conclusão

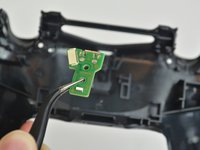
To reassemble your device, follow these instructions in reverse order.

16 outras pessoas executaram este guia.

David Seale

Membro desde: 10/09/17

1.630 Reputação

Autoria de 2 guias

Equipe

USF Tampa, Team S1-G5, Leahy Fall 2017 Membro de USF Tampa, Team S1-G5, Leahy Fall 2017

USFT-LEAHY-F17S1G5

Membros da 3

Autoria de 22 guias

9 comentários

Came in handy, since it’s hard enough to fix a JDM-030. Thanks!

Sunset Shimmer - Responder

Just did this on my JDM-030 (3rd generation DS4) as well. I would point out that the charge port for the JDM-030 (JDS-030?) looks slightly different and has more of a T-shape than the JDS-040, but aside from that, the instructions are functionally the same.

I will lastly add that having good tweezers is a must: the tweezers my jeweler’s drivers came with were crap and I had to go to the store to buy another pair. Make sure your equipment is solid before assembly.

Rob Barba - Responder

Can The JDS 040 work in a controller that uses the JDS 030?

RandyH - Responder

Tried to replace my usb port with a board that reads “1-981-33-31” from amazon. It was listed as JDS-40 and it does not work. In fact when plugged into a usb port on my laptop the ribbon cable gets noticeably hot but the controller will not power on.

Devin Sidell - Responder

Got the same problem. Any idea?

Jacco Veldscholten -

Adicione um comentário

Exibir estatísticas:

Últimas 24 horas: 0

Últimos 7 dias: 2

Últimos 30 dias: 7

Duração total: 13,156