Ir para o conteúdo principal
Disassembling Kinivo ZX100 Mini Portable Speaker

Disassembling Kinivo ZX100 Mini Portable Speaker

Laura Dion

Laura Dion e 9 outros colaboradores

Última atualização em February 20, 2020

15 minutos
Moderado
Pré-requisito somente
Este guia destina-se apenas a ser usado como pré-requisito para outros guias. É incompleto por si só.

Introdução

Ir para o passo 1

Prerequisite only.

O que você precisa

  1. Disassembling Kinivo ZX100 Mini Portable Speaker, Disassembling Kinivo ZX100 Mini Portable Speaker: passo 1, imagem 1 %32
    • Open the circular portion at the top of the speaker by twisting it until it reaches the maximum possible height.

    • Make sure it is twisted fully, as this will allow access to four screws to be removed in the next step.

  2. Disassembling Kinivo ZX100 Mini Portable Speaker: passo 2, imagem 1 %32 Disassembling Kinivo ZX100 Mini Portable Speaker: passo 2, imagem 2 %32
    • Remove the four 12 mm Phillips screws from the enclosure.

  3. Disassembling Kinivo ZX100 Mini Portable Speaker: passo 3, imagem 1 %32 Disassembling Kinivo ZX100 Mini Portable Speaker: passo 3, imagem 2 %32
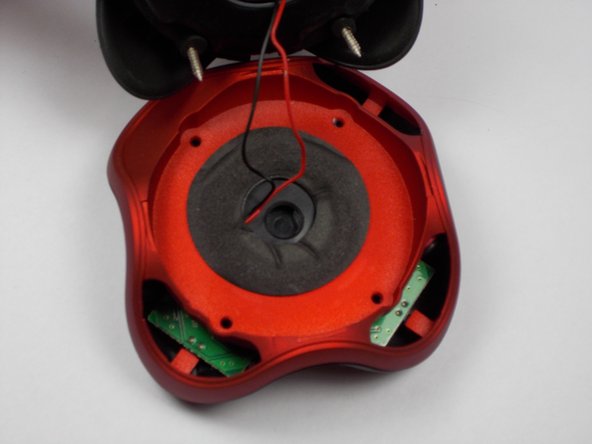
    • Separate the resonator portion from the base of device to reveal the middle separator of the enclosure. The enclosure will now be in two pieces.

    • Hold the resonator portion of the enclosure gently aside to make sure there is no tension on the black and red wires coming from the bottom portion of the device.

    • Excessive force may disconnect the black and red speaker wires from the circuitry in the bottom portion of the device.

  4. Disassembling Kinivo ZX100 Mini Portable Speaker: passo 4, imagem 1 %32
    • Separate the very bottom portion of the enclosure (marked in red) by pulling vertically on the red portion of the enclosure (marked in orange).

    • Gently set the very bottom portion and the resonator section aside once they have both been separated.

    • Remove the circuit board with your hands by lifting and sliding the board away from the LED indicator.

Conclusão

To reassemble your device, follow these instructions in reverse order.

2 outras pessoas executaram este guia.

Laura Dion

Membro desde: 03/26/15

143 Reputação

Autoria de 1 guia

Equipe

0 comentários

Comentar

Exibir estatísticas:

Últimas 24 horas: 0

Últimos 7 dias: 6

Últimos 30 dias: 10

Ao todo: 99