
Dell XPS 15 9500 SSD Replacement

Introdução
Ir para o passo 1This guide will show the steps required to replace the M.2 SSD on a Dell XPS 15 9500. The M.2 SSD is used to store data and the operating system on this laptop. You may want to follow this guide if you are having trouble with running out of storage space on your laptop, or if you noticed the storage speeds are getting slow and want to replace it. You may want to wear an anti-static strap but that is optional as it should be fine to do this process without one.
Before you begin this process make sure to completely shut down the laptop. It will require that you take off the bottom panel on the laptop, remove the screw holding the SSD in place, and lift the SSD out of its slot.
O que você precisa
Kits de conserto
Estes kits contêm todas as peças e ferramentas necessárias para executar este guia.


Peças


Ferramentas


Exibir mais…
-
-
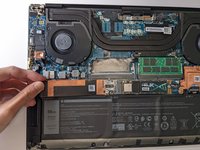
Remove the eight 3.0 mm screws from the bottom panel with a T5 Torx screwdriver.
-
-
-
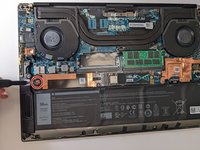
Use a Phillips #000 screwdriver to remove the single 3.0 mm screw on the right side of the SSD.
-


To reassemble your device, follow these instructions in reverse order.
To reassemble your device, follow these instructions in reverse order.

Equipe

UC Santa Barbara, Team A-1, Bator Winter 2022 Membro de UC Santa Barbara, Team A-1, Bator Winter 2022
UCSB-BATOR-W22SAG1
4 Membros
Autoria de 4 guias