
Attach Your Earphones Permanently

Introdução
Vá para o passo 1Using your favorite earphone with Jabra Clipper is pretty annoying. There would either be long tangible cord or folded earphone wires. Plus, the 3.5mm jack would protrude and add more bulk and tangles. Fear not, Jabra Clipper is truly a hackable device, you can actually solder them permanently!
O que você precisa
Peças
Ferramentas


Exibir mais…
-
-
First of all, before you continue, remember that this is a guide to attach your beloved earphones permanently to Jabra Clipper. Those who have weak hearts should not proceed.
-
-
-
The Jabra Clipper's cover is actually made of very elastic rubber, which allows many hacking possibiliites!
-
You'll need to peel the cover. Start by inserting a screwdriver from any of the sides until you hit the steel chassis. Pull it upwards, and do the rest of uncovering ritual with your fingers.
-
Clean up the remaining sealant from the sides of the case. Now there the waterproofing goes! Relax, nobody needs waterproofing. Well at least, not on the level of what was offered by Jabra Clipper!
-
-
-
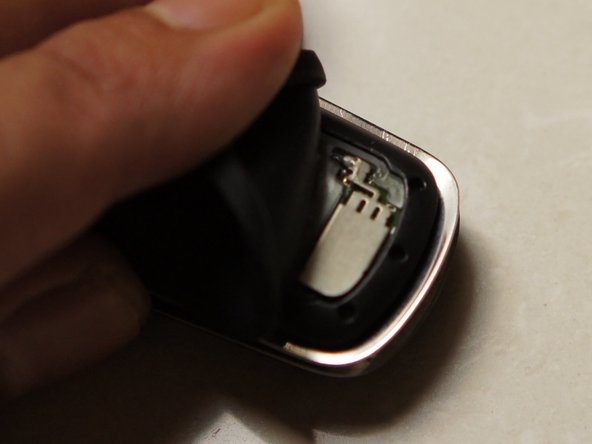
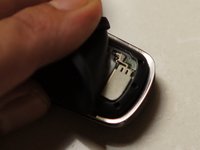
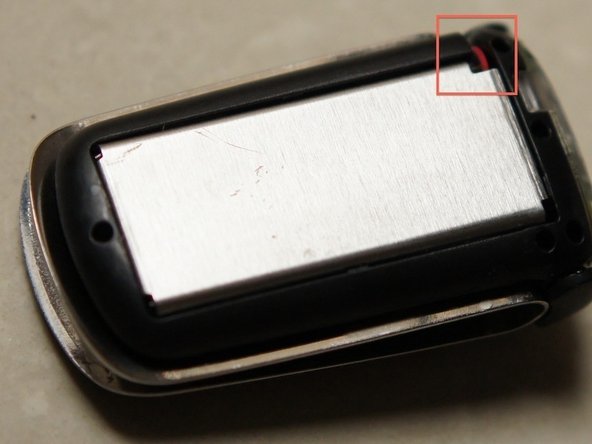
Before you can remove the top plastic, you'll need to unlock the clip on upper right corner. Use a screwdriver for that. The top plastic will pop, and you can remove them.
-
Remember, be careful to never strain the flex cable on top left, connecting front and top PCB!
-
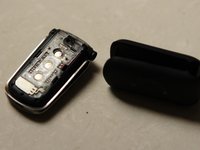
To remove the front plastic, use the screwdriver to pop it, starting from the bottom, and moving on to the sides.
-
-
-
Now you'll need to remove the front PCB. Check out the clip on the top, left, and a bit lower to the right. Pry open from the bottom of the front PCB, and work to the right and left clips. The top clip isn't movable so you'll have to move a bit downwards to pull the front PCB.
-
Now you may remove the top PCB. Again, beware not to strain the flex cable! To remove the top PCB, gently lift the microusb port side upwards, and push audio jack side to the microusb sideward, to remove it from the clip.
-
-
-
I didn't needed to remove the 3.5mm audio jack to solder the earphones, and guess what, I can now plug another earphones here. It works as a splitter!
-
Get ready to solder your earphones. Notice the spots where you should solder your R, L, and two G (common) wires from your earphone. I've got a couple of extra solders on the top right and left, only to figure out that those joints are active only when a 3.5mm jack is plugged in. Oh well.
-
Now reverse the steps to assemble the Jabra Clipper back. Please note that you'll need to cut some of the chassis' black plastic to allow space as well as let the headphone wires out. I've also cut out the top clear plastics clip shown in the previous step.
-
-
-
Now here's what Jabra Clipper should be like! No extra wires, no 3.5mm plug hassles, and Sennheiser-quality earbuds! And I've actually soldered another battery in parallel on the back, without issue thanks to the elastic rubber cover! Now the Clipper runs 12 hours of talk and music time! Good luck on that with BackBeat Go :p
-


To reassemble your device, follow these instructions in reverse order.
To reassemble your device, follow these instructions in reverse order.
Cancelar: não concluí este guia.
8 outras pessoas executaram este guia.

6 comentários
Which glue did you use in order to seal the device once you put the rubber cover back?
Sorry just saw your message. It didn't need any glue, the rubber cover had lip that clips to the frame as is. Never had it accidentally popped off.
But if your really had to, I think some cut of thin double tape would do.
Unfortunately I didn't use it anymore since the past couple years as Yosemite update made the Clipper's bluetooth connection very flaky and almost useless. Too bad, as built in mic is very handy for calls. Back to the iPhone earpods for laptop calls now...
Nicely done. Where did you find the battery? Mine is getting old and need a refresh...
Now it’s time to move on to aptX receivers — Ugreen 4.2 rocks ;)