Ir para o conteúdo principal
Acer Aspire TimelineU M5-481TG Keyboard Replacement

Acer Aspire TimelineU M5-481TG Keyboard Replacement

Christina Crasto

Christina Crasto e 5 outros colaboradores

Última atualização em December 21, 2021

20 minutos
Moderado

Introdução

Ir para o passo 1

Before performing any repairs, make sure the laptop is fully powered off and disconnected from its charger. To repair most parts of the Acer Aspire TimelineU M5-481TG, it is necessary to first remove the keyboard. Be sure to wear a anti-static wrist strap during all laptop repairs. Prying open the keyboard must be done very gently and carefully to ensure that no wires are damaged.

O que você precisa

Ferramentas

  1. Acer Aspire TimelineU M5-481TG Keyboard Replacement, Keyboard: passo 1, imagem 1 %32
    • With the laptop closed and powered off, place the laptop screen side down.

    • Turn the laptop so that the hinges are closest to you.

    • Remove sixteen 6 mm screws from the bottom of the laptop with the Phillips #00 screwdriver.

  2. Acer Aspire TimelineU M5-481TG Keyboard Replacement: passo 2, imagem 1 %32 Acer Aspire TimelineU M5-481TG Keyboard Replacement: passo 2, imagem 2 %32
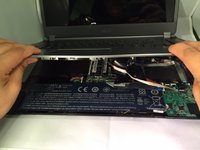
    • Flip the laptop over and open the lid.

    • Use the plastic opening tool with the half centimeter wide tip to gently separate the bottom case of the laptop from the keyboard.

    • Potential for device damage: Do not apply too much force or you may break the clips.

    • Gently pull the keyboard upwards to a 45 degree angle.

  3. Acer Aspire TimelineU M5-481TG Keyboard Replacement: passo 3, imagem 1 %32 Acer Aspire TimelineU M5-481TG Keyboard Replacement: passo 3, imagem 2 %32 Acer Aspire TimelineU M5-481TG Keyboard Replacement: passo 3, imagem 3 %32
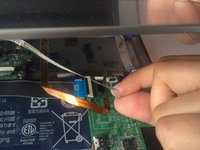
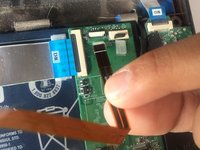
    • Hold the keyboard open with one hand to extend the three cables (white, black and copper) still connecting the bottom of the keyboard to the back case.

    • Be sure you are prying up the hinged retaining flap, not the connector itself.

    • Use your fingernail to flip up the small retaining flap of each zero insertion force connector and then gently pull each ribbon cable out one at a time.

    • The white line on this ribbon cable marks the edge of the connection area. To reinstall, insert the cable into the connector up to this line and then close the retaining flap. If the cable doesn’t insert easily up to (or very near to) this line, it’s probably misaligned and needs to be gently removed and repositioned.

  4. Acer Aspire TimelineU M5-481TG Keyboard Replacement: passo 4, imagem 1 %32 Acer Aspire TimelineU M5-481TG Keyboard Replacement: passo 4, imagem 2 %32
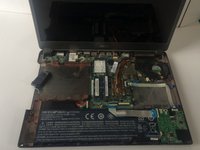
    • Use both hands to remove the keyboard.

    • Potential for device damage: Do not pull too forcibly or you could damage your keyboard.

Conclusão

To reassemble your device, follow these instructions in reverse order.

3 outras pessoas executaram este guia.

Christina Crasto

Membro desde: 03/07/16

475 Reputação

Autoria de 3 guias

Equipe

Marist, Team 1-2, Laflen Spring 2016 Membro de Marist, Team 1-2, Laflen Spring 2016

MARS-LAFLEN-S16S1G2

3 Membros

Autoria de 6 guias

Um comentário

my problem is how to replace the keyboard not how to dismantle it

roniejunbautista - Responder

Comentar

Visualizações:

Últimas 24 horas: 0

Últimos 7 dias: 0

Últimos 30 dias: 3

Ao todo: 2,790