Ir para o conteúdo principal

Acer Aspire 3000 RAM Replacement

O que você precisa

  1. Acer Aspire 3000 RAM Replacement, Battery: passo 1, imagem 1 %32
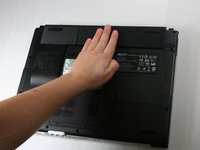
    • Begin with the device face down.

    • Orient the laptop so that the battery is on the side opposite of you and the headphone ports are facing towards you.

  2. Acer Aspire 3000 RAM Replacement: passo 2, imagem 1 %32 Acer Aspire 3000 RAM Replacement: passo 2, imagem 2 %32
    • Slide the button found below the battery to the left into the unlocked position.

    • You will know the battery is unlocked if the tab is pushed to the side where the symbol is unlocked.

  3. Acer Aspire 3000 RAM Replacement: passo 3, imagem 1 %32 Acer Aspire 3000 RAM Replacement: passo 3, imagem 2 %32
    • Locate the battery and the tab to the right of it.

    • Pull the tab to the right while simultaneously pushing the battery away from you.

    • Make sure you push the battery only when tab is held in the right position in order to avoid damage to the device.

  4. Acer Aspire 3000 RAM Replacement, RAM: passo 4, imagem 1 %32
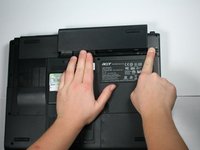
    • Unscrew the two 4.6 mm Phillips #1 screws found at the bottom of the RAM cover using the phillips head j1 bit.

  5. Acer Aspire 3000 RAM Replacement: passo 5, imagem 1 %32
    • Open the RAM cover by wedging the opening tool and the metal spudger in the opening between the two screws.

  6. Acer Aspire 3000 RAM Replacement: passo 6, imagem 1 %32
    • Slide the opening tool around the sides of the cover to release the 3 tabs that hold the cover down.

  7. Acer Aspire 3000 RAM Replacement: passo 7, imagem 1 %32
    • Lift and pull the cover back towards you to detach it from the device.

  8. Acer Aspire 3000 RAM Replacement: passo 8, imagem 1 %32
    • Push the white tabs on either side away from the from the chip.

    • The chip should be released upward automatically after pushing the tabs.

  9. Acer Aspire 3000 RAM Replacement: passo 9, imagem 1 %32
    • Pull and lift the chip to release it from the RAM port.

  10. Acer Aspire 3000 RAM Replacement: passo 10, imagem 1 %32
    • Repeat step 9 to release the bottom chip from its RAM port.

Conclusão

To reassemble your device, follow these instructions in reverse order.

2 outras pessoas executaram este guia.

roro6730

Membro desde: 10/30/16

351 Reputação

Autoria de 2 guias

Equipe

Baylor, Team 4-2, Williams Fall 2016 Membro de Baylor, Team 4-2, Williams Fall 2016

BU-WILLIAMS-F16S4G2

Membros da 4

Autoria de 7 guias

0 comentários

Adicione um comentário

Exibir estatísticas:

Últimas 24 horas: 0

Últimos 7 dias: 4

Últimos 30 dias: 8

Duração total: 681