
2001-2005 Honda Civic Oil Change

Introdução
Vá para o passo 1So the oil in your Civic is indistinguishable from dark roast sumatra. This should help.
For years, 3,000 miles was the correct interval to wait between oil changes, but that is no longer the case. Conventional oil in today's engines can easily last over 5,000 miles between changes. Synthetic oils are even more durable, maintaining good engine performance beyond 10,000 miles.
O que você precisa
Peças

Ferramentas


Exibir mais…
-
-
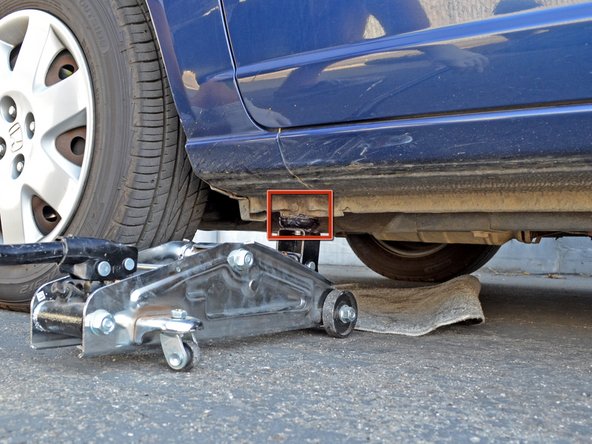
Begin by locating the jacking point on the driver side of your Civic. It's just behind the front wheel.
-
Place the jack just beneath the jacking point so that upon contact, the jacking point will be centered on the jack.
-
-
-
Lift the car high enough so that you can fit the jack stand beneath the car next to the jack. Be sure the jack stand is centered beneath the frame, so that when the car is lowered it will sit evenly on the jack stand.
-
Slowly lower the jack so that the frame of the car is resting securely on the jack stand.
-
Continue lowering the jack in order to remove it from under the car.
-
-
-
Use a 17 mm box-end or socket wrench to loosen the drain plug. When you're able to, remove the wrench and loosen it by hand.
-
-
-
When it's loose enough, remove the plug altogether and let that old stuff flow!
-
While the car's relieving itself, wipe the drain plug down with a clean towel.
-
Never reuse a compression "crush" washer. Always replace the oil-pan nut with a new compression washer. Once you tighten the new one, it's should be considered "used."
-
-
-
From the underside of the car, locate the oil filter. It will be installed on the engine block just above the driver side axle shaft.
-
Keep the oil drain pan nearby as you reach up to get a grip on the oil filter. Loosen it slowly and carefully, trying to avoid spilling oil.
-
Remove the filter and keep it open side up to prevent spilling oil on yourself.
-
-
-
Pour the remaining oil out of the filter. Set it top-side down in the oil drain pan to allow any excess oil to drain.
-
Now grab a clean rag or paper towel and reach up into the engine again to wipe off any oil from the face of the housing, where the new oil filter will seal against.
-
You can exit from beneath the car, and remove the oil drain pan as well.
-
-
-
Place the jack under the jacking point again (just next to the jack stand), and raise the car so that the car is off of the the jack stand.
-
Lift up the lever on the jack stand to lower its saddle column, and remove the jack stand from under the car.
-
-
-
The hood should be "popped". Find the hood latch centered at the front of the hood, just above the Honda emblem.
-
Push up on the latch and raise the hood.
-
With one hand holding the hood up, use your other hand to raise the hood prop rod and insert it into the corresponding notch under the hood. Voila!, your hood is propped up.
-
-
-
Locate your oil filler cap. It's on the top-right of your engine block. Unscrew it (counter-clockwise).
-
Remove the cap.
-
Place a clean plastic funnel in the opening.
-
-
-
Return the hood prop rod to its home in the clasp at the front of the engine.
-
Gently lower the hood, and push down on it to make sure it latches.
-
Before driving anywhere, start the car and let it run for a couple minutes. While the engine is running, check underneath the car for any oil leaks. If oil is dripping from the drain plug you should first check for any cracks in the drain pan. If there are no cracks, you can turn off the car, and tighten the drain plug. Also, check again that the oil level has not gone outside the limits while the car was on.
-
-
-
The light is indicated on the dash between the tachometer and speedometer
-
While the car is off, hold down the trip meter reset button. Turn the ignition on, but do not start the engine. Continue to hold the button for approximately 10 seconds, until the indicator turns off.
-
-
-
Allow oil filter to drain into oil drain pan for 12-24 hours.
-
Take your old oil and filter to a recycling facility. Most auto parts stores and repair shops accept these at no charge. In addition, some cities and/or counties have a service where they will collect used oil and filters from your home. For more information, see the American Petroleum Institute's web page on used motor oil collection and recycling.
-


Listen to her purr now... grrr.
Listen to her purr now... grrr.
Cancelar: não concluí este guia.
36 outras pessoas executaram este guia.

16 comentários
You may need a breaker bar to remove the drain plug from the oil pan housing. Also, the manual recommends that the drain plug be replaced at each oil change. I have found this wildly unnecessary, but was able to buy a couple spares for less than $3.00 each through a dealership. The reason they recommend this is because the plug itself is made from a softer aluminum alloy. After 150K miles, they're nearly impossible to remove without a breaker bar. A new plug (which is slightly shorter in length) does help, and does not leak.
Good Question it is very use full guide. please A civic hybrid can be done using these instructions, but Honda recommends using a synthetic oil - 0W-20 I believe.
The washer is aluminum (crushed washer), not the drain plug (at least on my Civic 2001) and needs to be changed each time. My car is 180000 miles and the drain plug is as good as new.
This is a nice article. I have noticed that removing the filter can be really messy so I would suggest to put some rags underneath to catch all the oil from the filter. Also I use the jack to raise the car higher in order to speed up the draining process.
A quick tip when draining the oil is, once you have the drain plug removed, also remove the cap on top of the engine. This will help to drain more oil out and do it faster. Also check with your supplier to see if you can buy a magnetic drain plug. This pulls any metal shavings out of the circulating oil and is better for your engine and filter. Will be a few more dollars than a regular plug but worth the peace of mind in my opinion, particularly if your car is older. Happy driving!