Ir para o conteúdo principal

iPhone 7 Battery Replacement

O que você precisa

Vídeo de Apresentação

  1. iPhone 7 Battery Replacement, Pentalobe Screws: passo 1, imagem 1 %32
    • Before you begin, discharge your iPhone battery below 25%. A charged lithium-ion battery can catch fire and/or explode if accidentally punctured.

    • Power off your iPhone before beginning disassembly.

    • Remove the two 3.4 mm pentalobe screws on the bottom edge of the iPhone.

    • Opening the iPhone's display will compromise its waterproof seals. Have replacement seals ready before you proceed past this step, or take care to avoid liquid exposure if you reassemble your iPhone without replacing the seals.

  2. iPhone 7 Battery Replacement, Mark your opening picks: passo 2, imagem 1 %32 iPhone 7 Battery Replacement, Mark your opening picks: passo 2, imagem 2 %32 iPhone 7 Battery Replacement, Mark your opening picks: passo 2, imagem 3 %32
    • If inserted too far, an opening pick can damage your device. Follow this step to mark your pick and prevent damage.

    • Measure 3 mm from the tip and mark the opening pick with a permanent marker.

    • You can also mark the other corners of the pick with different measurements.

    • Alternatively, tape a coin to a pick 3 mm from the tip.

  3. iPhone 7 Battery Replacement, Anti-Clamp instructions: passo 3, imagem 1 %32 iPhone 7 Battery Replacement, Anti-Clamp instructions: passo 3, imagem 2 %32 iPhone 7 Battery Replacement, Anti-Clamp instructions: passo 3, imagem 3 %32
    Ferramenta utilizada nesse passo:
    Anti-Clamp
    $24.95
    Comprar
    • The next three steps demonstrate the Anti-Clamp, a tool we designed to make the opening procedure easier. If you aren't using the Anti-Clamp, skip down three steps for an alternate method.

    • For complete instructions on how to use the Anti-Clamp, check out this guide.

    • Pull the blue handle backwards to unlock the Anti-Clamp's arms.

    • Slide the arms over either the left or right edge of your iPhone.

    • Position the suction cups near the bottom edge of the iPhone just above the home button—one on the front, and one on the back.

    • Squeeze the cups together to apply suction to the desired area.

    • If you find that the surface of your iPhone is too slippery for the Anti-Clamp to hold onto, you can use tape to create a grippier surface.

  4. iPhone 7 Battery Replacement: passo 4, imagem 1 %32 iPhone 7 Battery Replacement: passo 4, imagem 2 %32 iPhone 7 Battery Replacement: passo 4, imagem 3 %32
    • Pull the blue handle forwards to lock the arms.

    • Turn the handle clockwise 360 degrees or until the cups start to stretch.

    • Make sure the suction cups remain aligned with each other. If they begin to slip out of alignment, loosen the suction cups slightly and realign the arms.

  5. iPhone 7 Battery Replacement: passo 5, imagem 1 %32 iPhone 7 Battery Replacement: passo 5, imagem 2 %32
    • Heat an iOpener and thread it through the arms of the Anti-Clamp.

    • You can also use a hair dryer, heat gun, or hot plate—but extreme heat can damage the display and/or internal battery, so proceed with care.

    • Fold the iOpener so it lays on the bottom edge of the iPhone.

    • Wait one minute to give the adhesive a chance to release and present an opening gap.

    • Insert an opening pick into the gap.

    • If the Anti-Clamp doesn't create a sufficient gap, apply more heat to the area and rotate the handle a quarter turn.

    • Don't crank more than a quarter turn at a time, and wait one minute between turns. Let the Anti-Clamp and time do the work for you.

    • Skip the next three steps.

  6. iPhone 7 Battery Replacement, Heat the display: passo 6, imagem 1 %32
    • The next three steps show how to separate the screen using a suction cup.

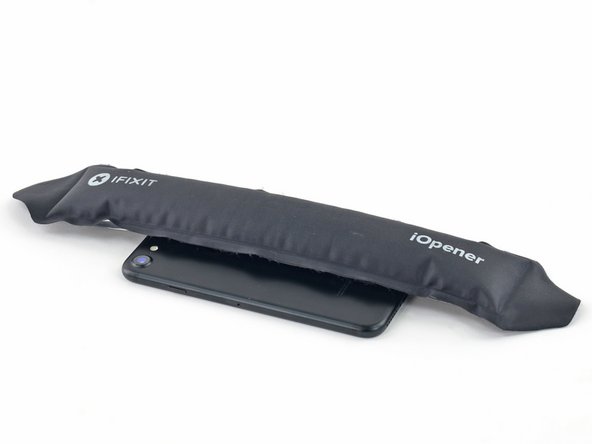
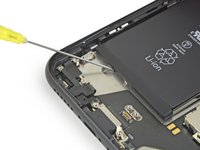
    • Heating the lower edge of the iPhone will help soften the adhesive securing the display, making it easier to open.

    • Use a hairdryer or prepare an iOpener and apply it to the lower edge of the phone for about 90 seconds in order to soften up the adhesive underneath.

  7. iPhone 7 Battery Replacement, Separate the display: passo 7, imagem 1 %32 iPhone 7 Battery Replacement, Separate the display: passo 7, imagem 2 %32
    • Apply a suction cup to the lower half of the front panel, just above the home button.

    • Be sure the suction cup does not overlap with the home button, as this will prevent a seal from forming between the suction cup and front glass.

  8. iPhone 7 Battery Replacement: passo 8, imagem 1 %32 iPhone 7 Battery Replacement: passo 8, imagem 2 %32 iPhone 7 Battery Replacement: passo 8, imagem 3 %32
    • Pull up on the suction cup with firm, constant pressure to create a slight gap between the screen and the frame.

    • Insert an opening pick into the gap.

    • The watertight adhesive holding the screen in place is very strong; creating this initial gap takes a significant amount of force. If you're having a hard time opening a gap, apply more heat, and gently rock the screen up and down to weaken the adhesive until you create enough of a gap to insert your tool.

  9. iPhone 7 Battery Replacement: passo 9, imagem 1 %32 iPhone 7 Battery Replacement: passo 9, imagem 2 %32 iPhone 7 Battery Replacement: passo 9, imagem 3 %32
    • Slide the opening pick up the left edge of the phone starting at the lower edge and moving towards the volume control buttons and silent switch, breaking up the adhesive holding the display in place.

    • Stop near the top left corner of the display.

    • Do not try to pry the top edge of the display away from the rear case, as it is held in place by plastic clips that may break.

  10. iPhone 7 Battery Replacement, Screen information: passo 10, imagem 1 %32
    • There are delicate cables along the right edge of your iPhone. Don't insert your pick here, as you may damage the cables.

  11. iPhone 7 Battery Replacement: passo 11, imagem 1 %32 iPhone 7 Battery Replacement: passo 11, imagem 2 %32 iPhone 7 Battery Replacement: passo 11, imagem 3 %32
    • Re-insert your tool at the lower right corner of the iPhone, and slide it around the corner and up the right side of the phone to separate the adhesive.

    • Don't insert your pick more than 3 mm, as you may damage the display cables.

  12. iPhone 7 Battery Replacement: passo 12, imagem 1 %32 iPhone 7 Battery Replacement: passo 12, imagem 2 %32
    • Gently pull up on the suction cup to lift up the bottom edge of the display.

    • Do not raise the display more than 15º or you'll risk straining or tearing the ribbon cables connecting the display.

    • Pull on the small nub on the suction cup to remove it from the front panel.

  13. iPhone 7 Battery Replacement: passo 13, imagem 1 %32 iPhone 7 Battery Replacement: passo 13, imagem 2 %32 iPhone 7 Battery Replacement: passo 13, imagem 3 %32
    • Slide an opening pick underneath the display around the top left corner and along the top edge of the phone to loosen the last of the adhesive.

  14. iPhone 7 Battery Replacement: passo 14, imagem 1 %32 iPhone 7 Battery Replacement: passo 14, imagem 2 %32
    • Slide the display assembly slightly down (away from the top edge of the phone) to disengage the clips holding it to the rear case.

  15. iPhone 7 Battery Replacement: passo 15, imagem 1 %32 iPhone 7 Battery Replacement: passo 15, imagem 2 %32 iPhone 7 Battery Replacement: passo 15, imagem 3 %32
    • Open the iPhone by swinging the display up from the left side, like the back cover of a book.

    • Don't try to fully separate the display yet, as several fragile ribbon cables still connect it to the iPhone's logic board.

    • Lean the display against something to keep it propped up while you're working on the phone.

  16. iPhone 7 Battery Replacement, Battery Disconnection: passo 16, imagem 1 %32
    Ferramenta utilizada nesse passo:
    Tri-point Y000 Screwdriver
    $5.99
    Comprar
  17. iPhone 7 Battery Replacement: passo 17, imagem 1 %32
    • Remove the lower connector bracket.

  18. iPhone 7 Battery Replacement: passo 18, imagem 1 %32 iPhone 7 Battery Replacement: passo 18, imagem 2 %32 iPhone 7 Battery Replacement: passo 18, imagem 3 %32
    • Use the point of a spudger to lift the battery connector out of its socket on the logic board.

    • Bend the connector cable up slightly to prevent it from making contact with the socket and providing power to the phone.

  19. iPhone 7 Battery Replacement, Display Assembly: passo 19, imagem 1 %32 iPhone 7 Battery Replacement, Display Assembly: passo 19, imagem 2 %32 iPhone 7 Battery Replacement, Display Assembly: passo 19, imagem 3 %32
    • Make sure the battery is disconnected before you disconnect or reconnect the cables in this step.

    • Use a spudger or a fingernail to disconnect the two lower display connectors by prying them straight up from their sockets on the logic board.

    • To reconnect these cables, press down on one end until it clicks into place, then repeat on the opposite end. Do not press down on the middle. If the connector is even slightly misaligned, the connector can bend, causing permanent damage.

    • If you have a blank screen, white lines on the display, or partial or complete lack of touch response after reassembling your phone, try disconnecting and carefully reconnecting both of these cables and make sure they are fully seated.

  20. iPhone 7 Battery Replacement: passo 20, imagem 1 %32 iPhone 7 Battery Replacement: passo 20, imagem 2 %32 iPhone 7 Battery Replacement: passo 20, imagem 3 %32
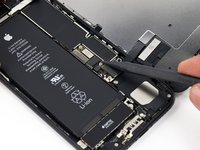
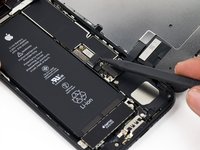
    • Remove the two 1.3 mm Phillips #000 screws securing the bracket over the front panel sensor assembly connector.

    • Some phones could be Y000. Apple started using Y000 for these at some point in the middle of the product's lifecycle.

  21. iPhone 7 Battery Replacement: passo 21, imagem 1 %32 iPhone 7 Battery Replacement: passo 21, imagem 2 %32
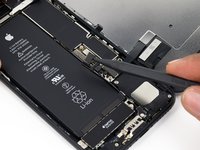
    • Disconnect the front panel sensor assembly connector from its socket on the logic board.

    • This press connector should also be reconnected one end at a time to minimize the risk of bending.

  22. iPhone 7 Battery Replacement: passo 22, imagem 1 %32
  23. iPhone 7 Battery Replacement, Barometric Vent: passo 23, imagem 1 %32
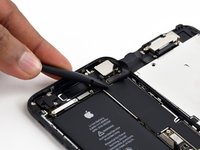
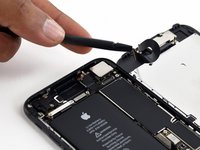
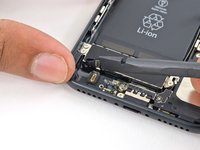
    • Remove the two 1.9 mm Phillips screws securing the barometric vent to the rear case.

  24. iPhone 7 Battery Replacement: passo 24, imagem 1 %32 iPhone 7 Battery Replacement: passo 24, imagem 2 %32
    • Remove the vent.

  25. iPhone 7 Battery Replacement, Taptic Engine: passo 25, imagem 1 %32 iPhone 7 Battery Replacement, Taptic Engine: passo 25, imagem 2 %32
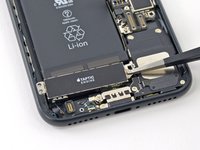
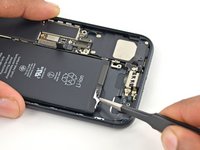
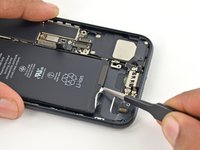
    • Use the flat end of a spudger to disconnect the Taptic Engine connector from its socket on the logic board.

  26. iPhone 7 Battery Replacement: passo 26, imagem 1 %32
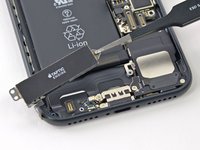
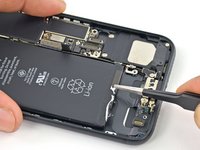
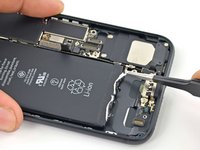
    • Remove the three 1.6 mm Phillips screws securing the Taptic Engine to the rear case.

  27. iPhone 7 Battery Replacement: passo 27, imagem 1 %32 iPhone 7 Battery Replacement: passo 27, imagem 2 %32
    • Remove the Taptic Engine.

  28. iPhone 7 Battery Replacement, Battery: passo 28, imagem 1 %32 iPhone 7 Battery Replacement, Battery: passo 28, imagem 2 %32 iPhone 7 Battery Replacement, Battery: passo 28, imagem 3 %32
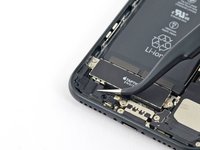
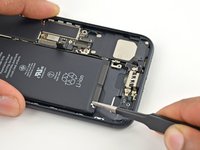
    • Use a pair of tweezers with blunt tips to peel back one of the adhesive strips on the lower edge of the battery.

  29. iPhone 7 Battery Replacement: passo 29, imagem 1 %32 iPhone 7 Battery Replacement: passo 29, imagem 2 %32
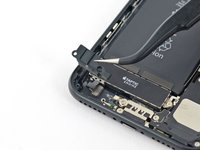
    • Use a pair of tweezers with blunt tips to peel back the other adhesive strip on the lower edge of the battery.

  30. iPhone 7 Battery Replacement: passo 30, imagem 1 %32 iPhone 7 Battery Replacement: passo 30, imagem 2 %32 iPhone 7 Battery Replacement: passo 30, imagem 3 %32
    • If this is your first time removing an iPhone battery adhesive strip, refer to the video in the following step before beginning.

    • Try to keep the strips flat and unwrinkled during this procedure; wrinkled strips will stick together and break instead of pulling out cleanly.

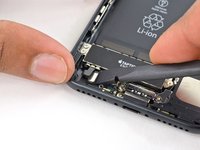
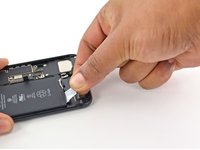
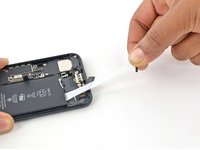
    • Slowly pull one battery adhesive tab away from the battery, toward the bottom of the iPhone.

    • Pull steadily, maintaining constant tension on the strip until it slips out from between the battery and the rear case. For best results, pull the strip at a 60º angle or less.

    • The strip will stretch to many times its original length. Continue pulling and re-grab the strip near the battery if necessary.

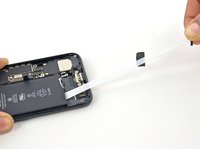
    • Repeat the previous step for the second strip.

    • Hold down the battery as you remove the second strip, or the strip may fling the battery when it separates from the case.

    • If you removed both adhesive strips successfully, skip the next step.

    • Otherwise, if either of the adhesive strips broke off underneath the battery and could not be retrieved, continue with the next step below.

  31. iPhone 7 Battery Replacement, Methods to unstick the battery from the case: passo 32, imagem 1 %32 iPhone 7 Battery Replacement, Methods to unstick the battery from the case: passo 32, imagem 2 %32 iPhone 7 Battery Replacement, Methods to unstick the battery from the case: passo 32, imagem 3 %32
    • If any of the adhesive strips broke off and the battery remains stuck to the rear case, remove it by adding a few drops of isopropyl alcohol (90% or greater) underneath the battery near the stuck strip(s).

    • After about a minute, gently lift the battery.

    • Do not insert your spudger in the area between the volume down (-) button and the top edge of the battery, or you may damage the volume control cable lying underneath.

    • Do not pry against the logic board or you may damage the phone.

    • Don't try to forcefully lever the battery out. If needed, apply a few more drops of alcohol to further weaken the adhesive. Never deform or puncture the battery with your pry tool.

    • If the battery remains stuck to the rear case, prepare an iOpener or use a hair dryer to heat the rear case directly behind the battery. It should be slightly too warm to touch comfortably.

    • Overheating the iPhone may ignite the battery.

    • A piece of dental floss may be used to separate the battery from the rear case. A stronger alternative to dental floss is an unwound guitar string, such as a 0.009 E string from a 12-string set. Thread the floss or string behind the upper battery corners, bring the ends together, wrap them around a folded cloth, and pull evenly.

  32. iPhone 7 Battery Replacement: passo 33, imagem 1 %32
    • Remove the battery from the rear case.

    • If your replacement battery came in a plastic sleeve, remove the sleeve before installation by pulling it away from the ribbon cable.

    • If there's any alcohol solution remaining in the phone, carefully wipe it off or allow it to air dry before installing your new battery.

    • Before you adhere the replacement battery, temporarily reconnect the battery connector to the logic board socket. This ensures that the battery is properly aligned in its recess.

    • Adhere the battery, disconnect it, and continue reassembling your device.

    • If your new battery doesn’t have adhesive preinstalled, refer to this guide to replace the adhesive strips.

    • Perform a force restart after reassembly. This can prevent several issues and simplify troubleshooting.

Conclusão

Compare your new replacement part to the original part—you may need to transfer remaining components or remove adhesive backings from the new part before installing.

To reassemble your device, follow the above steps in reverse order.

Take your e-waste to an R2 or e-Stewards certified recycler.

Repair didn’t go as planned? Check out our Answers community for troubleshooting help.

906 outras pessoas executaram este guia.

Paige Reisman

Membro desde: 04/07/14

23.562 Reputação

Autoria de 15 guias

120 comentários

Does this effectively negate the waterproof feature of the new iPhones?

Tubby - Responder

yes , unless it is sealed back with new waterproof tape, which almost no one has yet

Atronx -

No you can buy the replacement. See the above guide for a link on how to do that and iFixIt sells them. Recommend buying more than one because installation is tricky - must get it aligned perfectly though the spluger and pointy tweezers can help reposition minor slipups.

lovemymac -

The back adhesive is available on ifixit. So you can make it water proof-ish again.

Recall, an original iPhone is far from waterproof after only a month usage.

Guenter -

iPhone 6 take battery off put new one now not changing at all but saying yes but no going up new battery saying all time 6@.all time

ant2101 - Responder

Adicione um comentário

Exibir estatísticas:

Últimas 24 horas: 205

Últimos 7 dias: 1,816

Últimos 30 dias: 8,253

Duração total: 1,146,177