
iPhone 3GS Power Button Replacement

Introdução
Vá para o passo 1Use this guide to replace the plastic power button cover, not the electronic power button itself.
O que você precisa


-
-
If your display glass is cracked, keep further breakage contained and prevent bodily harm during your repair by taping the glass.
-
Lay overlapping strips of clear packing tape over the iPhone's display until the whole face is covered.
-
-
-
Remove the two 3.7mm Phillips #00 screws from the dock-connector end of the iPhone.
Shesh - why doesn't the first line of step #1 say "Turn off your phone" by holding the power button down and shutting it down. I know you don't HAVE to do this, but it certain didn't feel right opening a device while the screen was humming along looking at me.
The power button is broken... that is why?
Do seriously consider ESD when getting to the internals. External connectors have ESD protection circuits, but these will not help if you touch the internals!
ok, I did it but the vibration stopped working… I don’t know why. Is there a way to fix it?
-
-
-
Remove the metal handle from the suction cup. It's easier and safer to grip the suction cup's base instead of the metal handle.
-
Use a small suction cup near the Home button to gently pull up the bottom portion of the iPhone's display assembly.
The small suction cup near the home button didn't quite work for me, but i found some kind of workaround: just use the suction of your iPhone-carkit (if you have one)
that works like a charm
Duck Tape also works. :)
Be really careful at this point not too pull too hard when you're trying to get the screen out - I did, the screen came out suddenly and I pulled all the connectors off :/
put your fingers at power button end of phone, resting on edge of glass/bezel you can use them as lever so when you pull on suction at other end you don't need to apply much pressure and the cables underneath aren't ripped off
As a help to doing this step, put your thumb/fingers around the phone around the middle so it's cradled in your hand. Keep your fingers wrapped around and resting gently on the top of the screen with your thumb and the first few fingers. See how his thumb is sitting on the edge like that, but ready to 'catch' the screen when it comes up? Do that with your thumb and the tips of your fingers on the other side.
Now carefully use the suction cup to 'walk/rock' the screen out with a left-to-right while pulling up motions. With your fingers gently clamped around the phone and providing a little pressure on the edges overlapping the screen when the screen comes out, they'll catch the screen before you pull it up too far and yank the cables out.
I was very careful, but not careful enough removing the display with a suction cup, and Everything came unplugged in an instant. CAUTION: Pull with the suction cup near the round button, AND ALSO have someone else support the other end of the display so that only the end of the display with the round button comes out. I was very lucky.
I had no grip at all on the suction cup with my fingers. Problem solved by inserting the screw driver in the s-cup, which gave just the right leverage to control pulling loose the display assembly.
-
-
-
Rotate the display assembly up until it is at an angle of approximately 45 degrees.
When you get back to this step as you are reassembling it, it's tempting to test that you've got all the cables plugged in properly by switching the phone on and testing it. However the Home button will not work until the front panel is back in position, because the electrical connection is done by a pair of touch contacts which only work when the phone is assembled.
When the instructions say "Rotate the display assembly up until it is at an angle of approximately 45 degrees." they really mean "TILT THE HOME BUTTON END OF display assembly up until it is at an angle of approximately 45 degrees. Looking at the picture makes this step brain dead simple, but if you were using another iPhone to read the directions it would be easy to miss.
-
-
-
Continue to hold the display assembly with one hand, and use your other hand and a spudger to disconnect the black ribbon cable labeled "1". (Cable 1 is for the display)
What part is 1? My seems to keep dropping out and the ear speaker is not working. Is this what it is?
What are the flex cables #1, #2 and #3 for? There's a lot of questions about this, but no answers?!
SOMEONE has to know!?
Citação de Turbo Fredriksson:
What are the flex cables #1, #2 and #3 for?
Aparently #3 is 'Earpiece & Proximity Sensor'.
Citação de Turbo Fredriksson:
Aparently #3 is 'Earpiece & Proximity Sensor'.
Found the thread: What Ribbon "1" and "2" and "3" do?
1. Ribbon #1: Runs the LCD
2. Ribbon #2: Runs the digitizer
3. Ribbon #3: Earspeaker and various sensors on the iPhone face
Note that The connectors have a rubber-like Top surface. Make surre The spudger is inserted underneath that rubber piece. To disconnect, The connector ha to lifted upwards from the PC-Board (i.e. Orthogonally from the electronics board, as opposed to being moved sideways). holds true for all of those connectors, except for the one with the flip-tab.
-
-
-
Rotate the display assembly up until it is roughly vertical. This will allow easier access for disconnecting the remaining cables.
-
Use a spudger to disconnect the black ribbon cable labeled "2". (Cable 2 is for the capacitative touch panel)
-
-
-
Use a spudger to flip up the white plastic tab holding the ribbon cable "3" in place. The white tab will rotate up 90 degrees, releasing the ribbon cable.
-
Slide the black ribbon cable out of its connector, and remove the display assembly from the iPhone.
On my 3G, the piece that flips up on the #3 connector was black and the connector itself was white, seemingly opposite of the pictures. I mistakenly tried to pry up the wrong piece, but fortunately didn't do too much damage before I realized this. My phone was replaced on warranty in February so this must be the case in some newer 3G's.
Citação de lolsen4:
On my 3G, the piece that flips up on the #3 connector was black and the connector itself was white, seemingly opposite of the pictures. I mistakenly tried to pry up the wrong piece, but fortunately didn't do too much damage before I realized this. My phone was replaced on warranty in February so this must be the case in some newer 3G's.
Thanks for the heads-up. I added a note so that people are aware that the colors may be reversed.
That flip tab on the #3 connector split in half and came off completely. Be careful. And if anyone knows where to buy a replacement flip tab, that'd be cool too :)
I should also note that I used a little flat head screwdriver when lifting the flip tab and the narrow pressure point is what cause it to split. Should of used a spudger.
I bought my black iPhone a full housing white cover off ebay. No phone shops seem to be able to change it for me.
If I follow this guide, will I be able to pull my phone apart, change the covers and put it back together?
That is, once I pull the phone apart, will it work properly once I put it back together again?
Citação de kristymic:
I bought my black iPhone a full housing white cover off ebay. No phone shops seem to be able to change it for me.
If I follow this guide, will I be able to pull my phone apart, change the covers and put it back together?
That is, once I pull the phone apart, will it work properly once I put it back together again?
Yes, if you take care and follow the instructions to the letter.
How on earth do I get the black ribbon cable back into its connector???
Citação de Cor Berkelaar:
How on earth do I get the black ribbon cable back into its connector???
Cor, You have to slide the little bar on the connector away from the body of the connector before you can insert the ribbon cable into it. I know it's tight quarters, but even my meat hooks were able to finally get it inserted. The 'trick' is that once you have inserted the cable into the body of the connector, quickly slide the bar back toward the body as this will lock the cable into the connector. I hope this is helpful.
David
Is there a way of replacing the connector?
i have torn the top of the connector......... would that be the reason that the iPhone would not start even though the ribbon is in the connector and fastened secured with the white plastic tab is down.
I HAVE DONE IT GUYS SO THANK YOU.
Citação de Vishal Vaidya:
Is there a way of replacing the connector? i have torn the top of the connector......... would that be the reason that the iPhone would not start even though the ribbon is in the connector and fastened secured with the white plastic tab is down.
Citação de Vishal Vaidya:
Is there a way of replacing the connector?
You could replace it. That's what I'll have to do. Luckily my brother is great with soldering surface mounted components.
But if you had to ask if it can be replaced, you don't have knowledge to do it yourself! It's VERY difficult! Look among your friends or the 'Net. I found quite a lot of forums where they talk about the difficulty on replacing SMD's. Just mail one of them that seem to know what they're doin'...
Citação de cliffcurtis:
if anyone knows where to buy a replacement flip tab, that'd be cool too :)
http://www.earth2k.com/fpc-ribbon/
http://cgi.ebay.com/ws/eBayISAPI.dll?Vie...
I'm currently waiting for mine... :)
[quote|I'm currently waiting for mine... :)[/quote]
And my younger brother managed to replace it with only a couple of minutes whining about it's size :).
Works just fine now (exept that I can't seem to turn the darn thing off, even though I've also replaced the button harness!)
I have torn the top of the connector too and the iPhone is not starting.. Was that the reason? Did it work after replacing the connector?
Citação de Vishal Vaidya:
Is there a way of replacing the connector? i have torn the top of the connector......... would that be the reason that the iPhone would not start even though the ribbon is in the connector and fastened secured with the white plastic tab is down.
Citação de lolsen4:
On my 3G, the piece that flips up on the #3 connector was black and the connector itself was white, seemingly opposite of the pictures. I mistakenly tried to pry up the wrong piece, but fortunately didn't do too much damage before I realized this. My phone was replaced on warranty in February so this must be the case in some newer 3G's.
Maybe it adds Value to the explanation to say that the piece that needs to be flipped up is located on the opposite side of where the ribbon cable exits the connector. It needs to flip upwards towards the ribbon cable.
My confusion was to identify which connector I have in my phone, since everything in there is so tiny that it is hard to identify which is which. Maybe a zoom-in on the connector with the tab flipped up would be a good addition to the instructions also.
Be VERY careful when working with ribbon 3. I thought I was but when I got the phone back together the earpiece didn't work. While doing research to find out why, I discovered that ribbon 3 is very delicate and easy to damage. I'm now waiting for a new one... if I can't fix it, I'll have to get a new phone since I can't see myself hearing only via Bluetooth or speakerphone.
That step also had me thinking & reading for quite a while. Maybe a close-up picture of the connector might be helpful, seems that a lot of people screw up badly here.
My American 3GS white connector did not flip open. It split into 3 little pieces of white plastic when I tried lifting it with the spudger. The plastic seemed very brittle; the phone is 4 years old. Amazingly to me, I was able to slide the flex tail back in to position and it made all the necessary electrical contacts (at least for the time being). Wi-fi cable #6 was not properly seated after first assembly, but everything is working now! Thank for the help.
Dennis Smith
I strongly recommend that you review Step 7 of the 3GS 'Display,' 'Front Panel' or 'Front Panel Assembly' guide. As of this date (June 2015), only those three guides include a photo of a mock-up of Connector 3 that will provide you with detail that will help you avoid damaging that fragile connector.
-
-
-
Insert your SIM eject tool or a paper clip into the hole next to the headphone jack.
-
Press down on the tool until the SIM card tray pops out.
-
Grasp the SIM card tray and slide it out of the iPhone.
-
-
-
Use a spudger to disconnect the ribbon cable labeled "4."
Note! Be EXTRA careful with this cable #4. Twist and brakes easily!
What if I have one of those thin film screen protectors applied, would the suction cup peel it right off instead of lifting the screen up?
-
-
-
Use a spudger to disconnect the ribbon cable labeled "6."
Those "6" and "7" antenna connectors are quite fragile.
Be very careful when assembling not to force the connector down; It should click actually quite easily once it's placed properly.
If you try to force the connection, it might easily be deformed, which would really be a pity.
Actually, I had to apply some pressure to #7 to get it back in place - I tried not to force it as advice above said, but it wouldn't go in. The pressure wasn't too strong, but it doesn't just slide right in.
iluxan -
I think the steps to replace the connectors 6 & 7 should be emphasized because of the size/fragility of the connectors.
satsho -
I agree with the others that cable 6 and 7 are very fragile and can be difficult to reattach. I was able to get #7 back on but #6 just wouldn't attach. I put too much pressure on it so now I have a cell phone without WiFi or GPS. I would rate the repairability of this phone lower than it is because of the 50-50 chance of flattening these connectors. My 3GS is now effectively an iPod, but with a new battery.
In hindsight I should have read over the whole recipe twice and looked at the comments before starting but I didn't because I thought I could do it and was impatient. I agree that there should be warning at the top to draw attention to the multiple wires that could be damaged when you do this.
My antenna doesn't work now and there is a small metal part that looks like a letter p that fell out of my phone. I thought it wouldn't matter till my friend said it might attach the antenna. Does anybody know where it is supposed to go?
The small metal part that looks like a "p" is a clip that holds the camera in place. You need to put it in place before you replace the screw immediately next to the camera. It's mentioned in step 12 of many of the guides.
#6 would not reattach. I spent an hour trying to reattach that ONE thing. I finally had to give up. What a complete waste of time.
I had edited this step months ago to add a warning to make VERY certain that the connector on the ribbon cable for #6 is centered on its mating connector on the motherboard before applying pressure to it. If it's not centered and you apply pressure you will very likely destroy both halves of the connector. The half attaced to the ribbon is replaced with the wifi antenna- very inexpensive. However, the half on the motherboard is tiny and soldered on. You'll need to get someone equipped to repair circuit boards.
When I ruined my #6 I ended up getting another phone. If you don't repair it, your phone will work but your wifi will not because #6 is the wifi connector.
Months ago I wrote and placed an edit into step 10 which read something like this:
" Be very certain that the #6 connector half on the ribbon cable is perfectly concentric with the #6 connector half on the mother board before applying pressure. This may require a magnifying glass or jewelers' loupe. Failure to ensure proper alignment of these connector halves prior to applying pressure will destroy both connector halves."
At some point someone removed this much needed edit. WHY???????
"concentric" is not the right word. Try "parallel and aligned".
No, actually concentric is exactly correct. When the center of the circle in the ribbon is exactly over the center of the connector on the board the respective circles of the connector halves are CONCENTRIC and properly aligned.
-
-
-
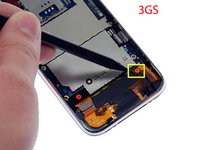
Remove the following 8 screws:
-
Five 2.3 mm Phillips #00 screws with partial threads securing the logic board to the rear case.
-
Two 2.3 mm Phillips #00 screws with full threads securing the logic board and camera.
-
One 2.9 mm Phillips #00 screw from beneath the "Do not remove" sticker.
-
Note for re-assembly:
-
The screw that goes next to the camera (bottom right orange highlighted screw) also has a metal strip that holds the camera in place.
I found that after putting the battery in place and reattaching the logic board with the screws I had to press down a little bit to get the screws to reach because the battery contacts kept the logic board from settling in this tension gives positive contact between board and battery.
My battery had swollen - so much so that the back cover was bulged. So when I was removing screws, I was really careful and did every-other-one first on one side, and then the other, then back to the first side, etc. Even in doing that, one of the screws went flying...somewhere...I never did find it, but it hasn't seemed to effect anything. And when I do find it I know I can get back in my phone to put it back.
I didn't have a removable screw in the bottom right with a metal strip, there was a fastening in there without a Philips type depression, but the camera came out with the board. Not sure if the last person in here before me broke something, as there was an aftermarket battery in the phone with no adhesive. However the camera works after putting it all back together
-
-
-
Use a spudger to gently pry the camera up and out of its housing in the rear case.
After removing the 2.3 mm Phillips #00 screw attached to the camera a small retaining clip may be present.
Take note of its position and orientation for later reinstallation.
3G and 3GS camera enclosure: As I was transplanting a 3G cover onto a 3GS, I realized as I was trying to re-assemble the camera that it would not fit: the 3GS camera does not fit in the 3G enclosure. Luckily, you can remove just the camera enclosure from the 3GS and transplant it to the 3G. It's dirty, I broke the ring, I transplanted some of the double face tape... but in the end it worked.
-
-
-
Use a spudger to gently pry up the end of the logic board closest to the dock connector.
When removing the logic board, a slight push towards the top of the phone, will "unclip" the bottom edge of the logic board near the "Do Not Remove" screw.
When reinserting the logic board, there is a tab in the top edge of the rear shell case that the edge of the logic board goes under. It is the edge closest to the camera.
Without this "comfortable" fit, you won't be able to get the SIM in.
The camera itself also has an element of "comfortable" Fit.
If the “Do not remove”-sticker is damaged it’s a warranty thing I suppose? It doesn’t have any function, does it?
-
-
-
Slide the logic board towards the dock connector and out of the iPhone.
-
When replacing the logic board after installing battery, connect the camera to the logic board before inserting it into the case. Then make sure to set the top section of the logic board (where the SIM tray is) in place before settling the rest of the board in place. This is important, as sometimes the SIM card slot will not align into place. Once the top section is in place, the bottom section can be maneuvered into place. You will know the logic board is correctly installed when the SIM tray is aligned with the opening in the iPhone case and the camera module seats neatly into its place.
Citação de Lenore:
When reversing directions for reassembly, the logic board needs to be clipped into the clips on the side.
++
Although I would say "needs to be slipped under the clips on the side". The most obvious clip is next to the camera, facing south (if the camera is in the NE corner). There is a corresponding clip on the opposite side of the north end the logic board, facing east (a bit east of the #6 ribbon cable).
It's still possible to get all the screws back in with the logic board above the clips (trust me), but it's a serious barnus because the SIM card holder won't fit back in and the camera will be pointing a bit askew ... and you'll have to pull all the screws back out and figure out what you did wrong (and why you had a naggling suspicion the logic board wasn't placed quite right).
I would recommend sliding in the SIM card tray *before* putting any screws back, just to make sure.
Slipping the SIM card in first is a helpful suggestion.
My motherboard actually was not quite lined-up as mentioned, and so after the SIM didn't fit, I was able to pull and reposition the motherboard properly before proceeding.
Citação de johnhart:
++
Although I would say "needs to be slipped under the clips on the side". The most obvious clip is next to the camera, facing south (if the camera is in the NE corner). There is a corresponding clip on the opposite side of the north end the logic board, facing east (a bit east of the #6 ribbon cable).
It's still possible to get all the screws back in with the logic board above the clips (trust me), but it's a serious barnus because the SIM card holder won't fit back in and the camera will be pointing a bit askew ... and you'll have to pull all the screws back out and figure out what you did wrong (and why you had a naggling suspicion the logic board wasn't placed quite right).
I would recommend sliding in the SIM card tray *before* putting any screws back, just to make sure.
When putting it back together, it helps with alignment to put in the SIM Card tray. This beats having all your screws back in and finding out it's misaligned. Put the logic board 5/6 the way in, and insert the SIM Card tray like normal. Allow it to guide your logic board into the proper place.
When re-installing the mother board ensure that all of the previoulsly diconnected connector cables are out of the way and do not become trapped by the motherboard.
-
-
-
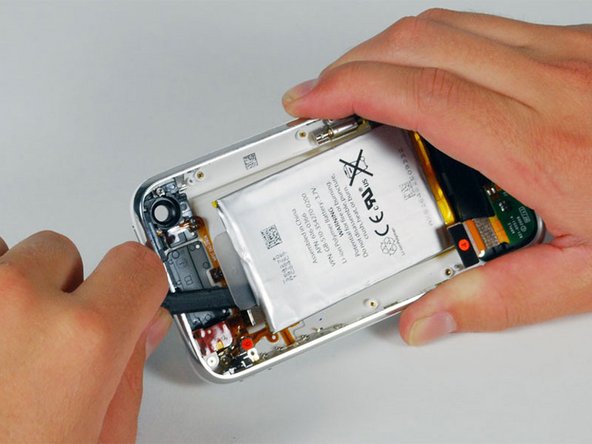
Use a spudger to pry the battery up from the rear case. The battery is attached with an adhesive strip around the perimeter of the battery.
I successfully completed these steps to dry out a wet phone. While everything inside was dry as a bone, I never did remove the battery since the adhesive was so strong.
I found the spudger far too weak to even attempt the removal of the battery. Instead, I used a folding bone (something I've had for years that's used for making perfect folds in heavy printmaking paper) however, I was still bending the battery far more than I was comfortable with. Since my mission was not to mess with or replace the battery anyways I just left it alone.
Excellent directions!
Installed and the phone is working... You'd think Apple didn't want us to be able to replace the battery. Good directions.
I've done all the steps and phone switches on and works just fine with the one exception that I do have a signal! Is it possible I've damaged the aerial in the process? The strange thing is that on checking the networks I can see T-Mobile, but not 02, so implies something is working. All very odd. Currently my iPhone has become an iPod! Erkk
Any tips?
You most likely forgot to re-atatch the antenna. It is one of the connecters you unhooked after the first 3...its located in the top left of the case..Its a circular connecter.
Citação de John:
I've done all the steps and phone switches on and works just fine with the one exception that I do have a signal! Is it possible I've damaged the aerial in the process? The strange thing is that on checking the networks I can see T-Mobile, but not 02, so implies something is working. All very odd. Currently my iPhone has become an iPod! Erkk
Any tips?
Sorry...Its the connecter on the bottom left..Rectangular shaped
Citação de John:
I've done all the steps and phone switches on and works just fine with the one exception that I do have a signal! Is it possible I've damaged the aerial in the process? The strange thing is that on checking the networks I can see T-Mobile, but not 02, so implies something is working. All very odd. Currently my iPhone has become an iPod! Erkk
Any tips?
I put back together my iPhone and put it in a new shell but I just finished and the power button won't work what could i have done wrong?
Citação de thomas manning:
I put back together my iPhone and put it in a new shell but I just finished and the power button won't work what could i have done wrong?
oh also the vibrate button won't work any ideas there?
I managed to replace the mute button without removing the on/off button :o)
Was able to peel the ribbons without removing the battery. Worked great with a 3G. Thanks
Instructions and notes made this fairly easy to do. I had one scary moment where my screen would not turn on but a Hard Reset on the phone fixed it.
any help welcome,just changed the battery on the wife's iPhone after it took a little swim,it wouldn't charge after drying out and i thought a new battery would be the answer,phone switches on ok and everything works except it won't charge on any of our proven chargers.guess something on the main board's knackered. if you have any ideas i would be a very happy chap.
Just a little tip I thought I might add. I would recommend having a digital camera handy to taking snap shots before proceeding with each step, so that you can see exactly how it originally looked at each stage. Once you've gotten to the battery section, just pop the card from the camera into a computer or applicable device and you now have a simple guide for reassembly that is specific to your device.
Also, it may be prudent to take a picture of the screws laid out in a tray along side the phone in the same positions they came out of.
Agree with others - spooger will almost certainly break if you try to pry it out using just that and you can't pull hard enough on the plastic tab. Even on my 2 year old phone, the glue was still *quite* good at holding the battery in.
I used an equally small flat-blade screwdriver and gently walked around the battery lifting against the bottom plastic and the edge of the phone being careful NEVER to touch any of the flat-cable wires. While you can pry against the bottom since there is nothing under it (just double-check since there are some wires running along the side of the phone and the pressure you need to remove the battery would damage the wires if you pryed on them), you need to be careful against the edge of the phone. It's cheap plastic. You can pry against it, but I dared not use more force than enough to start hearing the adhesive start to rip/creak loose. SLOWLY walking around the battery at safe pry points several times finally loosened it enough that I could pull it out. GO SLOW.
If you have the plastic spudger that comes in the kit, it will most likely break when trying to remove the battery. A butter knife worked extremely well, however ...
Agree with this comment. Prying the battery up from its adhesive was the hardest part of this repair, and yes, I did break the spudger thingy.
Barb -
Since I didn't have a hair dryer (never needed one) I used a 500W construction lamp... Those things get very hot. The battery came free relatively easy.
Had to use pliers to slowly pull the battery free by it's tab. When you reverse the steps to reassemble the phone - make sure to get all 6 (or 7 for the 3GS) cables plugged back in. I forgot connector 5 and had to take the phone back apart. Then realized the next day I also had missed connector 6 (wifi). So because I reassembled too quickly the first time - I got to do all the steps 3 times! But phone works perfectly now with a new battery.
Actually broke the plastic spludger trying to get the battery off. Considered it the hardest part of the tutorial. I kept looking at it to see if I hadn't ruined something.Asides from this, reassembling was fairly quick although there was no sliding back of the logic board for me on a 3G. Turned it back on, tested sound, microphone and wifi. All seems good. Thanks alot for all the help guys.
I've made all the disassembling process with no problems, but when I put the logic board back the battery starts getting hot and hotter. Any suggestions??
When I put the new battery in, it was a smidge too far toward the bottom. As a result the logic board didn't quite fit back into place and I was unable to put two screws back in. However, the repair seems successful and my phone is working now. Additional guidance on installing the battery would help.
The new battery that I have had air pocket in it. It kinda bloated. The logic board would not fit back perfectly because of the bloated battery.
So using a sharp cutter, I cut a bit hole. Pssssttt... the air came out. Watch out for the chemical smell. Using a good tape, tape back the hole. Double did that to make sure.
Don't know whether I supposed to do that or not, but sending back the battery to ifixit was not an option as I live on the other side of the planet.
any one can help me fix my iphone 3g. i was using it the other day when it suddenly turned off by itself and i cant turn it back on, any tips?
OK, I replaced the battery following the instructions (was more of a struggle than I thought it would be to get the logic board back in place) and put it all back together. All appears to be working fine except the Camera. The Camera App will not open the camera to let me take either a photo video. As the camera is never disconnected from the logic board I am puzzled as to what could be the issue. Very frustrating. Any ideas?
-
-
-
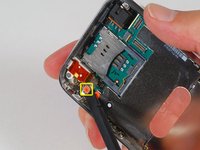
Remove the two Phillips #00 screws securing the on/off switch to the front bezel.
-
-
-
Gently pull the power button electronics away from the top edge of the rear case.
-
Use the tip of a spudger or your fingers to remove the power button from the rear case.
once at step 18 i realized that its not the button i need, its the electronic part of the button i need, oh well i still had fun disassembling the iPhone
-


To reassemble your device, follow these instructions in reverse order.
To reassemble your device, follow these instructions in reverse order.
Cancelar: não concluí este guia.
158 outras pessoas executaram este guia.

4 comentários
This was really helpful - I didn't have (and couldn't easily source) a spudger. I used a small flathead screwdriver instead. Probably not recommended as it could easily damage surrounding components, but seemed to work OK.
I wasn't able to remove the battery, largely because of the above (and the warning in the guide about pulling on the plastic tab), but was easily able to remove the power button assembly and install a new button with the battery in-place.
Works great now, although my mute button was also misbehaving (prior to opening the phone!), but I wasn't confident about removing the last ribbon cable required to get at that when I wasn't sure exactly what was wrong with it.
I ended up not needing to remove the battery to replace the power button. I also noticed that there is a very small plastic tab on the old power button which I had to transfer to the new power button in order for the connection to work correctly. And finally, I had a heck of a time reattaching the screws that hold the power button into place. I suppose that might have been due to not removing the battery, but what ever the cause, it was not easy and I'm still not 100% sure they are in correctly. But everything is working ... for now at least.
I did all of these steps but now my Iphone is stuck as a black screen with the apple and wont do anything...HELP! i'm freaking out.
You haven't reconnected the screen ribbon cables correctly. Open it back up and make sure they're all in properly. I've had this issue a few times and that is definitely the solution.