Ir para o conteúdo principal

Toshiba Satellite C55-A5310 Fan Replacement

O que você precisa

  1. Toshiba Satellite C55-A5310 Fan Replacement, Battery: passo 1, imagem 1 %32 Toshiba Satellite C55-A5310 Fan Replacement, Battery: passo 1, imagem 2 %32 Toshiba Satellite C55-A5310 Fan Replacement, Battery: passo 1, imagem 3 %32
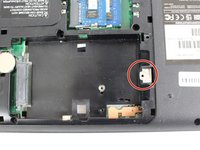
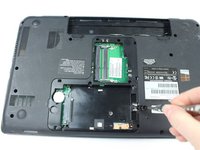
    • Push the left tab with your left hand.

    • Then push the right tab with your right hand.

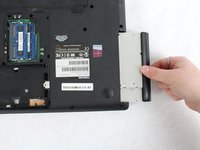
    • While your right hand is still pushing, remove the battery with your left hand.

  2. Toshiba Satellite C55-A5310 Fan Replacement, Optical Drive: passo 2, imagem 1 %32 Toshiba Satellite C55-A5310 Fan Replacement, Optical Drive: passo 2, imagem 2 %32
    • Remove one screw with a JIS #000 screwdriver.

    • This screw does not come completely out, but you will still be able to get the panel off.

  3. Toshiba Satellite C55-A5310 Fan Replacement: passo 3, imagem 1 %32
    • Use the plastic opening tool to pry open the back panel. Make sure to loosen all four sides then lift up.

  4. Toshiba Satellite C55-A5310 Fan Replacement: passo 4, imagem 1 %32 Toshiba Satellite C55-A5310 Fan Replacement: passo 4, imagem 2 %32
    • Remove a .5mm screw with a JIS #000 screwdriver.

  5. Toshiba Satellite C55-A5310 Fan Replacement: passo 5, imagem 1 %32 Toshiba Satellite C55-A5310 Fan Replacement: passo 5, imagem 2 %32
    • Using a plastic opening tool, pry open the disk drive. Once it has loosened it will pull out.

  6. Toshiba Satellite C55-A5310 Fan Replacement, Fan: passo 6, imagem 1 %32 Toshiba Satellite C55-A5310 Fan Replacement, Fan: passo 6, imagem 2 %32
    • Take a nylon spudger and push the prongs so that it releases the RAM.

  7. Toshiba Satellite C55-A5310 Fan Replacement: passo 7, imagem 1 %32
    • Once the RAM has lifted, use tweezers or fingers to pull it out.

  8. Toshiba Satellite C55-A5310 Fan Replacement: passo 8, imagem 1 %32 Toshiba Satellite C55-A5310 Fan Replacement: passo 8, imagem 2 %32
    • Remove the single .5mm JIS #000 screw.

  9. Toshiba Satellite C55-A5310 Fan Replacement: passo 9, imagem 1 %32
    • Use the plastic opening tool to remove the keyboard from the laptop.

  10. Toshiba Satellite C55-A5310 Fan Replacement: passo 10, imagem 1 %32 Toshiba Satellite C55-A5310 Fan Replacement: passo 10, imagem 2 %32
    • Once the keyboard is popped out, use a spudger to undo the ribbon or flap that attaches the back of the keyboard to the inside base of the laptop.

  11. Toshiba Satellite C55-A5310 Fan Replacement: passo 11, imagem 1 %32
    • Remove thirteen JIS #000 11mm screws.

  12. Toshiba Satellite C55-A5310 Fan Replacement: passo 12, imagem 1 %32 Toshiba Satellite C55-A5310 Fan Replacement: passo 12, imagem 2 %32
    • Use a nylon spudger tool to lift up on all sides.

    • Once the panel has been loosened it will pop off.

  13. Toshiba Satellite C55-A5310 Fan Replacement: passo 13, imagem 1 %32
    • Remove five 11mm JIS #000 screws.

  14. Toshiba Satellite C55-A5310 Fan Replacement: passo 14, imagem 1 %32 Toshiba Satellite C55-A5310 Fan Replacement: passo 14, imagem 2 %32 Toshiba Satellite C55-A5310 Fan Replacement: passo 14, imagem 3 %32
    • Remove the four wires with tweezers.

    • Remove wires gently to avoid damaging them.

  15. Toshiba Satellite C55-A5310 Fan Replacement: passo 15, imagem 1 %32
    • Lift from corresponding sides of the fan and it'll pop right out.

Conclusão

To reassemble your device, follow these instructions in reverse order.

Robin

Membro desde: 02/08/18

181 Reputação

Autoria de 1 guia

Equipe

0 comentários

Adicione um comentário

Exibir estatísticas:

Últimas 24 horas: 0

Últimos 7 dias: 2

Últimos 30 dias: 3

Duração total: 543