Ir para o conteúdo principal
Stihl O25 Chain Replacement

Stihl O25 Chain Replacement

Nathan Comar

Nathan Comar e 4 outros colaboradores

Última atualização em September 3, 2019

10 - 15 minutos
Difícil

This guide will walk you through the process of replacing the chain on a Stihl chainsaw. This guide will also show how to properly sharpen a worn out chain. Chainsaws are dangerous tools. Before you start working on your saw, make sure you have the proper personal protective equipment. This includes gloves, a long sleeve shirt and pants, eye protection, and chainsaw chaps if you are planning to run the saw. After you read this guide you should be able to safely disassemble and reassemble your chainsaw.

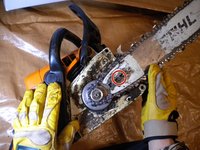
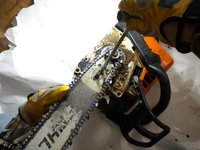
As with any piece of dangerous equipment, turn off the chainsaw before you begin the repair.

O que você precisa

A iFixit ganha comissão quando você compra por estes links.
  1. Stihl O25 Chain Replacement, Stihl O25 Chain: passo 1, imagem 1 %32
    • Be sure to turn off the chainsaw before servicing it.

    • Caution: Chainsaw blades are sharp. Wear protective gloves through the procedure.

    • Loosen the nuts on the chain cover with the wrench side of the scrench until the cover comes off of the saw.

  2. Stihl O25 Chain Replacement: passo 2, imagem 1 %32
    • Pull the chain and chainsaw bar off of the power head.

    • Pull the chain back to loosen off of the gears, and lift straight up.

  3. Stihl O25 Chain Replacement: passo 3, imagem 1 %32
    • Clean out the grooves on the chainsaw bar. This will help with the next step.

  4. Stihl O25 Chain Replacement: passo 4, imagem 1 %32
    • Make sure the chain is positioned correctly. If you are looking at the top of the saw, the chain rotates away from the operator.

    • Position the chain so the teeth face away on the top of the saw.

  5. Stihl O25 Chain Replacement: passo 5, imagem 1 %32
    • Place the bar and chain back onto the saw.

    • The bolt slot on the bar will slide onto the bolts on the saw.

    • The chain will go around the gear towards the back of the saw.

    • You may have to move the chain around to get it to fit properly.

  6. Stihl O25 Chain Replacement: passo 6, imagem 1 %32 Stihl O25 Chain Replacement: passo 6, imagem 2 %32
    • Tighten the chain by turning the tightening screw.

    • Insert the screwdriver end of the scrench into the screw and turn clockwise.

  7. Stihl O25 Chain Replacement: passo 7, imagem 1 %32
    • Chain tightness is often a preference of the chainsaw operator, but a good rule of thumb to follow is when you pull up on the chain, two chain links should come out of the bar grooves.

  8. Stihl O25 Chain Replacement: passo 8, imagem 1 %32
    • Put the cover back on and tighten the nuts down.

  9. Stihl O25 Chain Replacement: passo 9, imagem 1 %32
    • To sharpen the chain, mark one of the teeth with a pencil or sharpie.

  10. Stihl O25 Chain Replacement: passo 10, imagem 1 %32
    • Take a round file and place it on the cutting surface.

  11. Stihl O25 Chain Replacement: passo 11, imagem 1 %32
    • The file should be angled slighty upwards and follow the angle of the saw tooth.

    • Slide the file while applying pressure and twist slightly.

    • Teeth on a saw alternate which way they are facing.

    • Skip one tooth to continue to sharpen on the same side. Use the same number of file strokes on each tooth.

    • Continue to sharpen until you reach the original tooth that was marked. You can then sharpen the set of teeth facing the other way with the same process.

Linha de Chegada

2 outras pessoas executaram este guia.

Nathan Comar

Membro desde: 03/30/16

182 Reputação

Autoria de 1 guia

Equipe

0 comentários

Adicione um comentário

Exibir estatísticas:

Últimas 24 horas: 0

Últimos 7 dias: 10

Últimos 30 dias: 34

Duração total: 1,662