Ir para o conteúdo principal
Participe da comunidade de reparos - Criar conta
Sony Cyber-Shot DSC-W120 LCD Screen Replacement

Sony Cyber-Shot DSC-W120 LCD Screen Replacement

Christopher

Christopher e 4 outros colaboradores

Última atualização em 7 de mai de 2024

10 minutos
Difícil
Ferramentas incorretas

Introdução

Ir para o passo 1

If the LCD display unit of your Sony Cyber-Shot DSC-W120 is damaged, this guide will walk you through the process of locating and removing it.

O que você precisa

Ferramentas

Exibir mais…

  1. Sony Cyber-Shot DSC-W120 LCD Screen Replacement, LCD Screen: passo 1, imagem 1 %32
    • Unscrew the screws on the right side of the camera.

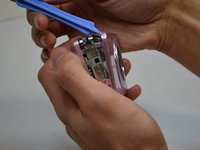
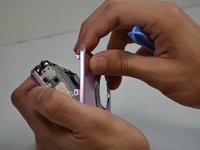
  2. Sony Cyber-Shot DSC-W120 LCD Screen Replacement: passo 2, imagem 1 %32 Sony Cyber-Shot DSC-W120 LCD Screen Replacement: passo 2, imagem 2 %32
    • With a plastic opening tool, gently lift and remove the silver piece on the right side of the camera.

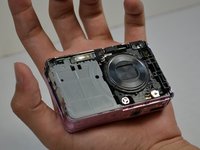
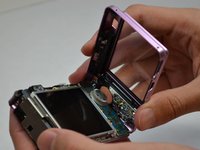
  3. Sony Cyber-Shot DSC-W120 LCD Screen Replacement: passo 3, imagem 1 %32 Sony Cyber-Shot DSC-W120 LCD Screen Replacement: passo 3, imagem 2 %32 Sony Cyber-Shot DSC-W120 LCD Screen Replacement: passo 3, imagem 3 %32
    • Use a plastic opening tool to carefully lift and remove the front case.

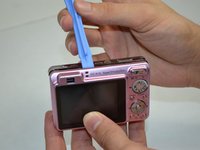
  4. Sony Cyber-Shot DSC-W120 LCD Screen Replacement: passo 4, imagem 1 %32
    • Gently pry the silver piece on the left side of the camera off with a plastic opening tool.

  5. Sony Cyber-Shot DSC-W120 LCD Screen Replacement: passo 5, imagem 1 %32
    • Unscrew the three screws on the bottom of the camera.

  6. Sony Cyber-Shot DSC-W120 LCD Screen Replacement: passo 6, imagem 1 %32 Sony Cyber-Shot DSC-W120 LCD Screen Replacement: passo 6, imagem 2 %32
    • Use a plastic opening tool to lift and remove the back case.

  7. Sony Cyber-Shot DSC-W120 LCD Screen Replacement: passo 7, imagem 1 %32
    • Remove the screw located above the mode dial.

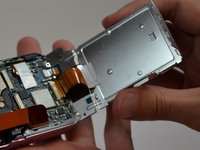
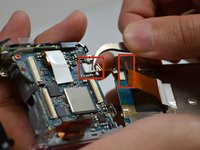
  8. Sony Cyber-Shot DSC-W120 LCD Screen Replacement: passo 8, imagem 1 %32 Sony Cyber-Shot DSC-W120 LCD Screen Replacement: passo 8, imagem 2 %32
    Ferramenta utilizada neste passo:
    Tweezers
    $4.99
    • Lift the LCD display from the rest of the camera.

    • Use tweezers to carefully separate the connecting tape.

Conclusão

To reassemble your device, follow these instructions in reverse order.

Uma outra pessoa concluiu este guia.

Gear Up For Future Repairs

Shop all

Christopher

Membro desde: 10/07/14

10 Reputação

Autoria de 1 guia

Equipe

USF Tampa, Team 1-5, Leahy Fall 2014 Membro de USF Tampa, Team 1-5, Leahy Fall 2014

USFT-LEAHY-F14S1G5

4 Membros

Autoria de 10 guias

1Comentário do guia

Hi, for step 8 the wider of the two ribbon cables is held by a black/dark grey clamp on the connector on the motherboard, it's best to release the clamp before pulling the cable out.

Do that by gently lifting it with a fingernail, it hinges on the screen side, it will rotate about 90 degrees to open. When reassembling it's simply the reverse, so push the cable in to the connector with the clamp open, when the cable is fully in there will be about 1mm of the gold connectors on the ribbon cable showing still, and then just clamp connector clamp shut but pushing it with your thumb.

Tony Neville - Responder

Comentar

Visualizações:

Últimas 24 horas: 1

Últimos 7 dias: 18

Últimos 30 dias: 40

Ao todo: 1,475