Ir para o conteúdo principal

Sonos Connect Internal Power Supply Replacement

O que você precisa

  1. Sonos Connect Internal Power Supply Replacement, WIFI Card: passo 1, imagem 1 %32 Sonos Connect Internal Power Supply Replacement, WIFI Card: passo 1, imagem 2 %32 Sonos Connect Internal Power Supply Replacement, WIFI Card: passo 1, imagem 3 %32
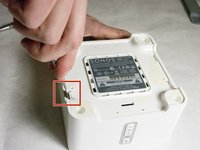
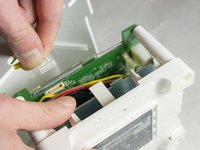
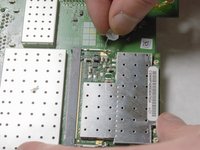
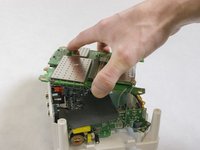
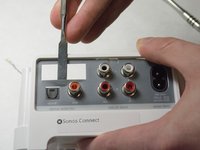
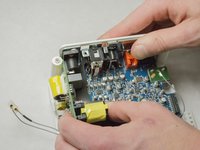
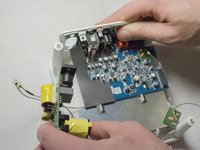
    • Start by using a spudger or plastic opening tool to remove the bottom cover.

    • When working with electronics, it's important to choose a tool that's ESD-safe to avoid accidental damage to the device. The regular black nylon spudger or a plastic opening tool should be used whenever possible.

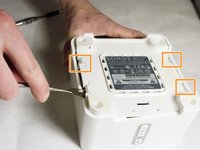
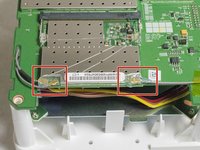
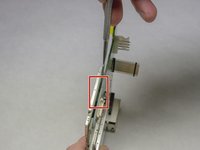
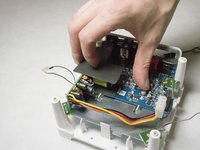
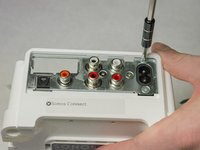
    • Once enough of the glue is removed, peel the cover off by hand,

  2. Sonos Connect Internal Power Supply Replacement: passo 2, imagem 1 %32 Sonos Connect Internal Power Supply Replacement: passo 2, imagem 2 %32 Sonos Connect Internal Power Supply Replacement: passo 2, imagem 3 %32
    • Remove the four 7.5mm length Philips head screws under the rubber cover.

  3. Sonos Connect Internal Power Supply Replacement: passo 3, imagem 1 %32 Sonos Connect Internal Power Supply Replacement: passo 3, imagem 2 %32 Sonos Connect Internal Power Supply Replacement: passo 3, imagem 3 %32
    • Use a nylon spudger to unsnap the bottom from the sides.

    • Pry until the remaining three points are unsnapped.

    • Once unsnapped, lift the cover.

  4. Sonos Connect Internal Power Supply Replacement: passo 4, imagem 1 %32 Sonos Connect Internal Power Supply Replacement: passo 4, imagem 2 %32
    • Remove the connection for the front buttons to fully remove the cover.

  5. Sonos Connect Internal Power Supply Replacement: passo 5, imagem 1 %32 Sonos Connect Internal Power Supply Replacement: passo 5, imagem 2 %32
    • Use a plastic opening tool or spudger to remove the adhesive covering the the WIFI connectors.

    • Gently pull the wires at the connection point to disconnect them from the motherboard.

  6. Sonos Connect Internal Power Supply Replacement: passo 6, imagem 1 %32 Sonos Connect Internal Power Supply Replacement: passo 6, imagem 2 %32
    • Remove the two pieces of glue holding the WIFI card in place.

  7. Sonos Connect Internal Power Supply Replacement: passo 7, imagem 1 %32 Sonos Connect Internal Power Supply Replacement: passo 7, imagem 2 %32 Sonos Connect Internal Power Supply Replacement: passo 7, imagem 3 %32
    • Scrape the glued pad underneath the WIFI card to seperate the card from the board.

    • Push apart the two clips holding the WIFI card in the connection.

    • Pull the WIFI card out of the connection.

    • When putting the new WIFI card in, put the card in the connector first, then push downward until it clicks.

  8. Sonos Connect Internal Power Supply Replacement, Top Motherboard: passo 8, imagem 1 %32
    • Remove the 7mm length Phillips screw holding the board in place.

  9. Sonos Connect Internal Power Supply Replacement: passo 9, imagem 1 %32 Sonos Connect Internal Power Supply Replacement: passo 9, imagem 2 %32
    • Flip the board over to access the Molex Cable.

  10. Sonos Connect Internal Power Supply Replacement: passo 10, imagem 1 %32
    • Disconnect the Molex Cable from the top motherboard.

  11. Sonos Connect Internal Power Supply Replacement, Internal Power Supply: passo 11, imagem 1 %32 Sonos Connect Internal Power Supply Replacement, Internal Power Supply: passo 11, imagem 2 %32
    • Remove foam protective insulator from the bottom board.

  12. Sonos Connect Internal Power Supply Replacement: passo 12, imagem 1 %32 Sonos Connect Internal Power Supply Replacement: passo 12, imagem 2 %32
    • Picture shows the side of the device.

    • Remove the 7mm length Phillips screw from the power supply motherboard.

  13. Sonos Connect Internal Power Supply Replacement: passo 13, imagem 1 %32 Sonos Connect Internal Power Supply Replacement: passo 13, imagem 2 %32 Sonos Connect Internal Power Supply Replacement: passo 13, imagem 3 %32
    • Remove the adhesive backed rear label by using a spudger.

    • Remove the two 8mm length screws as shown.

  14. Sonos Connect Internal Power Supply Replacement: passo 14, imagem 1 %32 Sonos Connect Internal Power Supply Replacement: passo 14, imagem 2 %32
    • Pull the power supply out of the back of the device.

Conclusão

To reassemble your device, follow these instructions in reverse order.

3 outras pessoas executaram este guia.

Clark Snyder

Membro desde: 01/21/16

483 Reputação

Autoria de 4 guias

Equipe

IUPUI, Team 3-2, Baechle Spring 2016 Membro de IUPUI, Team 3-2, Baechle Spring 2016

IUPUI-BAECHLE-S16S3G2

Membros da 4

Autoria de 4 guias

22 comentários

And where do you find a spare power supply ?

meh - Responder

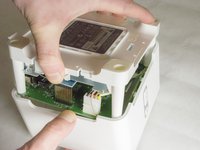
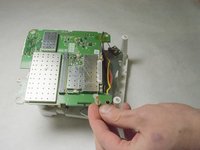
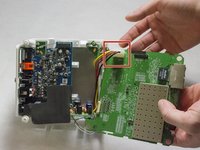
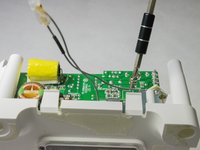
You'd probably just replace the 1800µƒ cap, which you can do without removing the board. Leave the wireless card attached to the top board when you carefully lift it out of the way. 99 times out of 100 if a PSU goes down it's one or more capacitors.

Steve Long - Responder

My Sonos was fried by a thunderstrike recently.

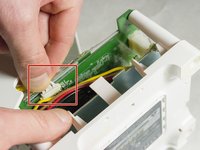
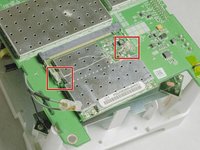
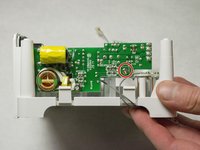
More precisely: 3 parts on the power supply PCB: the fuse, that 1800 uF cap mentioned above and some other part that I'm having a hard time to identify:

It's located pretty close to the fuse on the PCB, there labeled whith "TH1" and according to the symbol it's some kind of varistor or thermistor. With the "TH1" label I'm inclined to bet my money on thermistor, some NTC probably.

From what little is left of its housing (green, round with a diameter of about 8mm) its caption once read "SCK 102"... or something similar. But that's all I could find out.

Could anybody tell me more about this part and its dimensions?

When feeding the 3.3V and 14.V that the power supply PCB normaly provides from some lab power supply to the mainboard of the Sonos it works fine. So wether I'll be able t resurect my Sonos depends on identifying and replacing this one little bugger...

Thanks a lot

Ber

Tomarang - Responder

In my case, the 2A fuse and the MB8S Bridge rectifier were broken. Also my 14V output delivers 17.5V. The zener was not broken so I guess there are different versions.

Dirk de Vries - Responder

Can you lick up +5 volts from power supply black/red?

Robert Bruce - Responder

Adicione um comentário

Exibir estatísticas:

Últimas 24 horas: 7

Últimos 7 dias: 35

Últimos 30 dias: 111

Duração total: 17,529