
Een kleine tip voor het eenvoudig installeren van IKEA BESTA-scharnieren

-
-
Een kleine tip die je kan helpen bij het installeren van de deuren van IKEA BESTA meubels.
-
Bij het monteren van meubelscharnieren hebben we de hulp van iemand anders nodig. Het is echter vrij lastig om de gaten op één lijn te krijgen met de scharnierschroeven. Ik zal je wat stapsgewijze adviezen geven die de taak voor mij gemakkelijker maakten. Ik hoop dat het helpt.
-
Let op: Hoewel je op de foto's kunt zien dat ze overeenkomen met de bovenste en onderste scharnieren van dezelfde deur, komt de volledige stapsgewijze uitleg overeen met één scharnier, dan met het andere, beginnend met het bovenste, de foto's komen niet precies overeen, simpelweg omdat ik ze niet in volgorde heb gedaan.
-
Ik heb eerst verschillende scharnieren geprobeerd totdat ik zag dat het hier uitgelegde proces nuttig was.
-
-
-
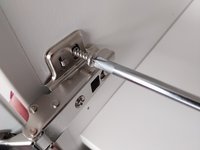
2º We hebben de hulp van iemand anders nodig om de deur voor ons vast te houden, zodat we de deur naar de opening kunnen draaien.
-
Net zoals bij IKEA-scharnieren, waarbij de schroeven al zijn gemonteerd, draai je de bovenste schroef van het scharnier 2 tot 3 slagen vast. Draai de schroef in het gat, maar niet helemaal vast. Het enige wat je wilt, is dat de schroef uit het metaal steekt, zodat je het gat met de punt van de schroef gemakkelijker kunt vinden.
-
-
-
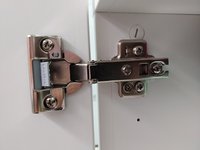
5º Zodra we de bovenste schroef 2 slagen hebben losgedraaid en het scharnier waterpas staat, kunnen we de schroef helemaal vastdraaien, aangezien deze nu naar het gat wijst.
-
We draaien de onderste schroef nog een laatste keer vast, hiermee is het scharnier klaar. Met het andere scharnier gaan we op dezelfde manier te werk.
-
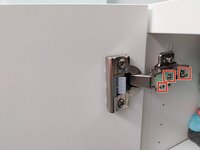
De deurafstelling is onderwerp van een ander document. Dit scharnier kan op 3 punten worden afgesteld. Deze punten heb ik in het rode kader gemarkeerd, omdat het ook een op- en neerwaartse verstelling heeft.
-


Cancelar: não concluí este guia.
9 outras pessoas executaram este guia.
Um agradecimento especial a esses tradutores:
100%


Estes tradutores estão nos ajudando a consertar o mundo! Quer contribuir?
Comece a traduzir ›
Gear Up For Future Repairs
Shop all


