Ir para o conteúdo principal

Sandisk Sansa m230 Series MP3 Player Headphone Jack Replacement

O que você precisa

  1. Sandisk Sansa m230 Series MP3 Player Headphone Jack Replacement, Sandisk Sansa m230 Series mp3 player Teardown: passo 1, imagem 1 %32
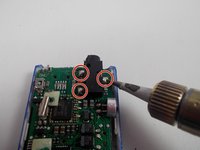
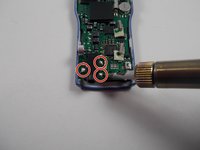
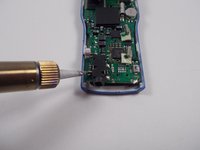
    • Remove the battery compartment cover.
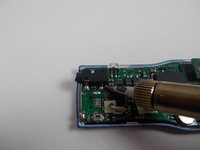
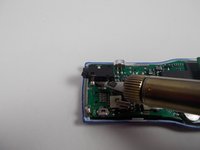
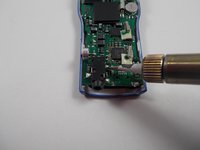
    • Remove the battery.

  2. Sandisk Sansa m230 Series MP3 Player Headphone Jack Replacement: passo 2, imagem 1 %32
    • Locate and remove the screw next to the battery compartment lid.

  3. Sandisk Sansa m230 Series MP3 Player Headphone Jack Replacement: passo 3, imagem 1 %32
    • Locate the interlocking pegs along the seam of the device's casings.

    • Gently pry the pegs apart one at a time, working your way around the case.

    • Be careful when prying apart the pegs: they are made of plastic and may break.

  4. Sandisk Sansa m230 Series MP3 Player Headphone Jack Replacement: passo 4, imagem 1 %32
    • The battery contact springs may prevent the case from separating.

    • Push the battery contact springs down through the hole in the case.

  5. Sandisk Sansa m230 Series MP3 Player Headphone Jack Replacement: passo 5, imagem 1 %32
    • The casing protecting the USB and headphone jacks must be removed.

    • Locate and gently pry apart the two interlocking clips holding it in place.

    • The outer casings may now be removed and the MP3 player should separate.

  6. Sandisk Sansa m230 Series MP3 Player Headphone Jack Replacement: passo 6, imagem 1 %32
    • You now have access to all components found on the inside of the device!

  7. Sandisk Sansa m230 Series MP3 Player Headphone Jack Replacement, Headphone Jack: passo 7, imagem 1 %32
    • Locate the headphone jack on the motherboard.

  8. Sandisk Sansa m230 Series MP3 Player Headphone Jack Replacement: passo 8, imagem 1 %32
    • Ensure the hot end of the soldering iron is elevated on a metal stand when not in use to prevent burns.

    • The solder and soldering iron are very hot! Do not touch unless you are wearing appropriate protective gloves.

  9. Sandisk Sansa m230 Series MP3 Player Headphone Jack Replacement: passo 9, imagem 1 %32 Sandisk Sansa m230 Series MP3 Player Headphone Jack Replacement: passo 9, imagem 2 %32 Sandisk Sansa m230 Series MP3 Player Headphone Jack Replacement: passo 9, imagem 3 %32
    • Use soldering iron to melt the existing solder at the three headphone jack connections.

  10. Sandisk Sansa m230 Series MP3 Player Headphone Jack Replacement: passo 10, imagem 1 %32
    • Remove the faulty headphone jack from the motherboard.

  11. Sandisk Sansa m230 Series MP3 Player Headphone Jack Replacement: passo 11, imagem 1 %32
    • Align the new headphone jack appropriately on the motherboard for soldering.

  12. Sandisk Sansa m230 Series MP3 Player Headphone Jack Replacement: passo 12, imagem 1 %32 Sandisk Sansa m230 Series MP3 Player Headphone Jack Replacement: passo 12, imagem 2 %32 Sandisk Sansa m230 Series MP3 Player Headphone Jack Replacement: passo 12, imagem 3 %32
    • Use the soldering iron and solder to create three stable connections between the motherboard and the headphone jack.

    • Allow the new solder to cool and harden before reassembling the MP3 player.

Conclusão

To reassemble your device, follow these instructions in reverse order.

James Thorne

Membro desde: 11/05/13

638 Reputação

Autoria de 6 guias

Equipe

UMass Dartmouth, Team 1-8, Shastany Fall 2013 Membro de UMass Dartmouth, Team 1-8, Shastany Fall 2013

UMASSD-SHASTANY-F13S1G8

Membros da 3

Autoria de 6 guias

0 comentários

Adicione um comentário

Exibir estatísticas:

Últimas 24 horas: 0

Últimos 7 dias: 0

Últimos 30 dias: 1

Duração total: 1,146