
Samsung Galaxy S4 Rear Facing Camera Replacement

Introdução
Ir para o passo 1Use this guide to replace the rear-facing camera in your Samsung Galaxy S4.
If you are getting a "Camera failed" error message, first open Camera app from the Application manager and select "Clear data," then restart the phone. If this doesn't solve the issue, try a factory reset of the phone (be sure to back up your data beforehand). If these options still don't help, try reinstalling Android OS, otherwise you will need to replace the hardware itself.
You can also test the camera from the Hidden/Test menu, dial *#0*# to access the service menu.
O que você precisa
Peças

Ferramentas


Exibir mais…
-
-
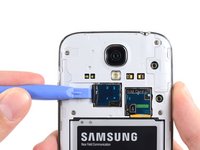
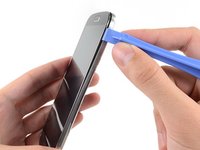
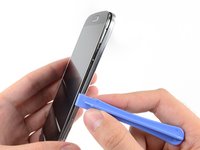
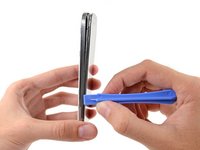
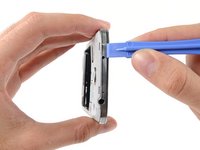
Pry with a plastic opening tool, or your fingernail, in the divot to the left of the rear-facing camera, near the power button.
-
-
-
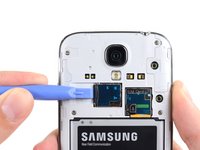
Lift the rear case by the corner nearest the divot and remove it from the phone.
I purchased a blue plastic opening tool(AKA: Spudge) like the one used in the above Step 1 rear cover pic and found the divot and was able to take off the rear cover as per the “Step 2 “ instructions.
-
-
-
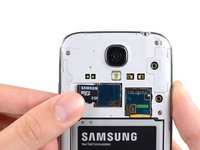
Use the flat end of a spudger, or your fingernail, to press the microSD card slightly deeper into its slot until you hear a click.
-
After the click, release the card and it will pop out of its slot.
-
Remove the microSD card.
I was able to remove the MicroSD Card as per the Step 3 MicroSD instructions with no problems.
-
-
-
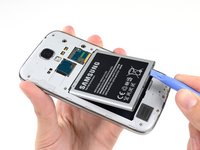
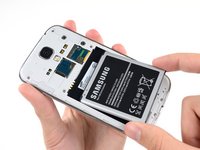
Insert a plastic opening tool, or your finger, into the notch of the battery compartment and lift the battery upward.
-
Remove the battery from your phone.
-
-
-
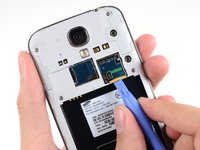
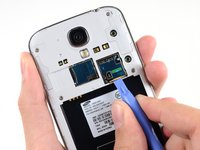
Use a plastic opening tool, or your fingernail, to press the SIM card slightly deeper into its slot until you hear a click.
-
After the click, release the card and it will pop out of its slot.
-
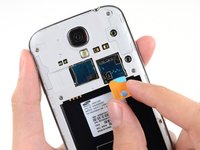
Remove the SIM card.
Looks easy but doesn't work. No one has a plastic opening tool. Using fingernail, you can press SIM card into slot but it does not pop out so you can remove it.
I agree with the comment above
I also don't have a plastic tool and my finger nail won't pop the card out.
Grethe Montano. September 22
-
-
-
Remove the nine 4.0 mm Phillips #00 screws securing the midframe to the display assembly.
How much cost will be on replace a midframe
I purchased a 1.5x40mm Phillips screw driver and was able to remove all 9 40mm screws from the midframe as per the Step 6 Midframe instructions.
-
-
-
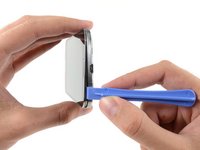
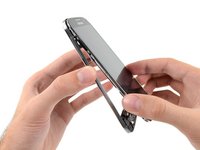
Starting on the volume button side of the phone, insert your plastic opening tool between the chrome bezel around the display glass and the larger chrome border piece. Look for the seam between the two.
-
Slide the opening tool along the seam, separating the plastic clips as you go.
I used same tool as in the photo and i broke the display. I think you should use a very thin plastic tool, such as a credit card but even more thin and flexible.
I purchased a blue plastic opening tool(AKA: Spudger) and was able to remove the midframe from the display assembly as per the Step 7. I had to hold the cell phone firmly in my left hand while I gently forced the spudger between the chrome bezel and the midframe with my right hand and heard plastics clips separate and saw the midframe start to separate from the display assembly. Don’t be afraid to get that spudger in and just gently go down the side of the phone and you will hear the plastics clips detach and the midframe to separate more and more until you are able to separate them 100%. I started at the volume button side of the phone in Step 7 and ended at the power button side in Step 9.
-
-
-
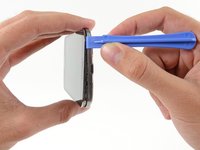
Continue prying around the corner of the phone.
-
Slide your opening tool along the seam between the midframe and display along the bottom of the device, releasing more of the plastic clips.
I purchased a blue plastic opening tool(AKA: Spudger) and was able to remove the midframe from the display assembly as per the Step 7. I had to hold the cell phone firmly in my left hand while I gently forced the spudger between the chrome bezel and the midframe with my right hand and heard plastics clips separate and saw the midframe start to separate from the display assembly. Don’t be afraid to get that spudger in and just gently go down the side of the phone and you will hear the plastics clips detach and the midframe to separate more and more until you are able to separate them 100%. I started at the volume button side of the phone in Step 7 and ended at the power button side in Step 9.
-
-
-
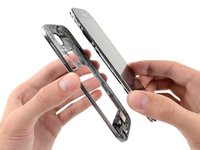
Continue sliding the opening tool around the top of the phone, releasing the last of the clips and freeing the midframe from the display assembly.
On my phone, there was another clip holding the white midframe to the battery compartment, in the middle of the top edge of the battery compartment, near the battery contacts. If you don't release that before removing the midframe, it is easy to break.
I purchased a blue plastic opening tool(AKA: Spudger) and was able to remove the midframe from the display assembly as per the Step 7. I had to hold the cell phone firmly in my left hand while I gently forced the spudger between the chrome bezel and the midframe with my right hand and heard plastics clips separate and saw the midframe start to separate from the display assembly. Don’t be afraid to get that spudger in and just gently go down the side of the phone and you will hear the plastics clips detach and the midframe to separate more and more until you are able to separate them 100%. I started at the volume button side of the phone in Step 7 and ended at the power button side in Step 9. In Step 10 just make sure all the plastic clips are separated from the midframe and the display assembly so you can pull them apart 100% without breaking them.
-
-
-
Remove the midframe from the display assembly.
My Sprint S4 was slightly different then the one pictured above but I just completed this repair in under 10 minutes.. It would have been slightly quicker but fooling around with those little screws can be irritating if you have big hands.
-
-
-
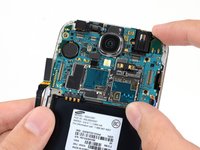
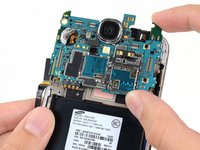
Use the flat end of a spudger to disconnect the USB board connector.
-
Disconnect the front-facing camera cable connector.
-
Disconnect the earpiece speaker assembly cable connector.
-
-
-
Disconnect the headphone jack assembly cable connector.
-
Disconnect the display/digitizer cable connector.
-
Disconnect the antenna cable connector.
My model had an antenna connection next to the usb board connector in addition to the antenna connection near the display cable connector.
That's point a, on the daughter board (where the USB is located is point b. You must connect it from a to b
I could not get the screen connector to fit on with the motherboard assembly in place. I had to remove the motherboard assembly, attach the screen connector, and then carefully replace the motherboard assembly, with the screen connector still attached..
Same as Tom4G above. When trying to connect the screen connector, it would not give me that nice clear snap indicating a positive connection. The phone powered up with no screen. So, I disconnected the other connectors again, lifted the motherboard out and connected the screen connector by pinching it with finger and thumb from both sides of the motherboard, this time getting a nice snap when it engaged.
speedrzr -
-
-
-
Use the flat end of a spudger to disconnect the rear-facing camera connector.
-


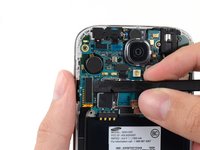


To reassemble your device, follow these instructions in reverse order.
To reassemble your device, follow these instructions in reverse order.
Cancelar: não concluí este guia.
76 outras pessoas executaram este guia.


11 comentários
Useful step by step guide, I was able to replace the cracked lens on the camera following the instructions here. Without them I wouldn't have had a clue where to start and what to unclip. The kit I used was purchased from ebay and was straight forward enough to complete that part without the need for further instruction. For a few pounds I have increased the value of my phone for trade in at next upgrade. Very pleased with this result. Thank you for the comprehensive instructions.
what a great guide! took me less than an hour to replace the camera...this success gives me the inspiration to do the bigger job of replacing the sealed battery in my sisters macbook pro 13' late 2013 model...for those asking about where to get a replacement camera, I got mine from ebay for $19 AUD including postage!
It would be great if I could put a better camerain it. Something with lower f stop. Is it possible to put a different camera in it?
I have to replace the rear camera of a galaxy S4 Black Edition
Does anybody know if this replacement guide is fully compatible with S4 Black Edition?
Thanks for advance
I bought the camera at:
100% satisfied. Top notch camera.
DHL ---> Excellent Service.
Congratulations to the Author of this guide. I made it thanks to you whoever you are.
Deeply grateful.
Xana
By the way... and your hands are beautiful.
Xaninha -
Terrible guide, steps 7 - 11 only a very vague explanation of what you are separating. Pictures do not do a great job either at showing what is actually going on. I saw no seem what and ended up utterly destroying my glass / digitizer, thanks. This could have been very clear and simple if the guide had recommend starting under the home button instead since the seem is visible there. The second phone I repaired went much smoother starting on the bottom and moving around & up the edge to the side with the power button. This is more natural place to separate the frame. The problem with doing it the way the guide suggested is that by the time you work your way to the corner you will have already broken off retaining clips if you are in the wrong place with your tool + the second you get down to the corner glass will break. No mention what so ever of spring loaded retaining clip that will come flying out once you life out the main-board. For the very first here I would have to tell you find another guide.