Ir para o conteúdo principal
Samsung DP515A2G Hard Disk Drive Replacement

Samsung DP515A2G Hard Disk Drive Replacement

gatewaynomad

gatewaynomad e um outro colaborador

Última atualização em November 9, 2022

15 minutos
Fácil
Guia colaborativo

In this guide, I will show you how to replace the hard drive in a Samsung All-in-One Desktop DP515A2G.

O que você precisa

Ferramentas

  1. Samsung DP515A2G Hard Disk Drive Replacement, Hard Disk Drive: passo 1, imagem 1 %32 Samsung DP515A2G Hard Disk Drive Replacement, Hard Disk Drive: passo 1, imagem 2 %32
    • Put the Samsung dp515a2g face down on a surface that will not scratch the monitor.

  2. Samsung DP515A2G Hard Disk Drive Replacement: passo 2, imagem 1 %32 Samsung DP515A2G Hard Disk Drive Replacement: passo 2, imagem 2 %32
    Ferramenta utilizada neste passo:
    iFixit Opening Picks (Set of 6)
    $4.99
    • Gently insert an opening pick in the seam between the back panel and bezel.

    • Run the opening pick along the seam, carefully freeing the clips holding the back panel in place.

    • The back panel should come away without resistance.

  3. Samsung DP515A2G Hard Disk Drive Replacement: passo 3, imagem 1 %32
    Ferramenta utilizada neste passo:
    Phillips #000 Screwdriver
    $5.49
  4. Samsung DP515A2G Hard Disk Drive Replacement: passo 4, imagem 1 %32 Samsung DP515A2G Hard Disk Drive Replacement: passo 4, imagem 2 %32
    • Once the shroud surrounding the hard drive is free, disconnect the hard drive by grasping the connector with one hand, and the shroud with the other hand and gently pull them apart.

    • Do not put the wires connecting the hard drive.

  5. Samsung DP515A2G Hard Disk Drive Replacement: passo 5, imagem 1 %32 Samsung DP515A2G Hard Disk Drive Replacement: passo 5, imagem 2 %32 Samsung DP515A2G Hard Disk Drive Replacement: passo 5, imagem 3 %32
    Ferramenta utilizada neste passo:
    Phillips #000 Screwdriver
    $5.49
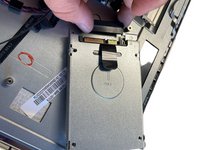
    • Using the 000 Screwdriver remove the screw on each side.

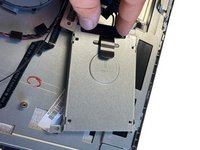
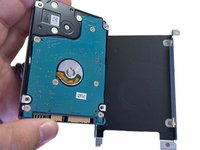
    • The hard drive should pull free of the shroud.

Conclusão

To reassemble your device, follow these instructions in reverse order.

4 outras pessoas executaram este guia.

gatewaynomad

Membro desde: 09/07/10

1.153 Reputação

Autoria de 1 guia

Equipe

Repair-O-Tech Membro de Repair-O-Tech

Business

Membros da 3

1 Guia de autoria

0 comentários

Adicione um comentário

Exibir estatísticas:

Últimas 24 horas: 2

Últimos 7 dias: 29

Últimos 30 dias: 61

Duração total: 838