Ir para o conteúdo principal
PSP 300x Power Board Replacement

PSP 300x Power Board Replacement

mbnewsom

mbnewsom e 12 outros colaboradores

Última atualização em June 8, 2023

15 minutos
Fácil
Imagens inconsistentes

Introdução

Ir para o passo 1

If your 3000-series PSP is having issues not turning on, this guide will explain how to replace the circuit board for the power switch.


When the power circuit board functions properly, the light next to the power switch should be illuminated after the PSP is turned on, even if there is no audio or video. A faulty circuit board can prevent the device from drawing power and beginning the startup sequence

PSP batteries have had reported issues with swelling, so remember to visually inspect the battery cover for bulging before removing the battery. For more information on swollen batteries, click here.


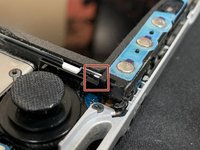
Before getting started with this guide, ensure that the problem is actually the circuit board itself. Follow this guide up to Step 10 to disassemble the PSP, and inspect the switch to make sure the power button on the case activates the switch on the circuit. With the screen removed, also ensure that the silver ribbon cable has a firm connection both on the power board and on the motherboard. If the cables are loose, then they can be secured with electrical tape underneath the cable and away from the connectors.

O que você precisa

Peças

Ferramentas

  • Phillips #00 Screwdriver
    Phillips #00 Screwdriver
  • Spudger
    Spudger

Exibir mais…

  1. PSP 300x Power Board Replacement, Battery: passo 1, imagem 1 %32 PSP 300x Power Board Replacement, Battery: passo 1, imagem 2 %32 PSP 300x Power Board Replacement, Battery: passo 1, imagem 3 %32
    • Place the PSP face down and locate the battery cover on the left side of the device.

    • Lift and remove the battery cover to reveal the battery.

    • Remove the battery.

  2. PSP 300x Power Board Replacement, Front Casing: passo 2, imagem 1 %32
    • Peel back the warranty sticker that is behind the battery with a spudger or your fingernail.

    This will end your warranty, so do it on your own risk!

    Paweł Kasztura - Responder

    Even though warranties are long expired on these things.

    Vincent C. -

    “IF” your on this Site “I FIX IT(tm) to lean how to repair something on your own… you “Should NOT” be too concerned about warranty any longer, as if you were .. for your iPhone or Pad etc… you would have taken it to the supplier.. No??

    Barry Goian - Responder

  3. PSP 300x Power Board Replacement: passo 3, imagem 1 %32 PSP 300x Power Board Replacement: passo 3, imagem 2 %32
    • Unscrew all four screws from the back of the PSP with the Phillips #00 Screwdriver.

    • Two are located behind the battery's warranty sticker.

    • Two are located on the right side of the PSP.

  4. PSP 300x Power Board Replacement: passo 4, imagem 1 %32
    • Next, unscrew the two screws located at the top of the PSP.

  5. PSP 300x Power Board Replacement: passo 5, imagem 1 %32
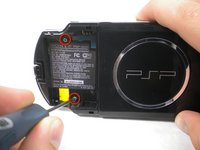
    • Then, remove the single screw from the bottom edge of the PSP (which is positioned next to the barcode).

    “DON’T” forget to put your screws separately on a mag mat (Or sticky tape) so to 1) Not loose them & 2) Remember where they go as they may be of differing sizes. (Refer time the pictures also helps, but you can take a pic on your camera as you go to remind you also.

    Barry Goian - Responder

  6. PSP 300x Power Board Replacement: passo 6, imagem 1 %32 PSP 300x Power Board Replacement: passo 6, imagem 2 %32
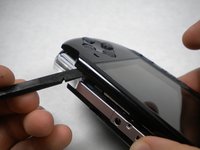
    • Slide the spudger in between the outer casing of the PSP, beginning at the "R" shoulder button, and gently pry off the casing.


    • Remove the front casing completely.

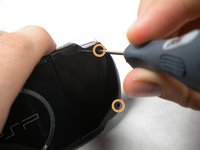
    J’ai récemment fait cette réparation et le boîtier avant ne voulait pas venir à condition d’enlever les deux vis sur le boîtier arrière au niveau du joystick et de la croix directionnelle. Il manque donc selon moi une partie mais je peux me tromper !

    Valentin Boileau - Responder

  7. PSP 300x Power Board Replacement, LCD Screen: passo 7, imagem 1 %32 PSP 300x Power Board Replacement, LCD Screen: passo 7, imagem 2 %32
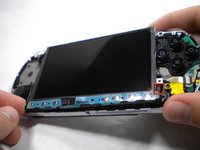
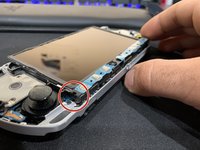
    • Push the homebar to the right to release the tab located on the right side of the LCD screen.

    • DO NOT completely remove the homebar, as it is still connected by ribbon cables.

    The homebar has a little tab screwed in place under the screw that alsoholds the lanyard trim-piece on. You will need to unscrew that screw first and pry the lanyard piece up, to get the homebar out from under it.

    B McG - Responder

  8. PSP 300x Power Board Replacement: passo 8, imagem 1 %32 PSP 300x Power Board Replacement: passo 8, imagem 2 %32 PSP 300x Power Board Replacement: passo 8, imagem 3 %32
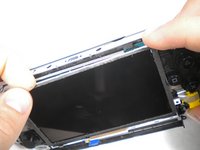
    • Slowly lift the LCD screen off the PSP starting at the top edge corner.

    • Again, the LCD screen is attached by ribbon cables, so do not remove it completely.

    • Orientation of PSP is flipped in photo.

    Attention à cette partie où l’écran est un peu bloqué dans le coin inférieur droit, il faut donner un peu de jeu vers la gauche pour le décaler et le retirer plus facilement.

    Valentin Boileau - Responder

  9. PSP 300x Power Board Replacement: passo 9, imagem 1 %32 PSP 300x Power Board Replacement: passo 9, imagem 2 %32
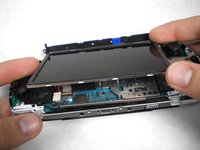
    • Flip the small brown locks on the four ribbon cable connectors up using a spudger or fingernail.

    • Pull all four ribbon cables out.

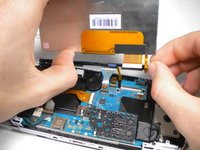
    • Now remove the LCD screen and homebar from the PSP.

    For anyone struggling to get the screen’s smaller ribbon cable back in, don’t be too afraid to use tweezers to pull on the little tabs. It has to go in a good half way (of the darker area) in order for you to latch it without it falling back out.

    Tom - Responder

  10. PSP 300x Power Board Replacement: passo 10, imagem 1 %32
    • Remove the metal tab that lies above the LCD screen.

    • Upon reassembly, make note that the stamped lettering faces down, and the large tab fits just above the motherboard to the right hand side of the left trigger.

  11. PSP 300x Power Board Replacement, Power Board: passo 11, imagem 1 %32
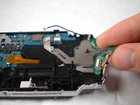
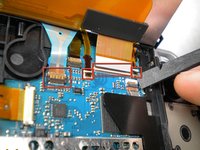
    • Using a spudger, lift up the lock and remove the ribbon cable from the motherboard

  12. PSP 300x Power Board Replacement: passo 12, imagem 1 %32
    • Use a Phillips #00 screwdriver to remove the screw located on the power switch board.

  13. PSP 300x Power Board Replacement: passo 13, imagem 1 %32
    • Lift up and remove the power-switch board.

Linha de Chegada

5 outras pessoas executaram este guia.

mbnewsom

Membro desde: 10/28/09

3.292 Reputação

Autoria de 11 guias

1Comentário do guia

for power board you can skip 7-10 steps ,1 to 6 is remove front case , real work start at step 11 ,between those was taking apart sreen, but not need for power board replacement.

javi - Responder

Comentar

Visualizações:

Últimas 24 horas: 6

Últimos 7 dias: 32

Últimos 30 dias: 194

Ao todo: 20,714