Ir para o conteúdo principal
PSP 2000 Display Replacement

PSP 2000 Display Replacement

espinks

espinks e 10 outros colaboradores

Última atualização em February 23, 2024

5 - 15 minutos
Moderado
Guia em destaque
Guia do aluno destaque
  1. PSP 2000 Display Replacement, Battery: passo 1, imagem 1 %32 PSP 2000 Display Replacement, Battery: passo 1, imagem 2 %32 PSP 2000 Display Replacement, Battery: passo 1, imagem 3 %32
    • Place PSP face down, so that the UMD Drive is facing upwards.

    • Locate the battery door and open.

    • Remove the battery from inside.

  2. PSP 2000 Display Replacement, Front Casing: passo 2, imagem 1 %32
    • This step requires the removal of the warranty sticker. Removing the sticker will void the warranty. According to the FTC removing this will not void your warranty.

    • Locate the sticker in the battery compartment labeled: "En: Warranty Void if Seal Damaged."

    • Remove the sticker using the PSP Opening Tools.

    • Under the sticker is a 5mm Phillips screw needed in the next step.

  3. PSP 2000 Display Replacement: passo 3, imagem 1 %32 PSP 2000 Display Replacement: passo 3, imagem 2 %32
    • Remove four 5 mm Phillips from the case.

    • If the screws stick in the case, you can use a magnetized screwdriver to draw them out.

  4. PSP 2000 Display Replacement: passo 4, imagem 1 %32 PSP 2000 Display Replacement: passo 4, imagem 2 %32
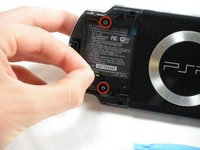
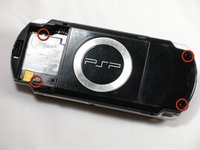
    • Remove the following screws from around the bezel:

    • Two 4 mm Phillips

    • One 5 mm Phillips

    • The two shorter 4 mm screws are on the top of the PSP; the longer 5 mm screw is on the bottom.

    Beware that some models of PSP 2000 (mine is a limited edition Crisis Core FF7 silver version, so I suppose it is related to it being a japanese PSP) have 2 minute TORX screws (T1? T2?) instead of the 2x 4mm Phillips pointed in orange around the USB port.

    Mighty Sashiman - Responder

  5. PSP 2000 Display Replacement: passo 5, imagem 1 %32 PSP 2000 Display Replacement: passo 5, imagem 2 %32
    • Gently pry the front bezel away from the casing using a PSP opening tool.

    • Start on the right hand side of the PSP bezel, and carefully work the tool around the side.

    • If you want to clean the control buttons or D-pad, you can easily pop them out once the faceplate is off and wipe them clean.

  6. PSP 2000 Display Replacement, Display: passo 6, imagem 1 %32 PSP 2000 Display Replacement, Display: passo 6, imagem 2 %32 PSP 2000 Display Replacement, Display: passo 6, imagem 3 %32
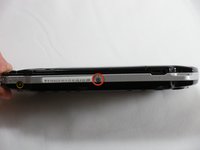
    • Remove the home bar by gently prying on the left and right sides of it with the opening tools. Lift the bar out of the device.

    • A ribbon cable connects the home bar to the logic board. Be careful not to damage the cable when removing the bar.

    Theres a latch you have to pry on the other side of the console through the small hole in order to remove home menu bar

    Janus Golovka - Responder

  7. PSP 2000 Display Replacement: passo 7, imagem 1 %32 PSP 2000 Display Replacement: passo 7, imagem 2 %32 PSP 2000 Display Replacement: passo 7, imagem 3 %32
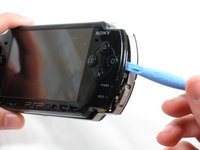
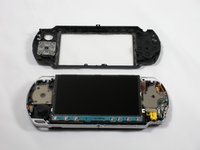
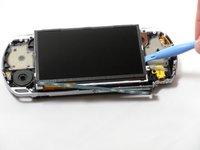
    • With the home bar out of the way, gently pry up the display using the opening tools.

    • There is another ribbon cable attached to the bottom of the LCD. Be careful not to damage either of the connectors when removing.

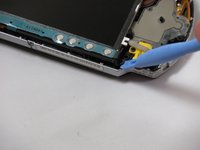
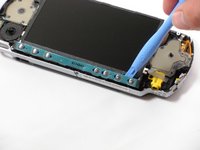
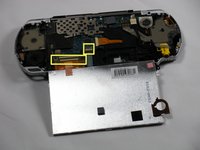
    • Lift the black tabs of the ribbon cable connectors using a opening tool. Pull the ribbons out towards the bottom of the PSP to disconnect.

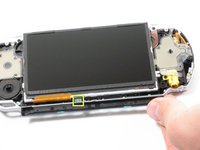
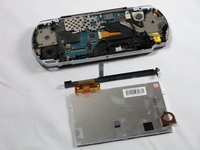
    • Gently lift out the display.

    There are 2 ribbons connected to the screen. Both of them have to be disconnected in order to remove the screen.

    Ovismue Veholkin - Responder

    Do not lift the black tab on the thin cable. That's attached to the logic board.

    Colin Wack - Responder

Conclusão

To reassemble your device, follow these instructions in reverse order.

63 outras pessoas executaram este guia.

espinks

Membro desde: 10/18/09

3.642 Reputação

Autoria de 5 guias

Equipe

Cal Poly, Team 6-3, Maness Fall 2009 Membro de Cal Poly, Team 6-3, Maness Fall 2009

CPSU-MANESS-F09S6G3

5 Membros

Autoria de 37 guias

6 comentários

That does’t seem that hard. Is this tutorial working with the PSP2004?

Jack Galinski - Responder

Yes it is, just did it :)

Billy -

Thanks for the great tut just fixed a trash find psp with a cracked lcd.

myhero667 - Responder

Parfait tutoriel pour remplacer mon écran de PSP 2004. Un grand merci

Ramius59 - Responder

I was wondering why after replacing the screen that the new one only shows a blank black screen. The backlight turns on and it plays the boot up sequence and you can play around on the Home Screen, but you just cant see what you’re doing on the screen. Everything seems connected right. Any suggestions??

Dylan Thomas - Responder

Same here after changing the screen

Hdgssjjddk -

Comentar

Exibir estatísticas:

Últimas 24 horas: 27

Últimos 7 dias: 134

Últimos 30 dias: 779

Ao todo: 71,411